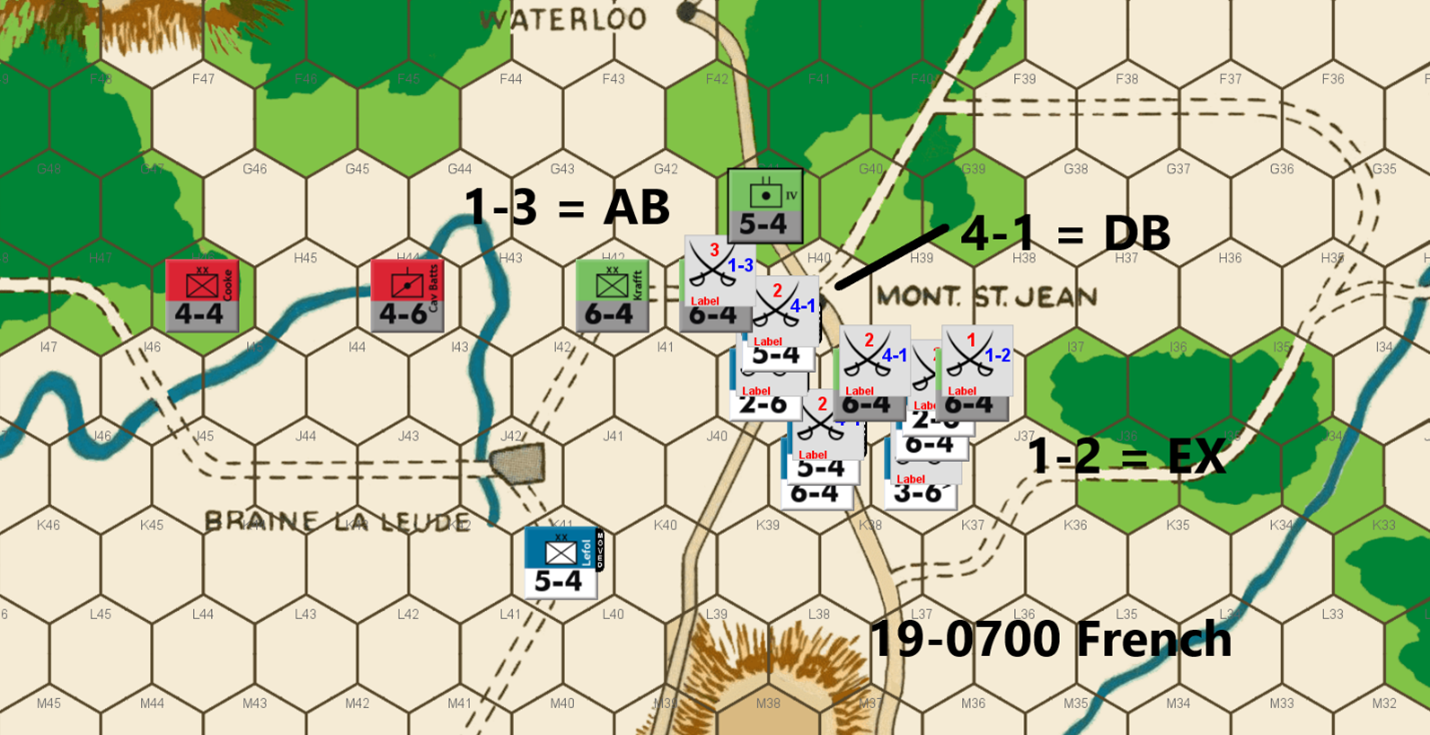
Bert:As morning of day 4 of this battle breaks, it is amazing to see how much this game turned around in a single turn. My very lucky shot on my 1-1 attack last turn, combined with the less-than-optimal results on the PAA counterattacks and this game is at a minimum, back to even.
Ed did not take the path of conserving his army and the attacks he decided to pursue likely worsened his position a bit. The A Elim on one of his 1-2’s hurts him and the exchange (I figured eventually we’d see that result for a PAA attack, again!) on his 3-1 has left him with a total of 7 pieces (37 factors) left with 7 turns to go in the game. Meanwhile, the French have just a measly 8 pieces and 34 factors left to work with – what a game!
As mentioned, there is still a full day of game play left… I’m fairly sure the game will be decided before we play out all seven turns.
The French have two paths to victory at this point. The first and most obvious one will be to kill at least one PAA piece per turn for each of the remaining turns. Without much of an army left, this option is not something I can count on with all the DB2s available on the CRT. The other path is to finally get to Mont. St. Jean and split the PAA in two. In this case, I can try to eliminate only half his pieces via combat and then exit what is left of my army to hopefully eliminate what is left of his. I think this is the more viable choice. The woods hexes on the north side of Mont. St. Jean makes it quite difficult for the PAA player to cover both sides, especially without many pieces.
One other point on Ed’s attacks, the AB2 that he rolled on his other 1-2 attack, allowed me to retreat that attacker to hex G41. This is important because if I can get a piece into hex I41 as of the end of this turn, which I will be able to do, the PAA could have one (or even zero if I am lucky enough to get another exchange on a 1-2 attack) units left that can protect the east side of the front for this coming turn. That could mean I’ll be able to attack without the need for a soak off or I might even have a clear path towards an exit hex. I’ll worry about that next turn since it is also possible that both of his PAA units on the east side survive this turn.
While I considered other options for how to make my attacks this move, I decided that the key was to be sure to occupy I40 to split Ed’s forces. It worked out that I could make my best possible soak off at 1-3 versus H41, while getting a 4-1 attack versus I39 and a 1-2 attack versus I38. This left a single piece to “protect” my left flank. The AA’s Cav Batts piece is positioned to consider trying to outflank me but that will mostly just allow him to possibly make some surround attacks in the coming turns since that piece can’t combine in any attack along with the Prussians.
If a single Prussian piece to the east of Mont. St. Jean survives my move, it will be difficult for Ed to risk surrounding my unit at I40. That hex will be vulnerable to a 3-1 attack without the need for soak off, as is. I’m afraid that both Prussian units might survive my move and so I felt I had to allow that 3-1 attack rather than stack another one of the French units in that hex and then Ed could maximize his bang for buck in his own desperation attack.
With both of our forces down to scraps, this final end game is likely to come down to which of us can get lucky on the remaining die rolls. I hope it has been as entertaining for you to follow along as it has been for me, no matter how it concludes, as a player.
Joe: After three campaign days of maneuvering and fighting, with player fortunes swinging wildly back and forth, this match has finally arrived at a decisive tipping point wherein a single lucky (or unlucky) die roll could well determine victory or defeat. In situations like this, players will oftentimes overlook the continuing importance of positional play, and place their faith, instead, in the verdict of the "dice." This is actually understandable: after all, during the late game turns of WATERLOO, counter density tends to be very low, and luck really does exert an exaggerated influence on the turn-to-turn flow and tempo of the game. Unfortunately, this sanguine player attitude – at least in my view – is also a mistake. And this is a point that I hope to prove by considering the several offensive options that were actually available to the French player on this game turn, and who – in spite of commanding a numerically depleted army, with very modest combat power – was, nonetheless, able to exploit terrain in a very limited battle space and, by initiating a meticulously-planned set of attacks, was also able to seriously threaten his opponent's whole defense.
For starters, let us consider the posted French move, and what the phasing player actually hoped to accomplish with it; then we will consider a pair of alternative French moves, each with its own advantages and disadvantages. So, to set the scene, L'Armee du Nord, after campaigning since the morning of the 16th, has been reduced from one hundred and ninety-three to thirty-four combat factors, distributed among eight units; the the combined strength of the PAA has likewise been severely depleted and now totals only thirty-seven factors spread among seven units. Referring to the accompanying "screen shot" of the French move, it can be seen that the Emperor has elected to gamble on three attacks: a 1-2 (die roll: Exchange!) soak-off versus Losthin (a 6-4); a 4-1 (die roll: DB2) versus Hiller (a 6-4); and a 1-3 (die roll: AB2) soak-off versus Borcke (another 6-4). The reason for the 1-3 soak-off is clear, it is to satisfy ZOC combat requirements so that Habert (a 5-4) can legally occupy I40 at the end of the combat phase and, by so doing, split the Allied front at Mont. Ste.-Jean. This also means, since Habert's ZOC would extend into H40 at the start of the PAA player turn, that Kraft, Borcke and the IV Corps Foot Arty would all be blocked from shifting east along the "H" row to defend the forest gap at H38, should the French break through on the Allied Right. Interestingly, once the French 1-2 yielded an Exchange, any outcome from the 4-1, other than a DB2 – because the French Army would then have had an open path to the eastern Brussels Road – would have almost certainly ended the game immediately. Alas, it was not to be. Nonetheless, and in spite of its very real risks, I really like the general strategy underpinning this French move. Granted, it only had a 14% chance of winning the game outright for the French, but I still think that it was worth a shot.
And since I cannot seem to leave well enough alone, I will now present my own (very similar) plan for the French, which is based on the fact that there is a 76% chance that at least one of the two eastern Prussian 6-4s would be eliminated as a result of the 1-2 or 4-1 attacks. So, with all that in mind, I personally would have modified this game's French approach slightly so as to take advantage of the unfortunate predicament of the IV Corps Foot Arty (a 5-4) trapped at G41. In essence, I would have deployed Durutte at K40, Bachelu and Chastel at I40, Friant, Habert and Soult at J39, and Lefol and Wathier on J38. The French attacks would have been set up in the same order, and with the same odds as the originals. The main advantage of these modest changes – at least to my mind – is that the Allied player would no longer be able to attack the French unit at I40 at 3-1 (because it is a 6-4, rather than a 5-4), without bringing in either Hiller or Losthin, a move that would be exceedingly unlikely – due to the French threat against the H38 forest gap – if even one of these two Prussian 6-4s had been eliminated.
But wait, I also have a much more conservative alternative French move for those players who dislike the idea of risking two (potentially painful) soak-offs to support a single high-odds attack; in that case, consider the following unit dispositions: Chastel at M40; Habert on K40; Friant, Durutte and Soult at J39; and Bachelu, Lefol and Wathier on J38. Needless-to-say, in the case of this "conservative" French move, there would only be two attacks: a 1-2 and a 4-1; there would also be, it should be noted, absolutely no chance that this move could win the game in a single bold stroke; but then, one takes the good, with the bad. Finally, my purpose in discussing these several alternatives at some length is not to bore my readers, but to illustrate the fact that – even when it comes to supposedly simple battlefield situations – the opportunities to make creative "game winning" moves, especially during the final turns of a game like WATERLOO, are actually there, but are too often overlooked, simply because, as the game winds down, a lot of players tend to stop looking for them at all.
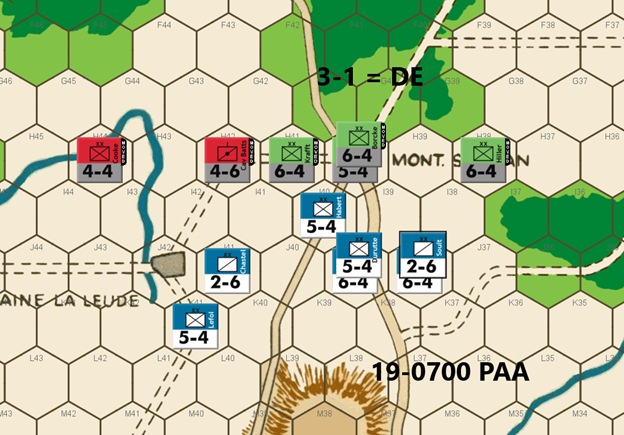
Ed: Well, I am still alive after the French attacks, but barely. Bert has seven units to my four Prussian and two A-A units. The non-cooperation rule really hurts the PAA’s ability to fight in this end game.
I bring the two A-A units forward to better assist the defense and be able to at least threaten an attack on a 2-6. The Prussians have an easy 3-1 attack with no soak off requirement. I get the DE result. Whew!
Every future attack result will be critical from here on.
Joe: he French commander may have had multiple options during his player turn, but the Allied player really has almost none. In fact, except for possible minor adjustments to the positions of the Anglo-Allied units, Cooke and Cav. Batts., the PAA move basically makes itself: the French 5-4 (Habert) at I40 absolutely has to go. And to that end, the good news for Marshal Blucher is that, this time around, the Prussian 3-1 versus the troublesome Habert does not require a soak-off, and, even better, it scores a D Elim. This small victory, however, does not solve a key problem for the PAA going forward: that of preventing the French from slipping around the Allied Left, and then making a dash for the eastern Brussels Road exit hex. As things currently stand, only a single Prussian 6-4 defends the forest gap at H38, and there are literally no PAA units currently in position – should a French unit or two move into J34, J35, or J36 – to stop any of those units from racing north towards A39 and a possible French victory.

Bert: Dang, so close to probably ending this game with a French breakout. Following the exchange on my 1-2 attack, the follow-on 4-1 attack had a 70% chance to eliminate the last blocking piece on the eastern section. Alas, another DB2 result. To make matters worse, the PAA commander’s 3-1 counterattack yielded another D Elim result. The pendulum has swung back in favor of the PAA’s position.
Relatively easy move with just 6 pieces left to shift around against the 6 defenders. I’ll hope for my own D Elim result on a 3-1 attack while still trying to hold the line against a flanking attempt. I did consider running my cavalry units to the La Lasne River, but I decided to utilize the hilltop at M38 as a defensive position but more importantly, allow me to potentially swing my forces back to the western sector, should Ed over commit to stopping me on the east side.
One last thing, I could have stacked two defenders at I40 last turn to force Ed to utilize a soak off unit, rather than get a straight 3-1 attack. I was fearful of I40 getting surrounded and I also figured that I had a 70% chance for a DB2 or exchange result and this was better than risking a stack for a potential desperate low odds attack in addition to the risk of being surrounded.
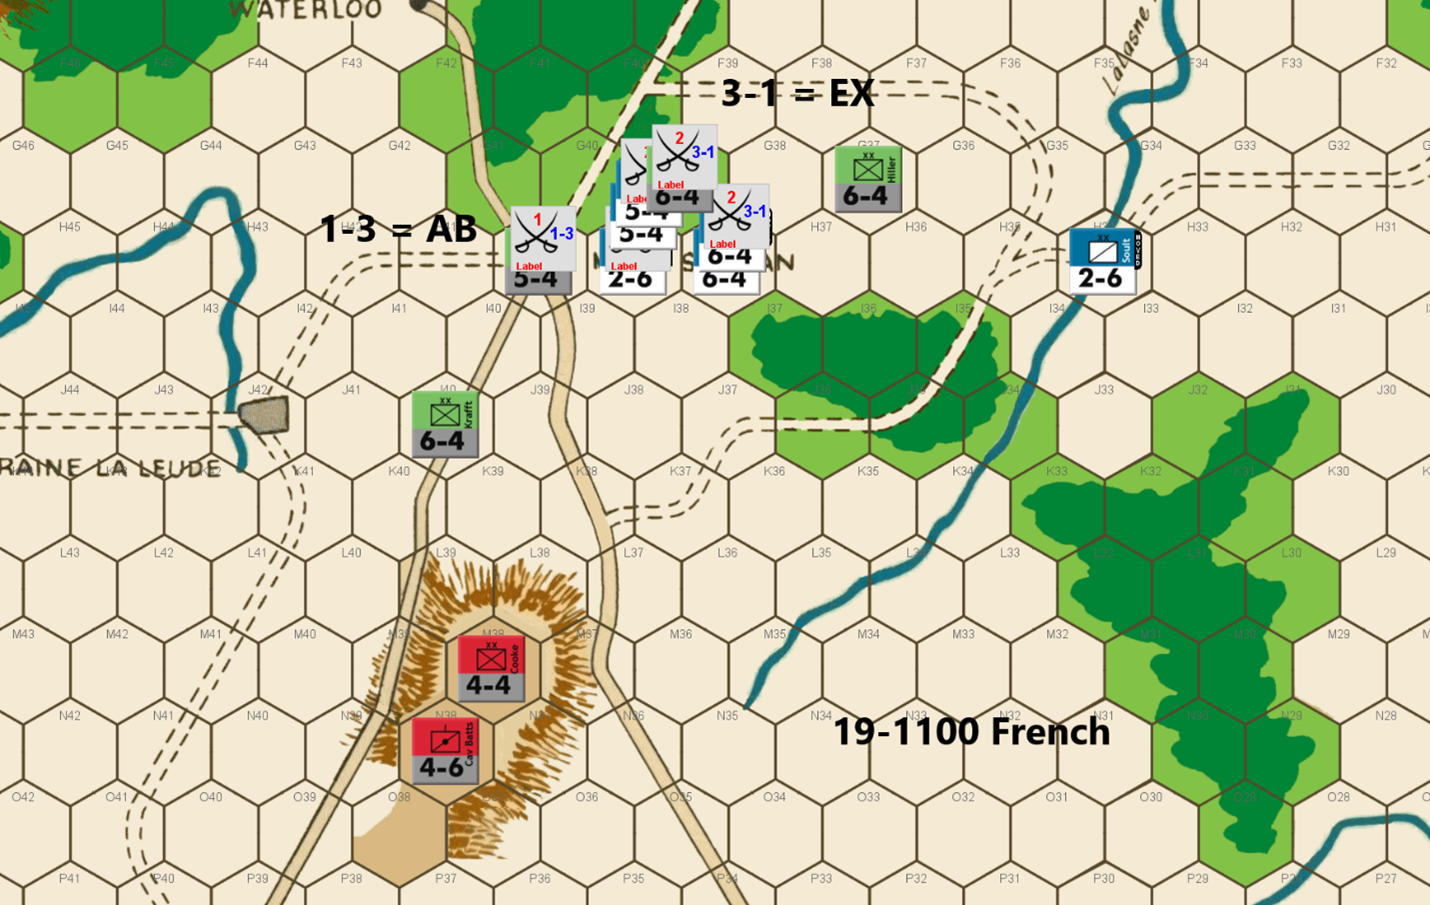
Joe: The French player opts for the only attack that does not require a soak-off: a 3-1 versus Hiller. Unfortunately, as seems to be an ongoing theme in this match, L'Armee du Nord continues its string of misfires on its 3-1s and 4-1s with yet another DB2. The other bit of bad news for the French player is that, with the Allies having again wrested uncontested control of H40, they can now shift units east to reinforce Hiller, via the G40 - F40 forest track. So far as this French move is concerned, while it would have been nice to position Chastel at M37 (so that he could reach J34 in a single bound), I understand why the Emperor opted to shelter this 2-6 on the ridge hex at M38, instead.
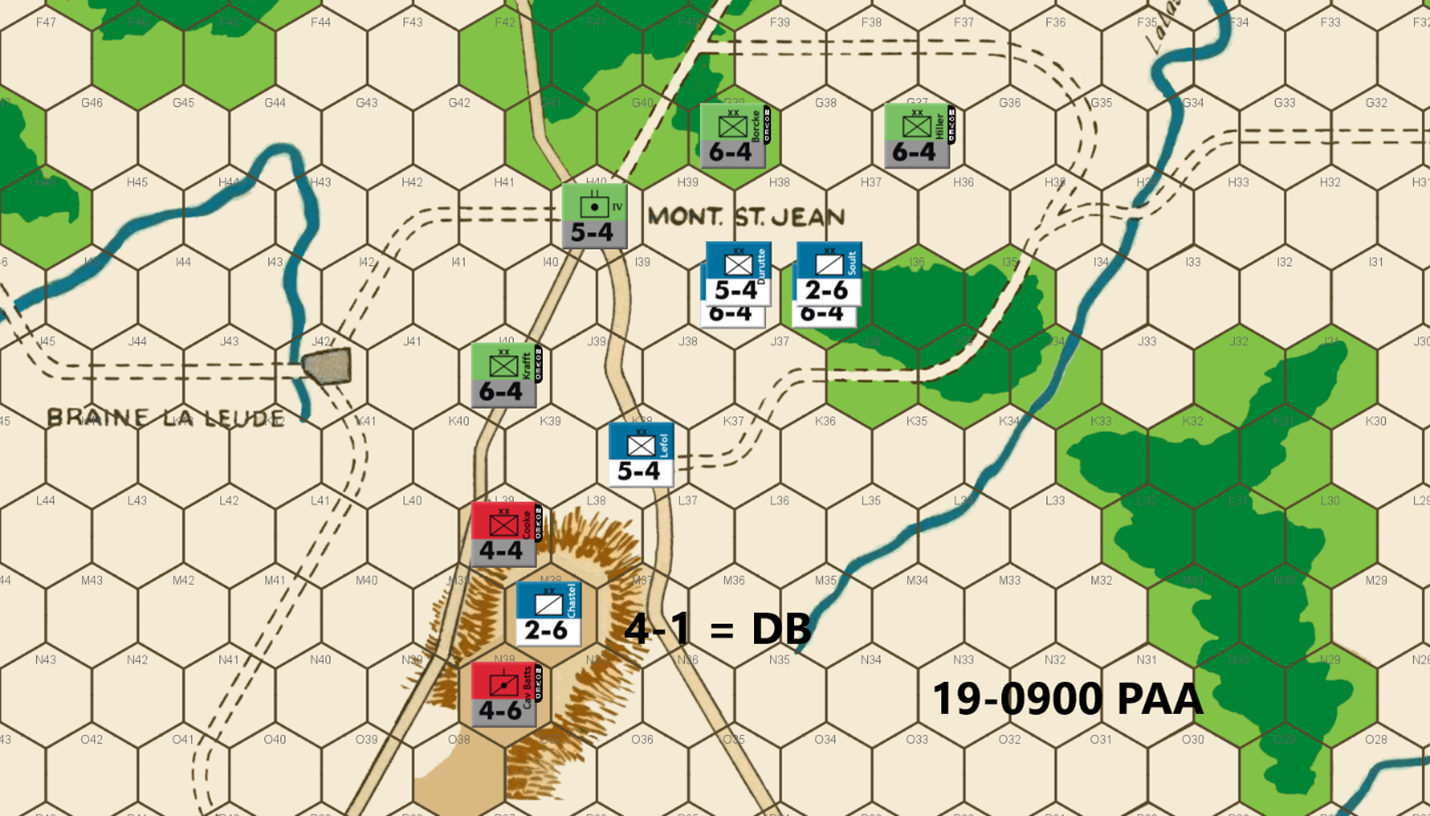
Ed:The question is whether it is better to attack with the Prussians or set up a defensive screen. Any attack will require a soak off which I really can ill-afford to lose. They are better utilized on the defense here, I think.
The A-A pair of units do have a 4-1 attack option. That is a 70% chance to eliminate a 2-6 and threaten the French rear. That is what I decide to go for. Drat, it is DB.
Joe: As expected, the PAA player immediately acts to shore up the fragile Allied Left by dispatching Borcke to G39. Farther south, the remnants of the Anglo-Allied contingent – eager to get back into the fight – launch themselves against Chastel (a 2-6) at 4-1. I personally am not particularly excited by this Anglo-Allied move. Better, I think to have left them where they were and to have stacked both Kraft and the IV Corps Foot Arty in H40: the French are going to have attack next turn, and the most likely target will be Borcke, so better to force the Emperor to soak-off at 1-6 rather than at 1-3! In any case, an attack by the PAA player finally misfires with a DB2 result.. Chastel retreats to J36, and Cooke advances into M38.
Bert: What a topsy-turvy game this has been! My 3-1 attack last turn yielded another bummer DB2 result. Worse, I obviously failed to count the hexes correctly and so I ended up permitting the Anglo-Allied two remaining pieces to ascend the hilltop and take a 4-1 against one of my two remaining cavalry units. Lo and behold, I got lucky again as Ed’s attack misfired and my boys escaped via their own DB2 result.
The resulting position looks like I’m going to be easily surrounded, however, I think that the PAA commander has left my remaining pieces a glimmer of hope. There are only two Prussian pieces left defending the east side of the forest line and I can get a 3-1 attack versus one of them this turn. Importantly, I will be occupying hex H41 at the conclusion of the attack. That hex prevents Ed from easily moving additional defenders to that east side. If I can get a D Elim on that attack (or even an exchange), it will make it challenging for Ed to keep me blocked with only that lone piece (Hiller). Either of those results will leave the PAA with only Hiller to the east as I mentioned and it will mean that Ed can no longer get a 3-1 attack versus one of my 6-factor units. Note, I’d have only one left on the board if there’s an exchange.
I tried multiple combinations of how to try and maximize my chances in this situation and I ended up settling on the combination of taking the 3-1 versus G39, soaking off at 1-3 versus H40, and running a lone cavalry unit to be astride the La Lasne River to the east. This seems optimal to me because I am mostly counting on my remaining ‘heavies’ to lead the charge since with the remaining combination of units for the PAA, make further counterattacks a bit risky. I could have made the attack a 4-1 by keeping my other cav unit in that attack, but both the 3-1 and the 4-1 have a 30% chance of the DB2 and avoiding that outcome is the optimal result for me. The annoyance that running my cavalry to the river line seems worth it to me too.
I was and am concerned about giving Ed a counterattack opportunity that surrounds and pins my units that survive this attack, especially if the cavalry unit is still in that location following the 1-3 attack, but I don’t see a way for Ed to actually completely pin me without him risking at least one attack at less than 3-1 odds to complete a pin. I think that I will be able to move to G39 or through H37 to ‘escape’ unless Ed risks that less than 3-1 attack. (Of course, I might have another late game blind spot.) We’ve already seen both sides succeed with low odds attacks, but if Ed is forced to take and win an attack at 2-1 or less to seal a PAA victory, I’d be happy to have gotten the game to that point. It meant I had “a chance” to pull it out at the end.
All of that is predicated on my eliminating his defender on my 3-1 attack. Without that, I’m pretty sure that Ed will be able to utilize a combination of the two eastern defenders to combine with his other units to effectively pin my units and wrap up this game. So, let’s hope that doesn’t happen!
Joe: The Emperor scrapes together virtually every unit he can and throws them against the Allied Left in two attacks: a 1-3 with Chastel against the IV Corps Foot Arty (a 5-4) at H40, and a 3-1 versus Borcke (a 6-4) at G39. The French results, not surprisingly, are mixed: an AB2 on the 1-3 retreats Chastel to J37?, while the 3-1 Exchanges Bachelu for Borcke. [I should note that the Allied choice of flight hexes for Chastel is somewhat unexpected, as a retreat to I37 would probably have been marginally better, especially if Borcke had survived.] The Exchange result, although a bit disappointing to the French commander, is nonetheless useful because it removes a key Prussian unit from the eastern section of the PAA defense line, while still leaving L'Armee du Nord with (barely) enough combat power to attack the lone surviving PAA unit (Hiller) on the Allied Left at 3-1. Now, "the ball is in the Allied player's court," and one thing is clear, since Hiller will be vulnerable to a surrounded 3-1 – either now, or on a future turn – if the Allies do not act promptly, it therefore follows that some sort of PAA counterattack is virtually guaranteed.

Ed: I made a mistake when I retreated Chastel on the French attack this turn. He should have been retreated to I37 instead of J37 which would have given me better options. I realized my mistake a few minutes after sending off the retreat message. But having sent the message, I didn’t feel right in asking if I could change it.
That left me with some less attractive options. I can get a surround attack vs Chastel with the two A-A units. If Hiller stayed at G37, Bert could get a 3-1surround attack, although it would take all four of his remaining units. Once Hiller is gone, I don’t have enough Prussians or A-A factors to get a 3-1 attack on anything but a 2-6. Not good. Definitely not good.
I can also attack Friant at 1-1, hoping for the DE/DB result (40%), to prevent Friant from heading north to march off the board. By adding two other attacks, I am able to end up with 3 surround attacks, albeit at less than 3-1 odds. That is the choice I made. First, I took the 2-1 on a 5-4 which ended up in an exchange. Next the two A-A units attacked the other 5-4 at 1-1 surround, yielding a DB which turned into a DE. The game now rode on my last 1-1 attack. Alas, my luck ran out when the dice yielded an AE. That opened up the path for Friant to reach Brussels unopposed requiring the PAA to remove 12 factors. Since I only had 13 factors left on the board, I had to remove all my units. That left a pair of French cavalries as the only two units remaining.
What a game!! We were each favored to win multiple times as luck swung back and forth. Congratulations to Bert on his hard-fought win.
Joe: The Allied commander does, indeed, promptly counterattack, and he does so with a mix of desperation and elan. Since all of his attacks are at low-odds, he opens his offensive with the most favorable attack first: a 2-1 surrounded attack (using Kraft & the IV Corps Foot Arty) versus Lefol (a 5-4) which yields an Exchange eliminating both Lefol and the IV Corps Foot; the second combat is another surrounded attack, in this case a 1-1 (using Cooke and Cav. Batts.) against Durutte, and this time the attack eliminates Durutte without cost; the third, and final "do or die" combat for the Allied player is a 1-1 surrounded attack (using Hiller) against Friant; and, at long last, the Allied player's luck runs out, and Hiller is dispatched to the "dead pile" by an A Elim. And, just like that, the campaign is quite astonishingly suddenly over: all because, even though the Allies currently outnumber the French, fourteen factors to ten, the path is now wide-open for the few surviving French units to march off the game map to Brussels and victory!
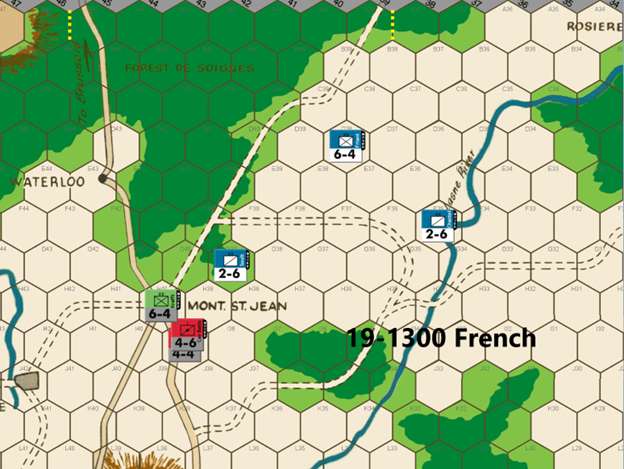
[Editor Note: French move guaranteeing their exit to Brussels next turn and a French win.]