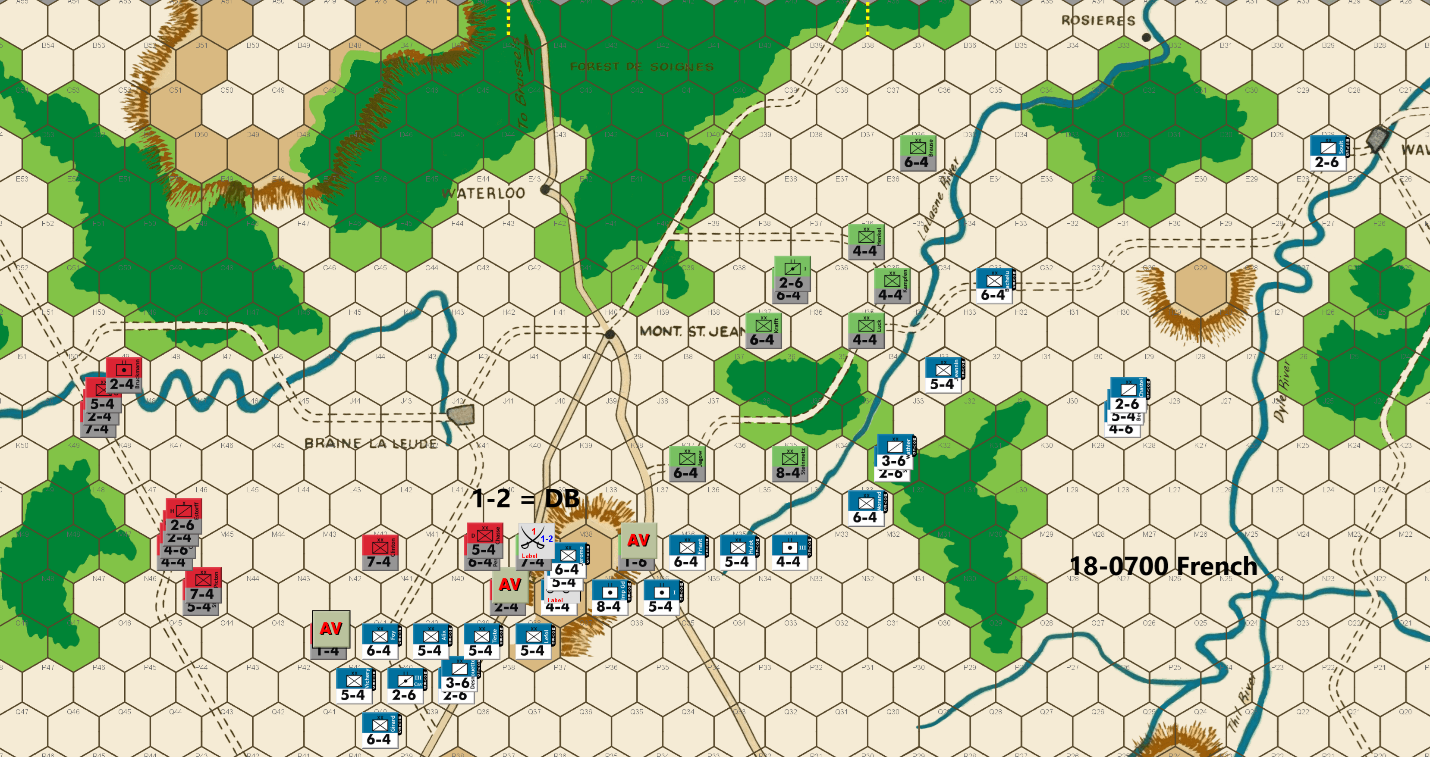
Bert: The battle in the west end of the board has turned into a disaster for my troops as I failed to eliminate his 2-6 on the 4-1 attack, lost my unit to an A Elim on my 1-2 attack, and then had three units and 8 factors go into the eliminated pile on Ed’s 3-1 counterattack. Ugh! Basically, those results have effectively shut down my western push as I don’t want to tangle with those strong Anglo-Allied troops anymore. When I combine those results with what happened to my forces in the east on the last turn, I have managed to allow my rather significant advantage in the game to almost disappear. It is time to consolidate my units to the center and make the end-game push in the center for now.
My goal at this point is to try and gain at least one hex row per turn towards Mt. St. Jean so that I can utilize the wooded hexes to separate the PAA forces into two separate groups. Ideally, I’ll eliminate 2 or more Allied units per turn, while making this push. Barring a successful counterattack, to hold a row, I think I can get to that city before the Prussian IV Corps, that is arriving this turn, can intervene in a meaningful way.
If I can achieve that goal, without losing a significant portion of my remaining units, I will be able to commit the majority of my units to one of the roads towards Brussels or the other. I’ll have about 9 turns remaining to advance 7 hexes. Failing that, with 36 PAA pieces left following my attacks this turn (pending the outcome of my 1-2 attack), I can eliminate all Allied pieces by killing 2.77 units per each of my 13 remaining turns of attacking. Neither path is very good math for the PAA side. At this point, I think I should be able to achieve one or the other without the need for any major attacks of less than 3-1 odds.
Most French players seem to like to use their 4-factor infantry units to attack Steinmetz on the Quatre Bras hill early in the game with a 1-2 attack. I prefer to not do that and instead wait for this point in the game to utilize those 4-factor units to attack undoubled Allied 7-factor (or Steinmetz) units that are holding blocking positions, at 1-2 odds. For example, I’m hitting Pirch II this turn at M39 with a 1-2 attack. While those attacks are less than 3-1 odds, I don’t consider them major. If I can get an exchange result (20% chance vs 30% of an A Elim), it can be quite a blow to the PAA player’s position. As the PAA player, I prefer to use a 6-factor unit to hold that single hex defensive position instead of the 7-factor unit. The French can still do their 1-2 attacks and only risk a 3-6 unit to do it, but that can leave a weaker unit on their front line that I can consider counter-attacking to try and hold a hex row for an additional turn.
In any case, Ed is running low on small units that can be used as blockers or as soak-offs and with the low number of remaining pieces, every counterattack he makes going forward runs the risk of him helping me to achieve my killed units per turn that I’ll need to ensure a French victory.
I considered sacrificing a piece at hex J34 to block his units from using that road to get back to the main front from the La Lasne River battle, but I don’t want to take any unnecessary losses anymore. A big decision that Ed has is where he will bring his IV Corps reinforcement on to the board this turn. I’ve dispatched a small contingent to deal with those units, should he choose to send them down the DD hex row road towards Quatre Bras. I also have sent a nuisance unit to slightly block his path coming through Wavre. I expect that this is where they’ll come in. I’ll consider minimally engaging them to slow them from reaching the main front for an extra turn, if I can do so economically.
Joe: Prologue: The arrival of the 18 Jun 0700 game turn is virtually always greeted with relief by the PAA player, and dread by the French commander. And why wouldn't this be the case? After all, it is on this game turn that the PAA player is at last able to bring into play his final contingent of Anglo-Allied reinforcements – four Hanoverian 2-4s – on the north edge of the game map, usually along the Brussels-Waterloo Road; and he also finally gets to usher in the nine units of the Prussian IVth Corps (thirty-four factors) somewhere (his choice between hexes A25 and FF09) on the eastern map edge. Of course, entering the game map and actually showing up in the battle space are two very different things. In the case of the Hanoverian 2-4s, they will typically reach the front in two game turns; however, when it comes to the various components of the Prussian IVth Corps, these units – depending on whether they are cavalry or infantry – will usually arrive, if not physically delayed, at the Mont. Ste. Jean battlefield in three to five game turns. And what all this means – at least in my view – is that the moods of the opposing players (whether optimistic or pessimistic) will often undergo an immediate change due to the prospect of this last batch of PAA reinforcements finally entering the game map. However, I would suggest that such "mood swings" are almost always an overreaction, as the actual situation on the battlefield – and with it, the strategic dynamic between the opposing forces – will only rarely be dramatically affected by the arrival of these incoming PAA units before the 1500 game turn of the 18th, and sometimes not even then.
THE FRENCH:
The sudden unexpected opportunity – thanks to an Allied miscalculation – for the Right Wing of L'Armee du Nord to launch a surprise attack against a vulnerable section of the Prussian line had, on the afternoon of the 17th, electrified Napoleon's headquarters' staff with hopes for an early, and victorious end to the campaign. This was only natural since the Emperor and his retinue had, very soon after the fact, received ebullient reports confirming the total success of a set of daring attacks by French horsemen on the unsuspecting Prussian cavalry pickets tasked with guarding a wide stretch of the northern La Lasne River. Subsequent events, however, soon dashed those hopes. For starters, and most disappointing for the Emperor, the promising breach in the Prussian line in the northeast – in spite of what had initially seemed to be a decisive French victory – could not be maintained; and, instead, all but one of the cavalry units that had just successfully attacked along the La Lasne River were, in their own turn, destroyed in a desperate, bloody, but winning Prussian counterattack. To add to Napoleon's multiplying woes, only two hours later, over on the western side of the map, a French mixed cavalry/infantry contingent, which had previously been cautiously covering the extreme left flank of L'Armee du Nord, suddenly charged forward in an ill-considered attempt to ride down a single Hanoverian cavalry brigade (Estroff). Unfortunately for the French, not only did this attack fail (with the immediate loss of a 3-6 soak-off), but three of the surviving four units committed to this assault ended up being destroyed in a PAA counterattack, all at no cost to the Allies. These several French setbacks, besides increasing casualties among Napoleon's cavalry arm to an alarming level, and more-or-less completely eliminating French pressure against the Allied right flank, also temporarily put Napoleon's campaign "back on its heels." In short, with available French cavalry units (and the mobility that goes with them) drastically reduced, with infantry losses steadily increasing, and with Allied reinforcements soon to be converging on the Mont. Ste. Jean battle space from west, north and east, the French Emperor now realized that he would have to scramble to salvage a campaign that, for the first time, looked to be jeopardy.
In the Center: The destruction of most of the units covering the French Left, leaves Napoleon with no choice but to pull what remains of the far west contingent of his front line units back towards the main body of L'Armee du Nord in the center. On its face, this decision is quite reasonable, yet reasonable or not, it is actually with the specifics of its execution that I take exception. Of special concern is the western end of the French battle line; to whit: by occupying the "O" hex row in strength, instead on the "P" row, the units at O41 and P41 can both be attacked by the PAA player from three hexes at 3-1 and/or 4-1 odds, and without the need for a soak-off. [Even double stacking both O41 and P41 – because of the required soak-off – could well discourage an Allied attack!] Since the French commander obviously wants to eliminate the Allied sacrifice/delay units at M37, N39 and O42, I think that it would probably be a little safer to pull the entire French battle line back one hex row (e.g., so the units in the M row, for instance, would line up in the "N" row instead; and units around the central ridge would pull back one row to the "O" row with O39 and P32 being occupied by 2-6 cavalry units serving as screeners. In addition, since the doubling effect of the central ridge is already neutralized by French units at N37, O37 and O38, I see no compelling reason to risk a 4-4 in a 1-2 soak-off/attrition attack against Pirch II. And last but not least, I personally think that the five French units (eighteen combat factors) racing south along the Quatre Bras primary road to, I assume, impede the progress of the Prussian IVth Corps (should its units enter the map at CC11 and DD10) is largely a wasted move. I understand why a French player might opt for such a defensive measure – I used to react much the same way, myself, when the 18 Jun 0700 game turn rolled around – but I have long since come to believe that this response is an overreaction. [Admittedly, there are a few situations (e.g., an ongoing attrition battle still going on in the Qautre Bras Gap, or a badly depleted French army which is still stalled south of the Nivelles-Genappe Line) when it might make sense for the PAA player to enter the IVth Corps on the Quatre Bras primary road, but, even in these situations, the French commander can easily discourage this move by posting a 6-4 at Y13, and a 2-6 at BB12, DD11, and FF10 on or before his own 18 Jun 0700 player turn. No the main reason that experienced Allied players almost never attempt this rear entry gambit is that the IVth Corps is actually surprisingly ill-suited – because of its unit composition (it can only stack twenty-nine factors in two hexes: therefore no 3-1 from two hexes versus a doubled 5-4) and combat limitations (with its total combat strength of thirty-four factors: no 3-1 versus a doubled 6-4 is ever possible) – to operate independently of the rest of the Prussian Army, especially when faced by a line of doubled enemy units. This means that, if the Prussian IVth Corps does enter play on the primary road to Quatre Bras, it will usually be fairly easy for the French player to box it in east of the central hillocks at W31 and T32, and south of the Genappe River.]
In the East: The French player, now faced with a stalemate on the La Lasne and the strong possibility of a powerful contingent of Prussians entering the map to his rear, temporarily abandons any further offensive plans in the east, and, instead, sets about extricating his units before they find themselves squeezed between two powerful enemy forces. One French 2-6 is dispatched to occupy the comparatively safe D28 (no incoming infantry can attack it initially, and Prussian cavalry cannot muster a 3-1 whether the 2-6 is doubled or not) so as to prevent any arriving Prussian horsemen from sideslipping along the Dyle River to E28 or F27. I should also note that, while this French blocking move – should the Prussian IVth Corps enter the map near Wavre – is virtually risk-free, ongoing attempts to delay the advancing Prussians will not be so easy but will tend to come with a steadily increasing opportunity cost in sacrificed units as the game wears on.

Ed: Good fortune has been on my side over the last couple of turns. Bert’s attacks have sputtered while mine have produced good results. All he got in his turn were the two blockers I sacrificed. As I start my turn, I have a five-unit count advantage. Exchanges are now helpful to my Allied Cause. I still want to minimize any soak offs in my attacks, but there is no need now to avoid 3-1 and 4-1 attacks. The order of the day is to attack wherever we can.
My attack in the west last turn has left me poorly positioned. But Bert has left two units subject to attack with no soak offs. I attack at 4-1 and 3-1. In the center, I use two blockers with (hopefully) some disadvantageous attacks on my flanking heavies. Bert blocks my Prussian cavalry in the east but stays out of range from my newly arrived infantry. And he decides to send some of his eastern forces back toward the center. I am a little unsure what the purpose of the three units at J29 is. I guess to slow the advance of the Prussian Fourth Corps.
Combat Results: More luck for me as I get a DE and exchange on my two attacks. Two more French infantry eliminated. I now think I have the advantage in the game. Of course, the dice luck can easily swing in Bert’s favor and the game is far from over.
Joe: In the Center: The Allied commander reacts to the French move pretty much as expected: he renews his attacks against the French Left, targeting Foy (6-4) at 3-1 (Exchange) and Vichery (5-4) at 4-1 (D Elim); and farther east, he screens the pullback of the rest of the Allied line with sacrifice/delay units at M40 and K38. The one "nit" I will offer about this move is that, rewarding as PAA combats in the west have been of late, the Allied player has now chosen to advance a sizeable share of his Anglo-Allied combat power out of range of the Brussels-Waterloo north-south primary road, and at least a couple of turns away from the soon-to-be central battlefield just south of Mont. Ste. Jean. Granted, reinforcements are rapidly approaching from several different quarters, but I still believe that the Anglo-Allies are soon going to have to concentrate in the center astride the two primary roads, as the local Prussians currently tasked with supporting the Allied Left have no conveniently-sized soak-off units available, and hence, their capacity for protracted "toe-to-toe" combat is going to be both brittle and severely limited, at least until the Prussian IVth Corps finally makes its appearance on the battlefield. And lastly, both Wellington and Blucher are finally able to breathe a collective sigh of relief upon learning that the desperately-needed Hanoverian 2-4s have belatedly entered the map on the Brussels Road, and are even now marching south "towards Mont. Ste. Jean and the sound of the guns."
In the East: The La Lasne River line is at least temporarily relegated – all in the space of a few game turns – from a critically-important front, to a strategic "sideshow." And all that was necessary for this to happen was the sudden appearance of a powerful Prussian force on the east edge of the map near Wavre. Now, the new focus of both sides, when it comes to their respective operations in this sector, has shifted to the Wavre bridges over the Dyle River, and to the French efforts to delay and otherwise impede the progress of the newly-arriving Prussian IVth Corps.

Bert:I have to admit that I did my last move rather quickly without actually counting out everything that was possible for Ed to do against me. I shouldn’t be making that kind of mistake in a PBEM championship game. Frankly, I wasn’t too worried about the PAA launching a counterattack against me. As a result, the 4-1 and 3-1 attacks against my infantry units were not expected. Unfortunately, the dice failed to bail me out (they really shouldn’t when I’ve made a poor move) and so the PAA was able to increase the total French losses up to 69 factors with those two kills. When compared to the 90 factors that the PAA has lost through the previous turn, I’d say that this game is back to a toss-up at this point, although to be fair, I really think it is leaning towards the PAA player with a little more leeway to handle some poor dice; we’ll see.
The fortunate thing for me was that the kill vs my 6-factor unit took the last remaining Anglo-Allied 6-factor unit with him in the exchange. Without a 6-factor unit left to lose in an exchange result, the Anglo-Allied forces will be risking either multiple pieces or a 7-factor unit on any further attacks versus my 6-factor defenders on any further attacks at less than 5-1 odds.
Meanwhile, the Prussians have plenty of 6-factor units left, but their dilemma is that they will have difficulty creating stacks of 15 factors. With my AV of the last remaining small Prussian unit on the main front this turn, any attacks launched by the troops clad in green will be risking larger units in any necessary soak-off in addition to having non-optimal stacks. It will still be at least 3 more turns before the small units from the Prussian’s IV Corps reach the main front.
Speaking of the IV Corps, I have committed minimal units that are trying to impede those reinforcements so that they will reach the main front with perhaps a one-tun delay. With my recent losses, it is likely not worth sacrificing a piece to gain another turn, but I’ll have at least one more turn before I need to make a final decision on that. I think Ed will send at least one if not two of his small units through the small village of Rosieres in order to avoid any further blocking moves. Unimpeded, those units can typically reach the main front by the 18-1300 turn, but I think they’ll end up getting there one turn later this game. While I can’t really afford to throw away many more units, my best move might be to sacrifice my eastern most units if it can prevent the IV corps from reaching the main front before I can reach Mt St Jean to split Ed’s armies.
At this point, I won’t be surprised by additional counterattacks by the PAA commander. My goal will be to force him to risk losses on soak-off attacks and exchanges whenever he orders an attack. Of course, I won’t complain about defender retreat results either. As an exception, I felt forced to expose the IV Corps cavalry to a high odds or AV attack this turn but making that attack will leave any PAA units in that attack or on the flanks, vulnerable to an effective follow-up attack by my units.
I made sure to position all of my attackers out of range of his reinforcements that are approaching from Hal and are on hex K45. He has enough firepower in range on that western front without me letting those units get added to his arsenal on this coming turn.
My units will use AV attacks to kill at least three more PAA units this turn. In addition, I am taking a 5-1 and a 1-2 (against a 7-factor defender) which give me a decent chance to kill at least one more unit and/or possibly a second defender. Obviously, with the way the last couple of turns have gone, the tide is turning, and I need to maximize the attrition that I cause the PAA army while hopefully minimizing my losses. If not, I’ll be in a lot of trouble and will have to consider some sort of desperation attack to turn the tide back in my favor. I feel like I don’t have much margin for error anymore.
Joe: In the Center: Given the current battlefield situation, and the combat units that he still has left to work with, the French commander does about as much as can be expected with his assets in this sector. L'Armee du Nord is now established north of the western end of the La Lasne River and is only a few hex rows south of the critical road junction at H40 (Mont. Ste. Jean). This strongly suggests a PAA counterattack, if for no other reason than that an attack is really the only way for the Allied player to be able to maintain control of the "J" hex row for another game turn, which, because of its proximity to H40, he really needs to do. Unfortunately for the PAA commander, only the Prussians (who are also currently without any available conveniently-sized soak-off units) are actually in a position to immediately counterattack the advancing French battle line in the center. In spite of that fact, the French 5-4s at K36 and K37 look particularly vulnerable; regrettably, it is also highly unlikely that stacking additional units in these two hexes would actually dissuade this Allied player who has lately become really keen on attacking the French line whenever and wherever an opportunity presents itself. Looking elsewhere on the game map, the PAA sacrifice/delay units at K38, M40 and P43 are all AV'd without difficulty, and the French player is also able to organize a promising pair of attacks (a 5-1 versus Stedmann and a 1-2 against Picton) on a couple of the troublesome Anglo-Allied units that have been tormenting the French Left since the evening of the 17th. Unfortunately, as has been the case for French "high" odds attacks over the last few game turns, the 5-1 succeeds only in retreating Stedmann, and the 1-2 versus Picton, although it does not yield an A Elim, also fails to eliminate the 7-4 with an Exchange. As a final note, I think that the IVth Cav. Hrs. Arty is actually cleverly placed: it is positioned far enough back so as to not be an attractive "high odds" target for the foe, but still far enough forward so as to prevent Cav. Batts. (at O42) from dashing through the French line to surround the Imp. Gd. Foot Arty (at N39) or any of the units farther south on the "Q" row.
In the East: It is clear that the French player has now pretty much abandoned any serious thought of continuing his offensive threat against the La Lasne line; and instead has decided to continue to gradually shift the bulk of his eastern combat power along the east bank of the river and towards the center, where the real action is certain to occur. Interestingly, the situation farther east has suddenly become a little more complicated thanks to the French commander's decision to dispatch a couple of units to impede – at least temporarily – the Prussian IVth Corps' western march towards Mont. Ste. Jean. Needless to say, a 5-4 and a 4-6, by themselves, cannot safely do much to delay the advance of the main Prussian force, especially once the bulk of its infantry has passed over to the west bank of the Dyle River. On the other hand, this token French force – so long as it stays out of range of the Prussian "heavies" – is more than enough to slow down the newly arrived Prussian cavalry for a turn or two. Of course, the real question still to be answered by the French commander is: Does he want to continue to slow the IVth Corps advance going forward and, if so, how much combat power is he willing to sacrifice, in order to accomplish that delay? [Since the topic of possible direct French interference with the entry of the IVth Corps has come up in this match, I thought that it might be helpful to mention an unorthodox French approach that can be quite effective in disrupting the Allied player's plans for the endgame, especially in certain low (French) casualty situations in which L'Armee du Nord is already on or ahead of schedule in its advance towards Mont. Ste. Jean. There are actually several different variations of this gambit, but my personal preference is to position a single 2-6 at B25, E23, H22 and K20; two 3-6s at N21; and a 5-4 at N19. Although the PAA commander has several possible counter-moves to this gambit, none of them are really all that appealing. And for those players who are skeptical, I invite you to experiment with this approach, if for no other reason than to have a prepared response should you ever encounter it your own play.]
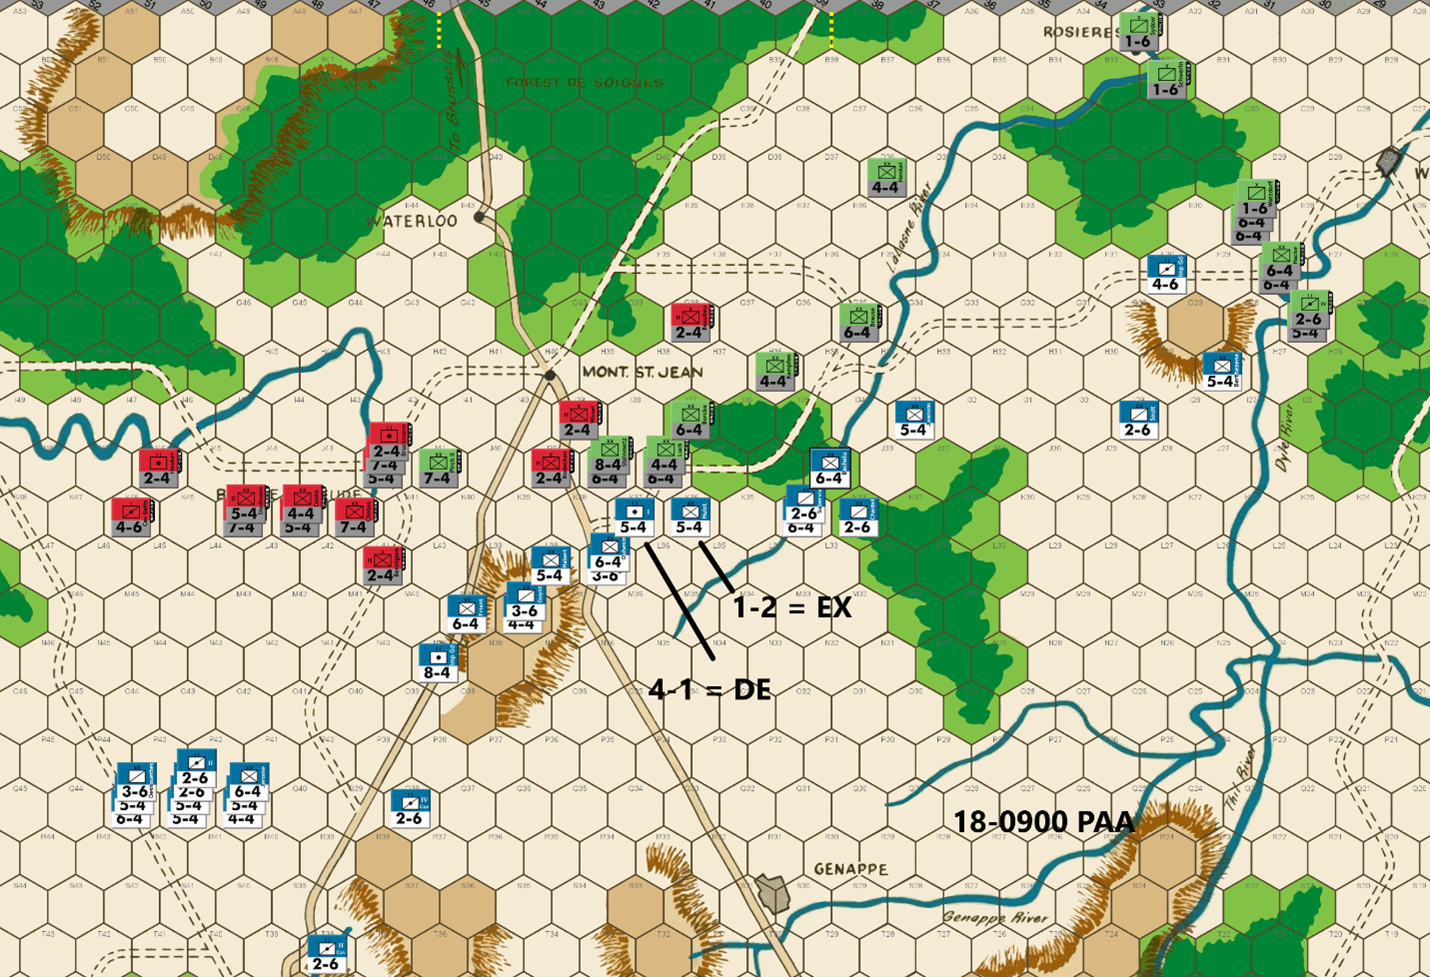
Ed: I am having a really good run of dice, as Bert’s two attacks against my heavies result in DB. We fall back on my right out of range of good French attacks. I again have to offer up two blockers but am able to launch a 4-1 attack in the center to hold ground and hopefully do some damage. This requires a soak off which falls to a 4-4 infantry for the task in a 1-2 attack.
In the east, the French again block my progress toward the central front. I decided to send two cavalries by way of Rosieres to augment the La Lasne River defense. They also have a guaranteed path to the central front in case Bert decides to continue his delay tactics against the Fourth Corps. I protect the La Lasne River with minimum forces against the now weakened French presence.
Combat Results: More luck for me as I get a DE on the 4-1 attack and an exchange on the 1-2 attack. The French are now down two more units for a positive differential for the PAA of five units on board.
Joe: In the Center: The Allied player, having again come through a pair of French attacks unscathed, opts for discretion over valor and retreats the exposed southern Anglo-Allied units northeast back towards the "K" row, and Braine La Leude. Unfortunately for the French commander, the Prussians execute their expected – and really almost mandatory – attacks, but unlike their foe, the Allied player rolls perfectly against both the 5-4 at K37 (a 4-1 D Elim) and the 5-4 at K36 (a 1-2 Exchange). The only good news for the French player, such as it is, was that the PAA commander was forced to trade a 4-4 for 5-4 in the K36 exchange.
In the East: The PAA player on this front is now confronted with two very different problems: a) his need to continue to defend the La Lasne River, but with as little combat power as is prudent; and b) his strong wish to push the units of the IVth Corps west as rapidly as possible. In the case of La [EdLasne, the units currently manning the defenses are adequate without being excessive. In addition, on its next move, the Hanoverian 2-4 at G38 will be able to replace the Prussian 4-4 (flank guard) at H36, which will then be able to move towards the center to take on the role of "emergency soak-off," if needed. So far as the IVth Corps is concerned, the bulk of this powerful mixed infantry/cavalry force pushes straight towards the La Lasne River crossing at H34, looking to attack and eliminate any French units that are foolhardy enough to attempt to block its continued forward progress; however, to insure that at least a couple of Prussian cavalry units are no longer delayed by the French player (no matter what he does), the Allied commander sends two 1-6s on a circuitous northern route around the French by way of Rossieres; this move guarantees that, whatever happens elsewhere on the map, at least these two cavalry units will be able to enter the fight at Mont. Ste. Jean by the 1500 game turn.
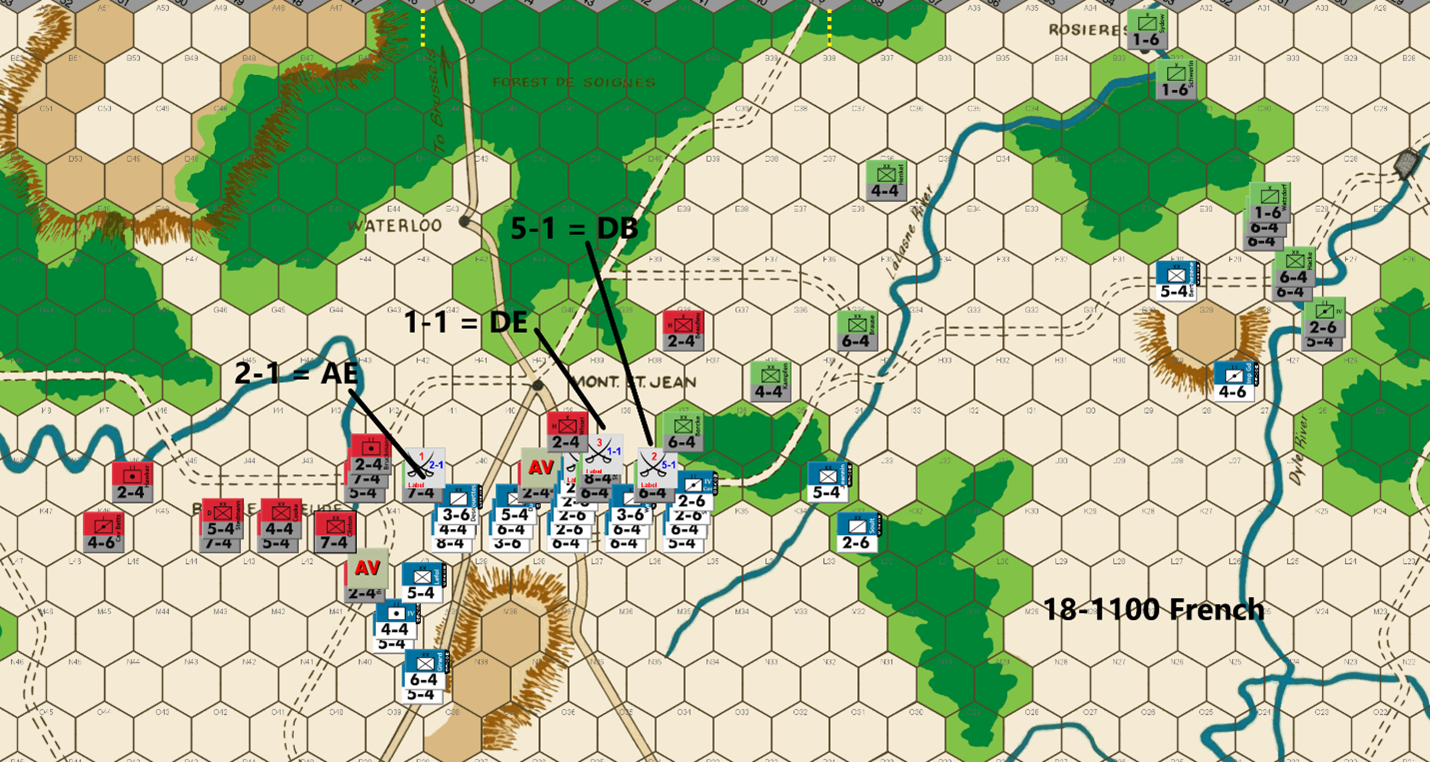
Bert: Oh my, I seem to have understated how precarious my position was this past turn. The dice have turned quite fickle for me as they have teased me with relatively worthless DB2 results on a couple of my last few 1-2 attacks. Without the defenders being surrounded, those “good” rolls don’t offer me much of an advantage, other than keeping my attackers alive and on the front line. Even worse, I managed to get another DB2 result on my favorable 5-1 attack. Meanwhile, the PAA got a D Elim on his 4-1 counterattack and a nasty Exchange on his 1-2 soak off.
Alas, 6 of the last 7 PAA rolled attacks have resulted in my defenders being eliminated. Those attacks killed 10 French pieces worth 36 factors, quite devastating attrition for my side. The tide has turned so much, that I don’t see another alternative other than launching some desperation moves to try and get this game back to even. The problem is that I’ll need almost perfect luck, which is unlikely and undeserved, but more importantly, I’ll need to survive a decent response that the PAA commander will be able to muster even if I hit on my attacks. We might be seeing an early end to this match. I never saw this coming going back to the 1700 turn of June 17th!
Anyway, I pondered a number of different combinations and alternatives for this turn. Please indulge me, but I’m going to talk about a couple of the ones I considered, but rejected, before getting to my actual move. First, I strongly considered an attack against the La Lasne River defense. I could have moved my Imperial Gd to C35 to block the two Prussian 1-1-6s from advancing to the main front, sacrificed Berthezene to a 6-1 attack in blocking the rest of the IV Corps, and then used my other units in range to make a 1-1 versus a doubled Henkel. I did some calculations and determined that even with a D Elim on the 1-1, Ed had just enough units to impede further advance of my units until the IV Corps could come to the rescue.
A second attack considered was quite similar to what I ultimately decided on. This option would have taken a 2-1 instead of a 1-1 versus the 14 Prussian factors at J38, a 1-2 vs the defender at I37, and a 3-1 vs the defender at J37. Since my only real hope for success is a D Elim result versus J38, a 1-1 attack gives me the same 20% chance of that D Elim as the 2-1 attack. As a result, I dismissed this option too. Instead, I settled on the move depicted on the screenshot.
First, I still want to block the IV Corps and so Berthezene and the Imp Guard unit took up blocking positions. Interestingly, the Imp Guard gets to take advantage of a river defense and the counter mix of that group means that the best odds the Prussians can get will be a 5-1 attack vs the 5-4. I’d appreciate getting lucky and having my defender get a DB2 result… 12
Next, I can muster two AVs on the main front and a 5-1 attack versus Kraft. You know what I’m counting on with that attack. That left me with making some attack versus J38. As I mentioned above, a 2-1 didn’t make much sense. With my forces near a breaking point, I didn’t see the need to just make a soak off attack against that stack, so the 1-1 attack was the obvious choice to make. I don’t expect it, but a timely D Elim would brighten my outlook quite a bit. An A Elim result will likely have me offering my surrender to Ed along with a huge congratulations. An Exchange result might be that same outcome, we’ll see. I’ll “try’ to be optimistic…!
I figured that if I do get lucky versus J38, I should probably push additional chips into the pot by attacking Pirch II, also. While of course, I’d love another D Elim on that attack, it might be just as important to try and hold the attacking hex, so a DB2 or an Exchange might be good enough. As a result, the 2-1 attack was the choice for that defender. The reason I need to try and hold that hex is because of the current western positions of the Anglo-Allied units. I hope to block some of maneuverability of those units from getting to good positions in front of Mont St Jean on Ed’s next move.
On this move, I’ve made my attack order so that the AV attacks follow the rolled attacks. This prevents Ed from retreating my cavalry units attacking J38 from getting retreated into a weak defensive position on an AB2 result. Without the attack sequence change, Ed could retreat them so that they are at risk of a very favorable surround attack.
Finally, even if the dice are completely favorable for me this turn, Ed will still be able to muster a decent attack on his coming turn. Since I can’t afford much more attrition, I’ll need to see some DB2 results on his attacks. I suppose a costly exchange or two might work. I’m not asking for too much, am I! Of course, that is all moot if I can’t do some damage myself, first. Looking forward to the rolls once again.
[Editor’s note: the 2-1 was an AE, the 1-1 a DE, and the 5-1 a DB]
Joe: A Possible Tipping Point?
The triumphalist euphoria that had animated French headquarters only a few hours ago has unexpectedly turned to gloomy pessimism: L'Armee du Nord has seen one Allied attack after another succeed while its own attacks have misfired repeatedly, and the result of this recent bad luck has been the destruction of an entire French corps with virtually no compensation in terms of PAA casualties. Even more worrying, the initiative, and with it the control of the battle space, has also gradually shifted to the Allied player. Under these circumstances, the temptation for the French commander to overreact can be irresistible; however, while the battlefield advantage may have lately seemed to tip in favor of the PAA, the "Hundred Days Campaign" has not yet foundered, and with meticulous planning and a little good luck, Napoleon could still retrieve his strategic situation, and with it his chance for victory. In order to do that, however, the Emperor must start with a clear-eyed assessment of both the enemy's and his own army's current strengths and weaknesses and then follow up with an appraisal of possible ways in which he might be able to exploit the terrain in the central battle space either now, or on future game turns.
First, army versus army: On the main front, L'Armee du Nord still exceeds the combined PAA force's combat power by 105 factors to 103, and the PAA unit count by twenty-five to twenty-two units. Since the French player is first to act, two Allied 2-4s can be subtracted from both of these totals as – no matter what else happens on the battlefield this coming turn – these two PAA units (along with their four combat factors) will be making the trip to the "dead pile." In view of the preceding, the primary (and immediate) goal of the French commander – at least in my opinion – should be for him to seek (3-1 or better) combats that would (statistically-speaking) be expected to expand his numerical advantage; this means that low-odds attacks should be strictly limited, and when deemed necessary – either because of soak-off requirements or positional considerations – should be restricted to those utilizing a single attacking unit only [one appealing option, should it present itself, would be to attack two enemy units (e.g., to attack two 7-4s with the a single 8-4) as in this specific types of attacks, an Exchange would eliminate all three units] ; not surprisingly, this approach strongly implies that potential soak-off losses should be minimized. Moreover, this also means that regular (3-1 or better) attacks that risk Exchanges should be organized – in so far as it is possible – so that attacking units are exchanged on a one for one, and factor for factor, basis. And finally, in keeping with this tactical approach, the few French cavalry units still remaining, should be carefully husbanded and, except for exceptional circumstances, should never be exposed en massto high odds enemy attacks.
Second, exploiting the battle space: Unfortunately, L'Armee du Nord – because of its rough parity with the local PAA – is currently in no position either to push the Anglo-Allies north across the eastern Samme River or to dispatch cavalry raiders around the Allied Right with the goal of threatening the PAA rear by driving towards the clear terrain along the western "A" and "B" rows. Nor is it in any position – given the approach of the Prussian IVth Corps – to continue to seriously threaten the northern La Lasne for more than one or two more game turns. On the contrary, in lieu of maneuver, the French player finds the majority of his army temporarily mired in a battle of attrition over control of the hex rows immediately south of the Mont. Ste. Jean crossroads at H40. However, if the PAA line can be pushed back to the "H" row or beyond, then, with the Allied front effectively cut in two, the French commander – assuming he still possesses sufficient combat power – may still be able to concentrate enough force against one part or the other of the now-divided Allied line to open a path to Brussels and victory.
The Move
In the Center: When I review the current French move on the central front, I am reminded of an observation made, decades ago, by George Phillies when he was critiquing a STALINGRAD Replay in the pages of The General. I am paraphrasing a little, but basically what he said was this: "Although even good players tend to make this mistake occasionally, it is still never a good idea to avoid making good attacks, in order to make bad ones." I suspect that, because of frustration with his bad luck (both attacking and defending) and more than a little bit of desperation, this French player has broken from his usual tactical style of meticulously planned attacks and has opted, instead, for a more Berserker low-odds approach to the battlefield. Of course, different players will all have their own preferred styles of play, but usually when several high risk low-dds attacks suddenly crop up in the same move by a seasoned competitor, it suggests that this player has decided that the time has come to resort to "Hail Mary" attacks in order salvage a losing situation. And while I think that we all have, at various times, appealed to the "Dice Gods" for help in dire game situations, I do not personally believe that the French player, in this game, is nearly far enough behind that it would warrant his risking some of the attacks he has chosen to make this time around. So, that being said, which specific attacks do I personally have a problem with? The French player executed five combats on his current player turn. The first two were uncontroversial 7-1 AVs versus PAA 2-4s, both of which I would have handled exactly the same. However, the problems – at least in my view – start with a highly risky 2-1 versus the Prussian 7-4 at J41 which used an 8-4, a 4-4 and a 3-6 (fifteen factors). Granted, the French player's reasoning for this combat seems obvious, he wanted to eliminate Pirch II by either a D Elim or an Exchange (1 50% chance), but just as importantly, it also looks like he wanted to seize and hold K40 (even in the event of an Exchange) so as to shore up the flanks of the French units at both L40 and K39: a secondary goal that, in my view, is perfectly reasonable. What was not reasonable, on the other hand, was his willingness to risk three units in a speculative attack that was not particularly advantageous attrition-wise, and although useful, was not especially important in a positional sense. My own preference – especially since I would have had different plans for the Imp. Gd. Foot Arty(the 8-4) – would have been to attack J41 with a single 4-4 (20% chance of DB2, 20% chance of an Exchange), and to have backed it up with a 3-6 and two 2-6s at L39. As things turned out, the actual die roll resulted in the "dreaded" A Elim which sent three French units and fifteen factors straight to the "dead pile." The next questionable French attack was a 1-1 versus a Prussian 8-4 and 6-4 at J38 using a 6-4 and four 2-6s. Needless to say, the possibility of losing five units (including almost half of the Emperor's surviving cavalry) whether by an A Elim (30% chance) or an Exchange (20% chance), all for the 20% possibility of snagging a lucky D Elim, struck me as a bit optimistic. However, in spite of the odds, the French player finally got lucky with this attack and garnered a hitherto elusive D Elim. The final combat, which actually required a die roll, was a (wasteful, to my mind) 5-1 versus the lone Prussian 6-4 at J37 using French stacks of fifteen factors at both K36 and K37. Unfortunately, the result of this high-odds attack, like so many other French combats in the last few game turns, managed to avoid the 70% possibility of a D Elim, and yielded yet another (30% chance) DB2 instead. For my own part, except for pulling the four 2-6s out of the battle line and replacing them with the 8-4, I would not have changed the positions of any of the other units along this section of the front The difference would have come in my choice of attacks: instead of a "big" 1-1 and a 5-1, I would have attacked the Prussian 6-4 at J38 at 3-1, the 8-4 at J38 at 1-1 (using the Imp. Gd. Foot Arty), and the other 6-4 at J37, also at 3-1. To my mind, the advantage of these alternate combats is: a) that a maximum of only two units, and twelve factors would actually be at risk from low-odds A Elim results, instead of the eight units and twenty-nine factors that were placed in jeopardy by the original attacks [In essence: my thinking is that losing the same number of units and eight more factors than the PAA, painful though that might be, would only lose the battle; however losing six more units and twenty-five more factors than the Allies would almost certainly lose the game] ; b) There is no scenario (even one that stipulates only A Elim and Exchange results), in which the French would finish the combat round – when counting the two Allied units AV'd in the final totals – having lost more units than the PAA; and c) a sizeable part – almost 50% – of the surviving French cavalry would, in the case of my alternate choice of combats, be withdrawn from the battle line to the rear, and hence, would not be exposed to a direct PAA attack during the Allied player turn.
In the East: As was the case in the center, I would also approach this sector somewhat differently than did the French commander in the game. And so far as the original French move is concerned, I understand that the French player, by positioning the 5-4 at F30 (where it can only be attacked from two hexes at 5-1, and thus, has a 30% chance of survival), and the 4-6 at H28 (where it is doubled), is attempting to impose the maximum delay on the advancing IVth Corps without resorting to French units that can easily be AV'd. However, my own approach would be to position the 5-4 at H28, Soult (a 2-6) at F30, and move the 4-6 to stack with Jeannin (a 5-4) at I33 to block the La Lasne River ford at H34. Chastel (a 2-6) would remain at K33. Admittedly, my version of the move guarantees the automatic elimination of Soult at F30, but it also maintains a very modest (if temporary) threat against the La Lasne River, while still leaving open the option of either positioning another sacrifice/delay unit in the direct path of the incoming Prussians, or, alternatively, of conducting an orderly French retreat out of harm's way by Berthezene, Jeannin, the 4-6, and Chastel next turn, should such a move be deemed worthwhile.

Ed: Bert’s attacks resulted in both of us losing significant units. But these exchanges are to my benefit as I have more units than he does. I am finally able to unite the Allied defense across the center of the board two hex rows in front of Mt. St. Jean. I launched two favorable attacks, which require two Anglo-Allied units for soak offs. I also put Cav Batts at H46 to protect the back door to Brussels through the G46-F48 forest gap. From there my cavalry can threaten a surround attack against the French left flank.
I’m surprised that Bert gave me two favorable attacks farther east – a 5-4 infantry on the La Lasne River and a 5-4 infantry blocker at F30.
Combat Results: I am having significantly better luck than Bert these last several turns, giving the PAA a big advantage in the game. While nice from a PAA winning standpoint, it is making the end game less interesting. I got three DEs for the cost of two soak off losses. The French are down to 21 units to the PAA count of 25.
Joe: In the Center: The PAA player – at this point in the game – really has only two basic goals when it comes to Allied operations in the center: a) To stall the French drive south of Mont. Ste. Jean until the Prussian IVth Corps can arrive in the battle area; and b) To whittle away at French combat strength (both numerically and factors-wise) so as to steadily degrade both the French commander's combat power, and his capacity to project strategic threats through maneuver. On the whole, the Allied player's move pursues both of these goals effectively. He attacks a couple of exposed French cavalry units at high odds (so as to avoid exchanges, rolling a DB2 against the 3-6, and a D Elim against the 2-6) and retreats his Right north behind the eastern Samme River. The only "nit" I have with this move is the decision to position a single 5-4 at I42. Given the French player's demonstrated affinity for "high risk/high reward" low-odds attacks, I personally would have either moved Cav. Batts. (a 4-6) to reinforce Stedmann at I42, or, alternatively, positioned the 5-4 at H43 where it would still be 3-1 proof, but where a successful French attack (say a 2-1, or a 1-1 using two 5-4s and a 2-6) would not allow a post-combat advance into I42 surrounding Picton at J41.
In the East: The French player's decision to expose both Jeannin (at J34) and Berthezene (at F30) to high-odds attacks (a 4-1 and 5-1 respectively) is a gift that the PAA commander is quick to accept. And, staying true to form, both PAA combats yield the usual D Elims. That said, the position of Jeannin is particularly unfortunate, as its position (at J34) as a block on the forest trail is pretty much pointless, especially since it is highly doubtful that the Allied player would advance any of his Prussian units along that track to attack the French Right, when those units could, in turn, easily be surrounded. [This, by the way, is why I personally preferred stacking Jeannin and the 4-6 at I33: besides pinning a few Prussian defenders west of the La Lasne for another turn, they would both be doubled, and any attempt by the PAA player to launch a "trapping attack" with the objective, for instance, of retreating a lone 4-6 into J32, followed by an advance, would be impossible.]
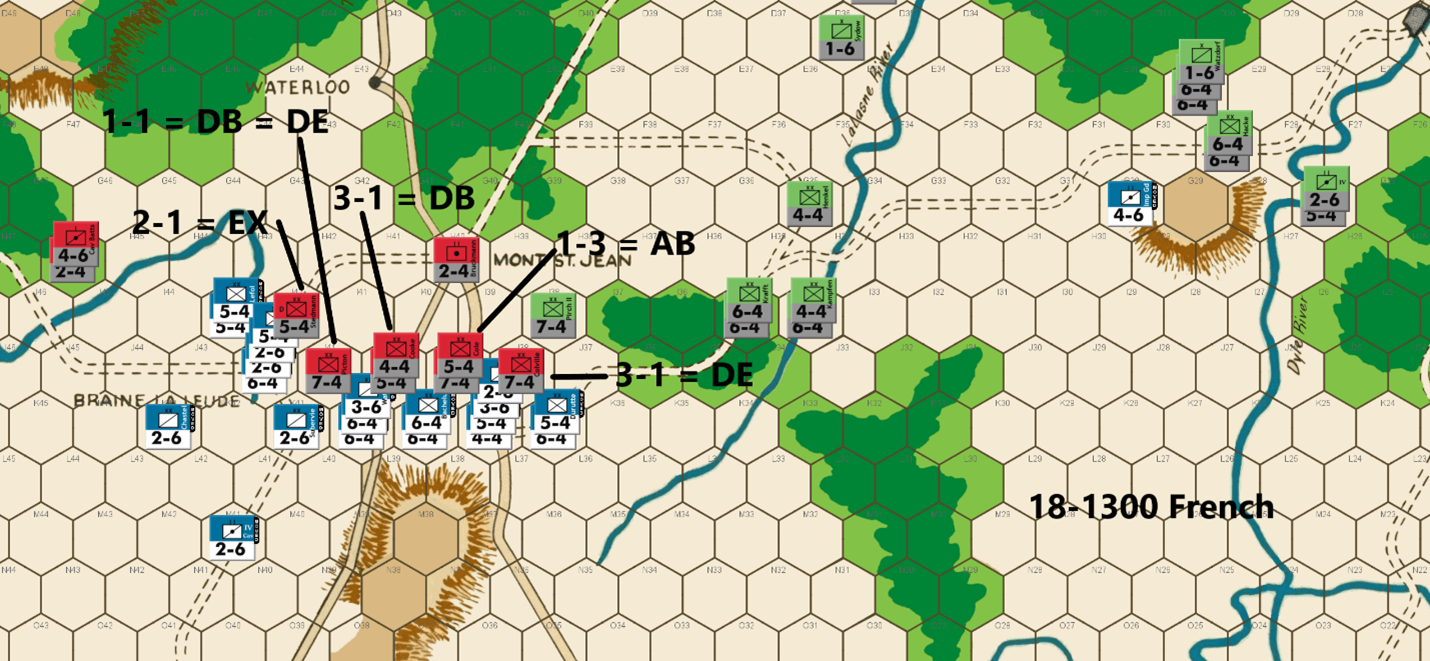
Bert:Oh well, we came close to doing what needed to be done last turn. As nice as the D Elim was on the 1-1 attack for the French, my forces were dealt a costly A Elim on the 2-1 attack. Those results are a fair outcome with something for both sides, but I needed better than a fair outcome, especially with another frustrating DB2 result on the 5-1 attack. Dealing with three more D Elim results on Ed’s attacks, my French forces are hanging on by the slimmest of threads. I like to battle on when there is a chance, and so I’ll keep pushing on.
My slim chance for success is predicated on continuing to cause as much attrition as I can to the PAA forces while trying to push forward to Mont St Jean before the arrival of the IV Corps. If I can pull this off, I will focus what is left of my army to mainly drive up the western road through Waterloo and then hopefully to Brussels.
If I can keep some semblance of an army left, I will have ten more attacks following this turn. At the end of this move, my units will be roughly 10 rows of hexes away from reaching the A row, but since there is little chance for the PAA to maneuver on the A row on that last turn, I am realistically 9 rows away. Further, my attacks this turn “could” eliminate up to five Anglo-Allied units, but let’s say that only three get eliminated. That will leave Ed with a precarious number of units left to block the western roads for the remaining turns and will make counterattacks along that road difficult. If he has to chance losing a unit on an exchange or soak-off, it will leave him likely short of units to hold that line. If he can’t, I might be able to exit enough of what is left of my rag tag forces to cause eliminations of the remaining units on the eastern side of the Forest De Soignes wood line.
Should I somehow push forward and reach the exit hex, I’m guessing I’ll need to have roughly 30 factors left to exit the board in order to eliminate the Prussian side of the defense. That will be ambitious and tight, especially with Ed almost certain to not just sit back, but to launch counterattacks with those Prussians. Hey, I didn’t claim that it was fool-proof or even a good plan!
Of course, it won’t be easy, and I could certainly be missing something, but I feel it is enough of a chance that I will play on a turn at a time until all reasonable hope is lost. My attacks could result in that happening followed by my resignation this turn, especially if I get another A Elim on the 2-1 attack or if my larger attacks are another series of D Back 2 results. I’ll try to be optimistic, until it’s actually over. It all starts from here forward with this turn.
In the east, I’ve determined that sacrificing my Imperial Guard unit to block the IV Corps is much more valuable usage of that unit rather than trying to run away to get back into the fight with the other French units. One full turn of preventing the IV Corps from reaching Mont. St. Jean is definitely worth it.
On the main battle front, I’m taking 3-1 attacks versus a 7-4 unit and a stack of two units totaling 9 factors. I can survive an exchange on at least one of these attacks so hopefully, I can get a D Elim and an Exchange result to maximize the PAA attrition. I’m taking a 2-1 attack, that really needs to displace (eliminate or retreat) the defender at I42. Again, an exchange is acceptable even though it is damaging. Any displacement of the defender will allow me to advance after combat and surround Picton at J41.
I’ll have a 1-1 versus Picton, which hopefully will be a surround attack if I get to advance on that previous attack. No matter the outcome of the 1-1 attack, Picton would be trapped, if not eliminated, following that 1-1 attack, provided I get the displacement on the 2-1. That would force an unfavorable counterattack to risk saving Picton and Ed would have to consider risking the loss of additional PAA pieces in order to save that unit on his turn.
Finally, I needed one soak off attack to allow all of the above to come together. I decided to risk my 4-factor infantry unit to make a 1-3 attack rather than a 2-factor unit to make a 1-6 attack. I did this intentionally because trying to have a better chance to keep my piece alive seems like a better risk than the almost certain elimination of my piece if I take the lower odds attack.
Let’s see a string of favorable rolls on this turn to keep this game interesting!
[Editor’s note: the 2-1 was an EX, the 1-1 a DE, the 3-1 a DB, and the 1-3 soak off an AB]
Joe: In the Center: The battlefield opportunity that the French commander has been waiting for all day has finally arrived! The PAA player – in order to hold the French army south of Mont. Ste. Jean – has been compelled to deploy a substantial number of his best units in a four hex battle line (in clear terrain) that can be attacked head-on from five hexes. This is a situation that the Emperor is justifiably eager to exploit to the greatest extent possible. [Moreover, these are precisely the battlefield situations that play to the French Army's unique strengths: a) a nicely balanced inventory of different unit sizes and types which, in turn, lead to b) a much more efficient organizational regime that allows French units to combine into fifteen factor stacks much more easily (and frequently) than can the component units of either the Anglo-Allied or Prussian Armies.] In view of all this, it is probably not surprising that the French player – confronted with a veritable a cornucopia of exposed Allied targets – falls prey to temptation and overconfidence and, instead of settling for inflicting a damaging and relatively risk-free defeat on the PAA force to his front, decides to go "all-in" in pursuit of a decisive "knockout" blow. Unfortunately for the Emperor, such a goal – as subsequent events will show – is probably out of reach of the French player, at least for the time being, due to the relatively evenly-matched current force levels of the two opposing armies. In any case, out of reach or not, the French commander eschews caution in favor of audacity, and mounts five attacks – two of which are very speculative – against the Anglo-Allied battle line in a quest for PAA casualties; to whit: a 3-1 versus Colville (D Elim); a 1-3 against the units in J39 (AB2); a 3-1 versus the two units in J40 (DB2); a 2-1 against a doubled Stedmann at I42 (Exchange, adv: Alix); and a 1-1 (now surrounded) against Picton at J41 (DB2 = D Elim; adv: Teste). While certainly not perfect (the doubled Exchange and the 3-1 DB2 were disappointing, I'm sure, to the French commander), these results are, nonetheless, a net plus for the commander of L'Armee du Nord, as the Allies end the combat phase having lost nineteen factors (and three units) to ten factors (and two units) for the French. And so, considering these generally advantageous combat outcomes, why am I still critical of certain key elements of the French move? The main reason, quite simply, is that, because I evaluate moves on a risk/reward and not an outcomes basis, I consider a couple of these French attacks to be far riskier than either the game situation or their potential combat benefits can presently justify. Consider the following: the two speculative French attacks that I find especially questionable: a 2-1 risking twenty factors and five units; and a 1-1 risking seven factors, and two units, when considered together could, with good luck, potentially eliminate twelve Anglo-Allied factors, and two units; on the other hand, two unlucky A Elim die rolls would permanently remove, from the French "Order of Battle," twenty-seven factors, and seven units. In addition, because of his post-combat advance across the Samme, Alix (a 5-4) is now vulnerable to a surrounded counterattack. Admittedly, had the "big" French 3-1 versus Cooke (a 4-4) and Chasse (a 5-4) succeeded in eliminating both units (a 70% chance), then the PAA player would have found his position south of Mont. Ste.- Jean severely compromised going into his own player turn; on the other hand, that would also have required (along with Stedmann) that Colville (a 7-4) be eliminated, as well (another 70% chance). Since the probability of the 2-1, and both 3-1s all succeeding in eliminating their enemy target units (the 1-1 versus Picton is irrelevant for this calculation) is only about 34%, I personally consider the two French low-odds attacks (however creative and potentially rewarding they might have been) to be just a little too risky – given the 66% chance of at least one of these three key attacks failing – to gamble on at this point in the game, especially since the French player will now be fighting on ground that is favorable to him, and increasingly hazardous to his opponent. Of course, since I have gone out of my way to criticize the kind of clever and audacious French play that conceivably might have won this game at a single stroke, it is probably reasonable to ask: what French move would I have made instead? The short answer – in keeping with my personal "Coat of Arms" which features two crossed white chicken feathers on a field of bilious yellow, with the motto: Sauve Qui Peut!(rough translation: Every man for himself!) – is that my own far more conservative (read: timid) version of this turn's move seeks to maximize the French advantage in efficient stacking, while minimizing both combat and soak-off losses. That said – and having gone to the trouble of actually executing this alternative move just to make sure that it was legal – I would have begun by attending to the flank protection for the French left, then I would have organized four stacks of fifteen factors, and one stack of fourteen, and with those units I would have made the following attacks: a 4-1 versus Picton (a 7-4); a 1-2 (using a 2-6) versus Cooke (a 4-4); a 1-5 (using a 2-6) versus Chasse (a 5-4) and Cole (another 5-4); a 3-1 versus Clinton (a 7-4); and a 3-1 versus Colville (a 7-4). Admittedly, while the current French player's move – with better luck – could well have fatally crippled the Anglo-Allied Army, my own move, as likely as not, would probably have only caused the PAA commander a bit of inconvenience. On the other hand, even if all of my attacks had misfired, the French battlefield situation would not have ended up being much worse than it was at the beginning of the turn.
In the East: The curtain, at least for the time being, is finally getting ready to ring down on French operations in this sector, as the troopers of the Imp. Gd. Hrs. Arty (a 4-6) prepare to "give the last full measure of their devotion" in their suicidal mission to slow the Prussian IVth Corps for one last game turn. I confess that I have mixed feelings about a French strategy that employs major French units as sacrifice/delay units on this, or any other front. On the other hand, while the loss of Jeannin, Berhezene and the Imp. Gd. Hrs. Arty has been a heavy price to pay just to gain a few extra game turns of freedom from battlefield interference, on the central front, by the Prussian IVth Corps, I will withhold judgement until I see how all this plays out in the end.
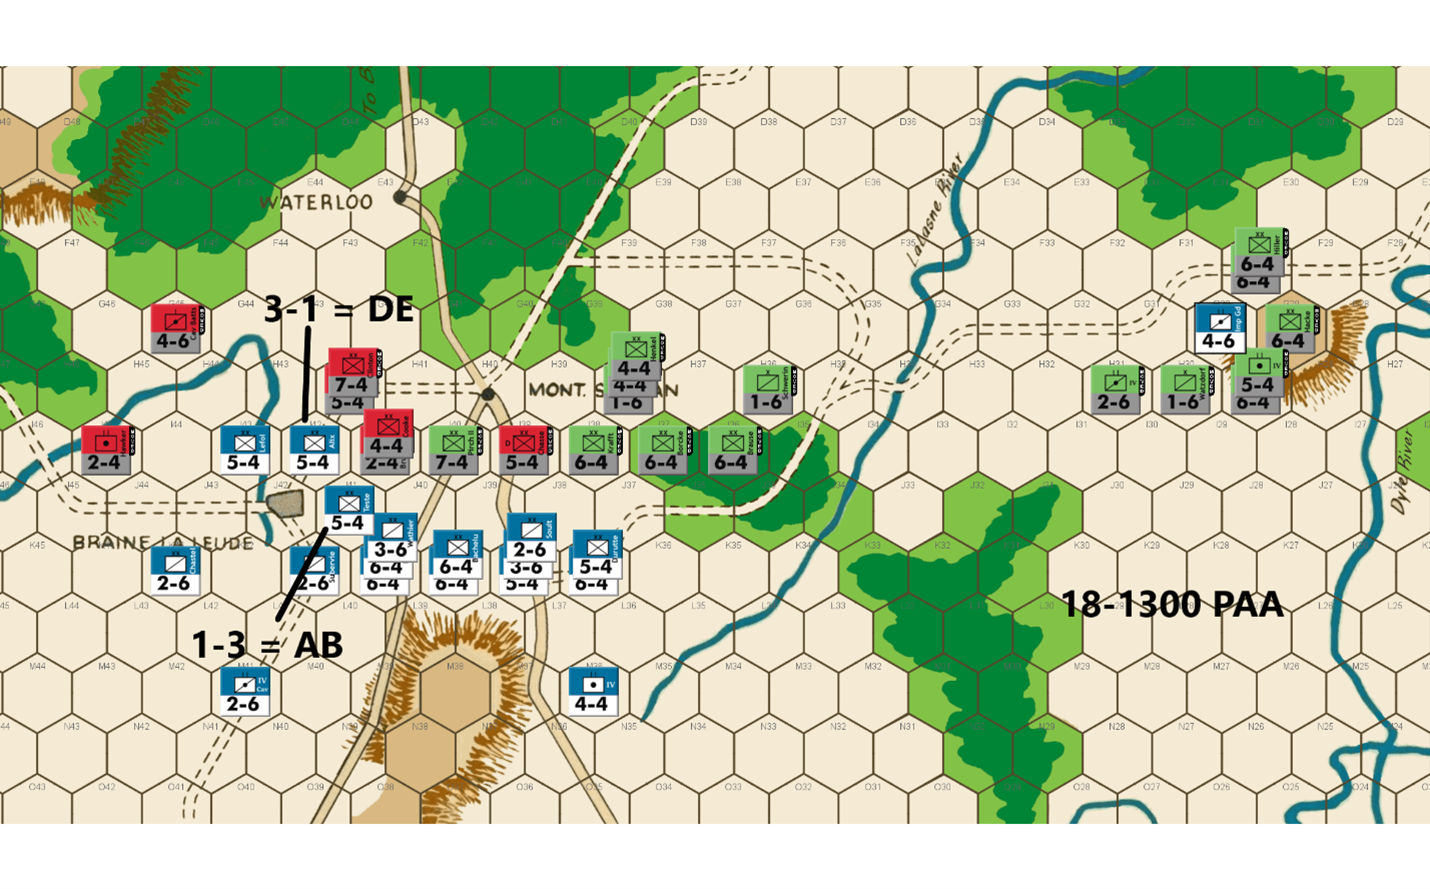
Ed:Bert did considerable damage to the Anglo-Allied forces, sending two 7-4s and a 5-4 to the dead pile. But the French suffered an exchange against a doubled position costing them three units, leaving me with a four-unit advantage in total forces. Maybe Bert felt that he was down enough in the game, and he needed to get lucky. I expected a high odds attack vs the 7-4 at J41 and advancing a unit into the vacated hex. It would require a soak off against the doubled 5-4. But that way the advancing unit would have a retreat route if attacked.
However, seven of my units are stuck in the east due to Bert’s delaying tactics. The two horse units can get into action at the center of the board in two turns. It will be three turns before that infantry can get into the battle. At the moment he has three more units at the battle front than I do.
But I believe I have an advantage in the game. I do not believe Bert will be able to eliminate all my forces with attacks. His only chance as I see it is to exit the board to Brussels, allowing him to eliminate two PAA factors for every French factor that exits. The impending arrival of the Prussian Fourth Corps likely rules out the secondary road in the east. That leaves the Primary Road, which has two options. One is through Waterloo. The second is via the back door through the forest gap at G46, F47, and E48 and on to the road to A45. He very well may try both.
I take the 3-1 surround attack against the adventurous French 5-4 infantry that has his back to the river guaranteeing his demise and holding ground. The Imp Gd FA will also die in an AV attack. That will leave the French with 16 units and 68 combat factors to my 22 units and 96 combat factors.
I move Prussians toward Mt. St. Jean where they can help defend the Primary Road and assist in blocking the exit path. I also avoid stacking units together, where possible, so as not to offer tempting targets on one hex for low odds attacks.
My 3-1 attack is a perfect outcome for me as I get the DE on the 5-4 and my 1-3 soak off survives.
Joe:In the Center: The Allied player, having just narrowly avoided catastrophe thanks to a single unfavorable French die roll, responds pretty much as expected: when it is this turn to act, he counterattacks Alix at 3-1 surrounded (D Elim), and soaks-off against Teste (AB2). Naturally, his good luck continues, as he avoids an Exchange in the 3-1 against Alix, and the A Elim in the 1-3 against Teste. On the downside, the PAA forces in the center have just about run out of room when it comes to shielding the critically-important crossroads at H40; and to add to the PAA player's woes, Anglo-Allied soak-off units are also about to run out. In view of all that, the PAA commander abandons his central front tactic of screening sections of his battle line, and, instead, arrays his units in a linear shoulder-to-shoulder formation, doubtless in hopes both of limiting the number of future French attacks, and of picking-off a few French soak-off units, as well.
In the East: The Prussians at last finish mopping up the last French remnants in this sector with a 7-1 surrounded AV versus the gallant Imp. Gd. Hrs. Arty. This attack finally clears the way for the IVth Corps to resume its march towards the distant "sound of the guns" at Mont. Ste.-Jean. However, precious time has been lost, and while the several cavalry units still accompanying the main force will now show up at Mont. Ste.-Jean by the 1700 game turn, the infantry component of the corps will not arrive at the central battle space until the 18 Jun 1900 game turn, at the earliest.
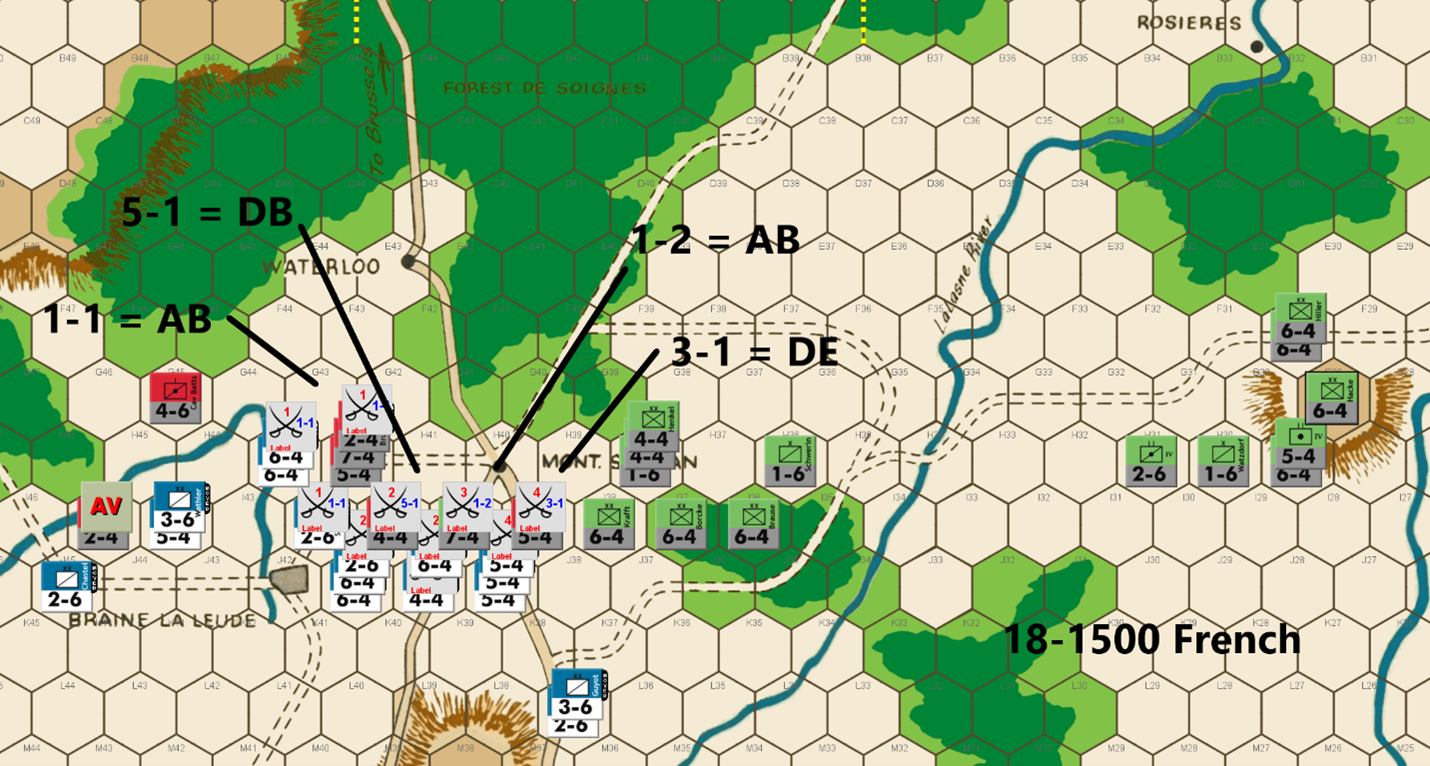
Bert: I'm happy as I’m getting to play on for at least another turn and perhaps longer. My attacks went well last turn, and I have no complaints, just a wish. Of course, I wish that I could have traded the DB2 on the attack versus J40 with the exchange on the attack versus I42 as this would have eliminated one more PAA defender and cost the French one less attack factor.
I want to point out a subtle move that I made with my attacks last turn that made Ed’s move a tiny bit more challenging. I planned for my attacks versus J40 and I42 to have retreat results move those defenders to hex I41. The idea behind this is to take advantage of the rule that a unit that starts in the ZOC of an enemy unit can’t exit that units ZOC and move into a different hex that is in that same units ZOC. My plan was that if I displaced the defender in hex I42, which I did, I would be advancing into hex I42. I wanted to make sure that the units that were retreated to hex I41, couldn’t reposition themselves to a more favorable hex to counterattack from, such as a hex on the H row. If they are to be used in a counterattack against any piece on my western flank, it would have to be from hex I41. This forces the PAA commander to leave units that I can get favorable (at least 3-1) odds against on my next move to be attacked from at least two hexes. If I had just retreated the J40 defenders to say hex I39 or H40, they would have had much more flexibility about where they would be placed on the PAA’s 1300 turn. Ed’s response was pretty much what I expected, especially with the juicy target on hex I42, that could be surrounded. Despite my best chanting for a die roll that would exchange some valuable PAA piece, it was another D Elim result – he didn’t even need the DB2. Alas, his soak off unit escaped as well.
After doing some calculating, I consider three versions of attacks this move. The first was to line up my troops on the J row and attack his pieces on the west side of the I row and hope that I could roll D Elim results on my 3-1+ attacks with an Exchange on a 1-2. The calculus was that while this would have more than likely conserved my army to fight on for awhile longer, I just don’t have enough army left to try that conservative approach.
Next, I put together a combination of taking three 3-1 attacks, two of which would have been surrounded if all went according to plan. There was also a 1-2 attack vs Pirch II, hoping for an exchange result. The key was going to be a potentially decisive 2-1 attack versus hex H42, since I could advance after combat into that hex, which would put more pressure on the PAA position.
After pondering the various combinations of the results, I concluded that an exchange or a DB2 on the 2-1 was not going to be enough to turn the tide. Further, if I somehow got the needed D Elim on that attack, it could very well be offset by lousy results (exchanges) on the 3-1 attacks, which would have offset most of the good from a D Elim on that 2-1. In the end, I determined that a 1-1 versus H42, with the same two possible D Elim outcomes that a 2-1 offers up could be combined by turning two of my 3-1 attacks into 5-1 attacks. I also would have an extra unit to cover my eastern flank slightly more efficiently.
Bottom line, if you are counting on a lucky roll to salvage a position, you need to do a couple of things if at all possible. First, try for an outcome that maximizes the damage that your lucky roll causes should you actually get it. One of the reasons I chose to retreat Bruckmann to H42 after the last combat was that I was pretty sure I would be attacking H42 at low odds on my turn. My thought was why not kill an extra piece and two more factors if I can hit a lucky roll! Next, try to maximize the effectiveness of any other attacks you are making on the turn that you’re trying for that lucky roll. As I noted above, what good would a D Elim result be for me versus H42, if I end up getting exchange results on two or three other attacks this turn? I think that would still have left me in a losing position.
Anyway, my logic and plan could be all wrong, but the point of this exercise is to let you follow along with my thinking and then decide what works best for your play. Of course, the various favorable outcomes are moot unless I actually can hit the lucky roll this turn!
Joe: The French player, it would appear, has set his heart on turning the Allied Right, no matter what it costs, and, unless he starts getting a lot luckier than he has been up to now, it could cost plenty. To be fair, I understand his desire to complete the destruction of the Anglo-Allied Army and, by so doing, to open up a path to Waterloo (E43) and the Brussels Road, before the Prussians can decisively intervene. Regrettably, this ongoing fight around Braine la Leude has already consumed three French infantry divisions and shows no sign, as yet, that the Allied commander is ready to "throw in the towel." On the other hand, abandoning J38 in order to free up units for the "big" 1-1 against the Allied stack at H42 – while this does temporarily take the Prussians out of the fight for the center, at least for a turn – also opens up the French Right to the possibility of a follow-on Prussian attack against J39 from J38, I39 and I40. Moreover, since I have already noted my skepticism regarding risky French low-odds attacks in my previous comments, I will not belabor the issue again now; however, I will suggest that, because the total French force now numbers only sixty-eight factors, and sixteen units, as opposed to a local PAA contingent of sixty-four factors, and fifteen units (with substantially more on the way), it might be prudent for the French player to avoid combat situations that – either before or after battle resolution – leave any of his units without a retreat route. For example, during this round of combats, the French player stipulated five attacks, in the following order: a 5-1 surrounded AV versus I45, a 1-1 versus H42 (AB2), a 5-1 versus I41 (DB2), a 1-2 versus I40 (AB2), and a 3-1 versus I39 (D Elim). In the case of the 1-1 cross-river/open terrain attack against H42, two 6-4s attacked from H43 (a river hex), while a 2-6 attacked from I42 (a clear terrain hex) which negated the river bonus for the units at H42. Unfortunately, there was a small problem – ignoring its perilous odds – with this attack as it had been organized by the French commander; to whit: the 2-6 attacking from I42 had no retreat route until the Allied 4-4 in I41 had either been retreated or eliminated. And since there is only a 30% chance that the French cross-river attack would produce an advance after combat (on a D Elim or DB2 result only), and a 30% chance that the 5-1 versus the 4-4 in I41 would yield a DB2, instead of a D Elim, this meant that together, these two results only represented a 9% chance of actually producing a DB2=D Elim (surrounded) combat outcome for the 4-4, while the chance of an AB2 retreating the 2-6 was 20%. That being the case, I believe that whatever one might think of the wisdom of the French attacks themselves, the order of their combat resolution – unlike that in the actual game – should have stipulated the 5-1 attack versus the 4-4 before the 1-1 versus H42. Finally, as I noted above, I think that abandoning J38 was a nontrivial positional mistake. And so, out of curiosity, I decided to deconstruct the original move and then reorganize the French dispositions so as to be able to retain French control of the "J" row from J38 to J42. Once I had finished, and all the various positional changes had been made, I discovered that the L'Armee du Nord had enough units and combat power remaining to be able to AV the 2-4 at I45, and also make the following additional attacks: a 5-1 versus the 4-4 (at I41), a 1-2 versus the 7-4 (in I40), a 5-1 versus the 5-4 (at I39) and a 1-2 versus the 6-4 (in I38). In addition, the French Army still ended up with a left-over 5-4 which could be placed at K36, so as to block the forest track on the French Right.

Ed: It is critical to hold the I Row to avoid having my forces split. The Anglo-Allies have been whittled down such that my attacks with them are very limited. I want to protect the back door route to Brussels which takes up Cav Batts and a 4-4. But I can muster a 6-1 on a cavalry unit.
The Prussians mount an attack on a 5-4 at 5-1 to avoid an exchange result. I need to preserve as many units as I can. Both attacks are DE, which certainly helps. I protect my flank with a pair of 4-4s. It provides a six-hex long line of PAA forces which is more than the French will be able to attack. I’m hoping for some attack opportunities next turn against however Bert deploys.
Meanwhile, the Prussian Fourth Corps infantry continues its slow slog toward the front.
Joe: In the Center: The Anglo-Allied contingent, having finally been reduced by constant combat to five total units, manages to scrape up enough combat power for one last attack against the western end of the French battle line south of Mont. Ste.-Jean. After this combat, which essentially trades Bruckmann, the last Anglo-Allied 2-4, for the IV Cav. Hrs. Arty., Wellington's surviving units, of necessity, will have to be relegated to a mainly defensive role – except, of course, for low-odds desperation attacks – for the remainder of the campaign. From here on out, Blucher's Prussians will be the main obstacle standing in the way of the French drive towards Brussels. And in keeping with that mission, the Prussians move to support the Anglo-Allied spoiling attack against the French Left, with a more ambitious attack against the eastern end of the French line; however, this 5-1 attack unexpectedly misfires and, although a Prussian 1-6 cavalry brigade is eliminated as a soak-off, the targeted French unit, a 5-4, is retreated unharmed.
In the East: The remaining cavalry from the Prussian IVth Corps will enter the Mont. Ste.-Jean battle area next turn, while the infantry will appear at the front on the turn after. Fortunately for Wellington and Blucher, the arrival of these Prussian reinforcements will come just in time to shore up the central front. The PAA forces, when finally concentrated, will outnumber L'Armee du Nord; however, in terms of numbers of units – when the few surviving Anglo-Allied units are excluded – the Prussian and French Armies will essentially be evenly-matched.
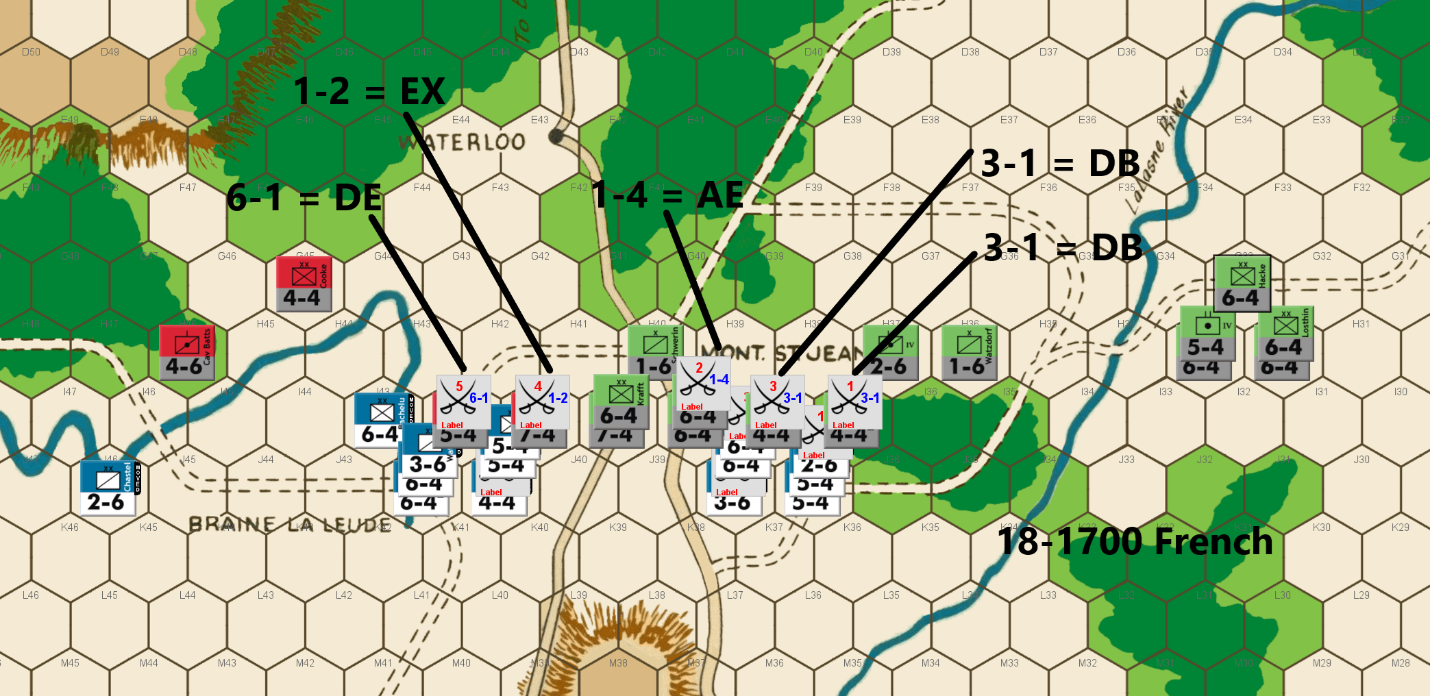
Bert: This continues to be an interesting match from my perspective. My attacks failed to accomplish my grand goals last turn, but they avoided a disastrous result as well. Those of you with an eagle eye on that turn might notice that I made the 1-1 attack versus H42 prior to the 5-1 attack versus Cooke. I knew that I would lose my cavalry piece (2-6) on an AB2 result by making the 1-1 attack first. I prioritized that eliminated Cooke was more important than that piece. IF I had succeeded in advancing after combat on the 1-1 attack, Cooke would have been surrounded on the 5-1 attack. Of course, the result ended up being an AB2 on the 1-1 and a DB2 on the 5-1… ugh. To make matters worse, had I switched the order to prioritize saving my piece on the potential AB2, the numbers rolled would have been D Elim on the 5-1 and D Elim on the 1-1 attack! Alas, it was not to be.
On Ed’s turn, he obliged me with what I was trying to accomplish by losing two pieces an attacker AV results. The dice were in my favor on his 5-1 attack, as we saw a rare DB2 result by the very effective PAA army. The remaining piece count for the PAA army is rather critical and fundamental to my strategy from pretty much turn 1 of this game.
At this point, there are 9 possible turns left in our game and the PAA army has 18 pieces left following his move which concluded the 18-1500 turn. My simple math indicates that I must somehow kill two of his pieces per turn in order to eliminate all his pieces. If he tries to run a piece away, I will hopefully be able to exit something off the board that would eliminate any wayward piece. Killing two pieces per move will not be an easy task, especially with my dwindling army. I think that there is a chance to do so without needing to resort to desperate low odds attacks for now. I am going to try and kill as many of his pieces as I can, but I will need some favorable die rolls and so the odds are still stacked against me.
Obviously, I can kill his pieces by attacking. There is another factor with which Ed might assist me in eliminating PAA units. If he continues to make attacks against me, there will hopefully be the risk of exchanges or A Elim results on any soak off attacks. I think if I was playing the PAA side, I would stop attacking and just play a complete defensive position to try and offer up only 2 units per turn to be attacked and make the French side pay the price of any DB2 or exchange results.
My previous goal of reaching Mont. St. Jean before the arrival of the IV Corps will fail, but with the unit count as I outlined, that is not as critical as it was. At this point, Ed could lose one hex row per turn for the remaining turns and that would prevent me from exiting the board. That is of course, if he can keep me from killing more than two units per turn.
Fortunately, he has exposed enough units that I have “a chance” to eliminate four more PAA pieces on this turn. Two 3-1 attacks, a 6-1 attack and a 20% chance of an exchange on my 1-2 attack. I have little leeway to absorb many exchanges or losses on my soak off attacks. If Ed does continue to attack, I’ll need him to minimize the killing of my units, unless they cost him more pieces. I’m probably asking for too much, but the game is not lost yet, so I’ll continue to play on.
Joe: L'Armee du Nord, in spite of its soldiers' yeoman efforts, finds itself stalled, during the last few game turns, in a grinding attrition battle with the PAA over possession of the "I" hex row. Both commanders know that this ground is critically important and thus, it is not surprising that the Allies are determined to hold it, and that the French are just as determined to take it. The stakes of this fight couldn't be higher: until Napoleon's army can drive the Allied battle line back, the PAA front will remain linear and unbroken, offering adequate freedom of maneuver and therefore, also preserving the capacity for the Allies to effectively counterattack the advancing French. Once the Allies are forced to retreat, however, their front will be split and the French will be able to mass against one half of the PAA force, or the other. On the other hand, while this battle is a "do or die" contest for the PAA, the French have problems other than this frustrating stalemate just south of Mont. Ste.-Jean; which is to say: in addition to the Emperor's growing concerns about both his army's mounting casualties, and a "campaign clock" that is now ticking against him, there is the new worry that the Prussian IVth Corps is fast approaching and will soon reach the central battle area. Hence, the Emperor's growing frustration: for although the the Mont. Ste.-Jean crossroads hex (H40) is tantalizingly just out of reach; the French battle line is still no closer to it now, than it was two turns ago. Needless-to-say, the French player has no choice but to renew his attack; however, with only sixty-four combat factors, and fourteen units remaining of the once powerful L'Armee du Nord, he decides that it is time to "cut his cloak to fit his cloth" and, at least for this one turn, largely eschews low-odds gambles in favor of 3-1 and better attacks. This is an interesting change of pace for this French commander, and on the whole, in spite of the potential for uneven exchange losses, I actually like the odds and targets chosen for this round's series of attacks; to whit: a 6-1 versus Cole (a 5-4), a 1-2 (soak-off) versus Clinton (a 7-4), a 1-4 (soak-off) versus Brause & Borcke (two 6-4s), a 3-1 versus Henkel (a 4-4), and another 3-1 versus Kampfen (a 4-4). Regrettably, while the French attacks start out promisingly enough against the Anglo-Allies: a D Elim on the 6-1 versus the 5-4, and an Exchange on the 1-2 versus the 7-4; they totally misfire against the Prussians: the 1-4 (soak-off) yields an A Elim, and both 3-1 attacks whiff with DB2s. Certainly, this is not a disastrous set of outcomes (twelve factors eliminated at a cost of seven) for the Emperor, but the elimination of both soak-offs also means that the French player has not been able to improve his numerical position vis-a-vis the PAA. [A quick note: although the French player's decision to target the two 4-4s with 3-1s, rather than opting for a single high odds attack against the 7-4 or one of the 6-4s may seem a little puzzling to some players, it actually makes perfect sense, from a tactical (stacking) standpoint. This is because, the one organizational disadvantage that is shared by both the Anglo-Allies and the Prussians is the challenge they both face in achieving efficient (15 factor) stacking when on the attack; and, in the case of Blucher's army, the often underappreciated (three) 4-4s and (two) 5-4s help mitigate this problem by offering much-needed tactical flexibility, especially when the Prussians are forced to trade blows with the French – as is the case in this game – in a protracted "toe-to-toe" slugging match.]
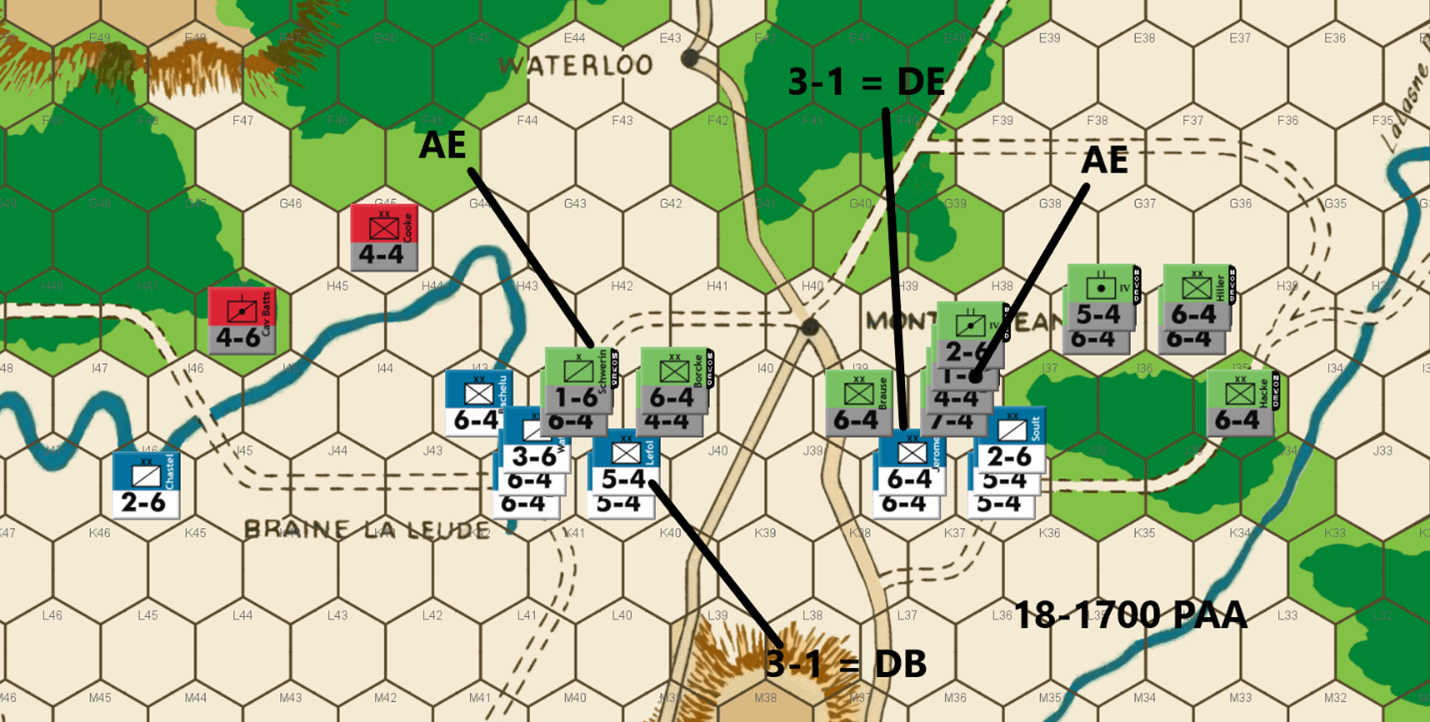
Ed: Drat! My lone remaining Anglo-Allied 5-4 and 7-4 units were eliminated in French attacks. My two remaining A-A units are now reduced to defensive rolls – at least for now.
I have enough remining Prussians to attack and hold the vital I Row. I get one DE and one DB. I only have one remaining “light” for soak off duty but at least all of the Prussian infantries will now be able to get into the fight. My two remaining A-A units continue to protect my left flank.
The French have eleven units to my fourteen after my attacks. This is a nice advantage for the PAA as any exchanges are favorable to me.
Joe: Given the forces available, and the absolute necessity for the PAA to hold the "I" hex row, the Allied move pretty much makes itself. Granted, the powerful Prussian IVth Corps infantry will belatedly show up in the central battle space next turn, but for now, the Allied player must make do with the units immediately on hand. This he does, in fine form, by attacking both ends of the French line with four separate combats: a 3-1 versus Lefol (DB2), accompanied by an automatic A Elim soak-off (using a 1-6); and a 3-1 versus Jerome (D Elim) also accompanied by an auto A Elim (with another 1-6). Needless-to-say, these combat results could have been better, but they could also have been worse: the elimination of Jerome (a 6-4) at least partially avenges the loss of Cole and Clinton, but the sacrifice of the last two PAA 1-6s really means that, for all intents and purposes, this battle has ended in a "draw." More to the point, although these attacks have succeeded in reducing total enemy combat factors by about 10%, they have not managed to decisively cripple French combat power, so a bloody enemy rebuke is a real possibility, once the French commander mounts his inevitable riposte.

Bert: A couple more DB2 results on my attacks combined with the PAA commander eliminating another French unit on a D Elim instead of an exchange has put me in a position with just a tiny bit of leeway left. As a result, I have to go to a desperate mode to take a shot to try and turn this around.
Often, one side or the other often reaches this stage in Waterloo. Players will line up multiple desperate attacks and hope for the best. In my opinion, that approach minimizes their chance of success. It is much more likely if they can muster one key attack that can potentially turn the tide rather than count on winning multiple low odds attacks.
While every situation can be different, imagine in this situation, if I were to do multiple 1-1 attacks instead of just one. Let’s say I get a D Elim on one and an A Elim on the other. A single A Elim would almost certainly put a nail in my coffin no matter which attack yielded that result. If I limit the desperation attack to only one, I have much better chance to only count on success from just that one attack.
One more piece of advice that I’ve followed here, when you go for a desperation attack, figure out which target will give you maximum bang for your buck should you end up hitting the lucky outcome. If the game is lost anyway on an adverse result, you haven’t risked anything. If you don’t maximize value, you’ll almost certainly be making other desperation attacks to turn your position around.
Anyway, following the above guidance myself, I looked over the position at the start of my move and determined that my maximum bang for my back would be to put 15 factors in J38 and attack three defenders (2 in I38 and 1 in I39) at 1-1 odds. I could then attack the other I38 defender at 3-1 odds along with an additional attack to the west. Unfortunately, my units were just out of position to accomplish that counter mix. I settled for my next best option which is to attack the entire stack at I38 as my Hail Mary. Obviously, I’m dreaming of a D Elim result, but an AB2 would at least likely give me another shot for a desperation attack next turn, albeit that would likely be after my forces are reduced even more.
Ideally, I’ll eliminate the defenders on the other two attacks with some combination of a D Elim and an Exchange.
The results came in… and wow, I got lucky! A D Elim result on the 1-1 attack and no DB2’s on the other attacks was not a perfect result, but I’ll take that as it completely changes the complexion of our game. I even got a lucky AB2 on my 1-6 soak off. It’ll be interesting to see how Ed responds. If I were him, I would probably just conserve what’s left of the PAA army and force the French to keep attacking and get D Elim results. I wouldn’t want to do the French any favors by eliminating any of the remaining pieces on counterattacks. I'll be happy if he keeps attacking me as that could help me whittle down his remaining units.
Joe: L'Armee du Nord has finally reached a "do or die" inflection point: its total combat strength now stands at fifty-one factors, distributed among eleven units, and it faces a PAA force that, when surviving Anglo-Allied and Prussian units are counted together, total seventy-two factors and fourteen units. Even if the two marginally useful Anglo-Allied "4s" are subtracted from this combined total, that still leaves a Prussian contingent of sixty-four factors and twelve units. As if that weren't bad enough, just by itself, the actual offensive options available to the French commander are also severely limited because a significant part of his available force – twenty-eight factors and six units – is currently deployed so far to the west that virtually none of these units would be able to move east along the front far enough to take up new positions in hexes I37 and/or I38. In addition, once the French Army loses even a couple more units, then maintaining a cohesive line and protecting its Left Flank will become increasingly difficult because of the presence of the Anglo-Allied Cav. Batts. (a 4-6) and a likely shortage (because of soak-off losses) of French cavalry. In view of these considerations, the French player organizes his attacks – except for the assault versus I38 – about the only way that he can: a 1-6 soak-off (AB2!) versus Kraft & Borcke (two 6-4s); a 4-1 (Exchange) against Henkel (a 4-4); a 3-1 (Exchange) against Brause; and, last but not least, a "big" 1-1 (D Elim!) versus the three Prussian units at I38. In all honesty, the only one of these attacks that could reasonably have been organized differently would have been the attack versus I38. In this instance, the French player could have played it safe with a 5-1 against the 2-6, accompanied by a 1-4 soak-off versus the 7-4 and 4-4. However, given the impending arrival of the IVth Corps, I actually find myself in agreement – at least this time around – with the French commander's decision to go "all in" on the very "risky" 1-1; especially since – given the current balance of forces – continuing to trade units, on a one for one basis, with the PAA player is almost certainly a guaranteed recipe for a French defeat. Finally, in reviewing the results of this latest round of French combats, it is important not to assign too much significance to this impressive string of battlefield successes. Admittedly, the French commander – thanks to the amazing survival of his 1-6 soak-off unit, and the equally astonishing annihilation of the three Prussian units in I38 – no longer finds himself nearly as outnumbered as he was when he began his move. Moreover, the destruction of literally all of the Prussian soak-off units (including the 4-4s) means that any future PAA attacks – unlike those initiated by the French who, it should be remembered, still possess three soak-off units – will necessarily have to risk major units in the thankless role of required soak-offs. Still, it is important to recognize that, in spite of everything, L'Armee du Nord is still outgunned in terms of absolute combat power: the PAA totals forty-nine factors (counting the two surviving Anglo-Allied "4s") distributed among nine units ; while the French Army totals forty factors, also distributed among nine units. Thus, while it is certainly too early to say that the French player has suddenly become the heavy favorite to win, it is also true that he is no longer the obvious "underdog" that he was only a turn or two ago.

Ed:Yikes!! Yet another DE on his 1-1 attack. Five Prussian units go to the dead pile. All of a sudden things have gone from a good PAA advantage to being an underdog. I now have seven units to the French eight on the central battle front.
To make matters, I don’t have enough to maintain the I Row. If I don’t attack, I’m afraid he will be able to attrite my split forces for a French win. Ugh. Compounding my problems is the lack of any small units for soak off duty.
I don’t like any of my options, but I decide to attack. I can use a 6-4 to attack a pair of 5-4s. That gives me a 40% chance for a good result – either an exchange eliminating two units for one or holding my position with a DB.
I can also get a 6-1 on a 3-6 and a 5-4 against a pair of 6-4s at 1-3; or a 3-1 on a 6-4 and a 1-2 on a 6-4 and a 3-6. I decide to go for the last option. Unfortunately, the attacks go badly for me. I get an exchange on the 3-1 and AB/AE on the 1-2 attacks. Things are not looking very good for the forces of democracy.
Joe:The Allied player had fully expected that the arrival of the infantry divisions of the Prussian IVth Corps would finally – in concert with the Anglo-Allied and Prussian units already fighting along a battle line south of Mont. Ste.-Jean – be powerful enough to put an end to Napoleon's imperial ambitions, once and for all. Unfortunately, what the units of the IVth Corps encountered at Mont.-Ste.-Jean, instead of the demoralized and exhausted French troops that they had expected, were the shattered remnants of two once great Allied armies, whose soldiers – only a few hours before – had been convinced that their combined numbers would be able to halt and then fix L'Armee du Nord in place, long enough for the powerful Prussian host marching in from the east to be able to fall upon and destroy the French Right. Events, however, had been turned on their head: the PAA Center and Left – and not the French Right – had been virtually obliterated by a wave of devastating French attacks that had swept, west to east, across the whole of the Allied front; only a small handful of PAA units had actually survived this ferocious French onslaught, and they had dutifully remained behind at their posts and hence, were still present to greet the hard-marching Prussians when they, at last, debouched onto the battle field. Enter "Alt Vorvarts" who, having only recently come face-to-face with one military catastrophe, nonetheless wastes no time in searching for another. And in furtherance of that goal, he chooses to hurl his newly arrived reinforcements immediately into battle against the more numerous foe. Of course, crazy as Marshal Blucher might be, even he is not so unmoored from reality as to attack the entire French battle line; instead, he launches the whole of the IVth Corps forward, straight from the march, in a set of three attacks (two of which are speculative) against the French Right, all in hopes of getting lucky enough, in his own turn, to inflict disproportionate and unexpected casualties on his French tormentors. Unfortunately for Blucher, his hurried attacks do not go well. The first of his combats is a 1-2 (AB2) with a 5-4 versus Friant (a 6-4) and Wathier (a 3-6); the second, more reasonable attack is a 3-1 (Exchange) with three 6-4s versus Morand (a 6-4); and the third attack is another highly speculative 1-2 (A Elim) with a 6-4 versus Habert and Durutte (two 5-4s). As combat results go, these are not the worst possible, but they are bad enough: twelve factors and two Prussian units traded for a single French 6-4. "Alt Vorvarts" probably hoped to partially salvage the Allied situation south of Mont. Ste.-Jean, but thus far, he has only made it worse.