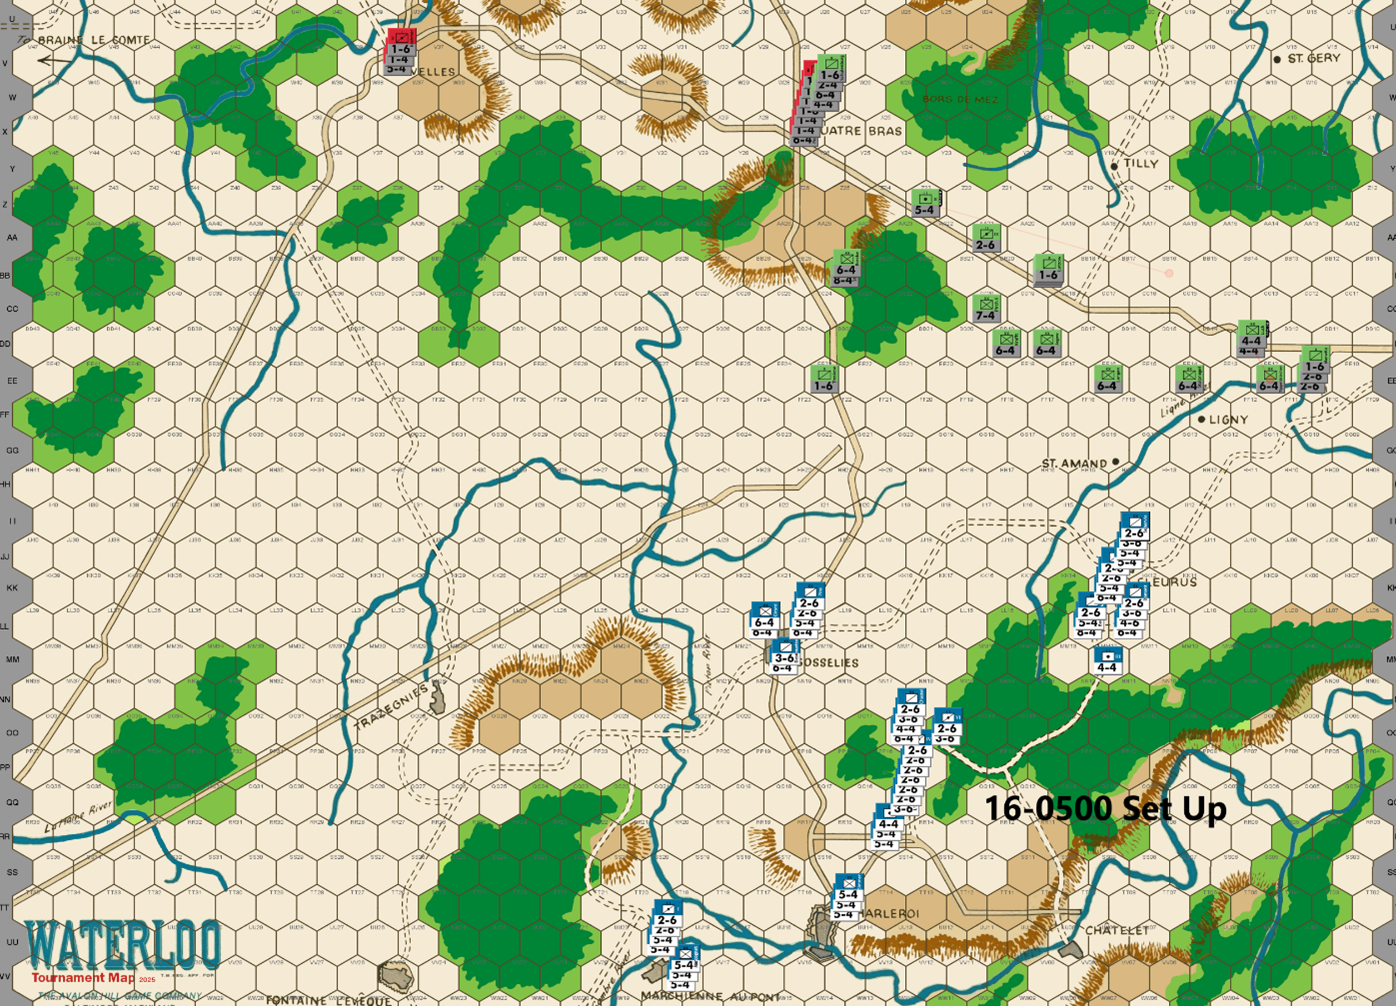
Bert: My goal as the French player is to try and threaten as broad a front as possible in order to spread out the PAA player’s defenders. I think that early attrition of the defender is very beneficial when playing the French side and the broader the front, the more likely that you can force your opponent into offering up additional blocking units as targets. To accomplish the broad front strategy, I expect that my set up will allow me to reach the far western sector of the battlefield by turn 4 with a contingent of cavalry followed by the slower infantry a turn or two after that. Breaking through the forest hexes blocking the approach to Nivelles is always a challenge, but I do plan to get some supporting units to the forest hexes southeast of the city, as quickly as possible, to threaten any large blocking units with at least a 3-1 attack. The attacks towards Quatre Bras and the Tilly corridor will mostly be dictated by how Ed defends those areas, but I hope to threaten both of them as long as is feasible.
Frankly, most of the attacks across the entire front are highly dependent on the PAA player’s decisions of where to defend. I expect Ed to be passive on the early turns with some minimal blocking units. I suspect his counterattacking will be in the southeast approach to Quatre Bras, once I get there, but likely not before then. I think there will be some counterattacks as I try to break through the woods near Nivelles. I plan to aggressively expose some units to early PAA attacks in order to put pressure on his positions, but I doubt I’ll be successful in drawing Ed into any kind of meaningful battles in the early turns – of course, he might shake things up and surprise me this game. Looking forward to it, either way.
Ed is a great gamer, and it has always been a pleasure to play against him and so I hope for both our sakes that we have a good and well-played game. I also very much look forward to Joe’s insightful feedback on our play. I have learned a lot from reading and absorbing his feedback and I treasure the opportunity to once again get to learn from his wisdom. I hope the readers enjoy this endeavor as well!
Ed: One Prussian 6-4 is removed as a result of the bid. Treskow sets up to block any French from gaining access to a hex adjacent to the critical hilltop hexes south of Quatre Bras. The rest of my set up is intended to restrict the French 7am advance as much as possible without exposing any unit to a 3-1 attack. The Prussians adjacent to Quatre Bras will head toward Nivelles to aid the Anglo-Allies in the defense of the Nivelles sector.
Unfortunately, I forgot to save my final move file before I sent it to Bert. The file I sent allowed a 3-1 on a 6-4. There are a couple of other units a little out of their intended positions as well.
Joe: Because of the small movement allowances of the various WATERLOO units, the paucity of primary (bonus movement) roads, and the comparatively large scope of the game map, the decisions made as to how and where the French and the Anglo-Allied/PAA starting units are to be deployed are actually quite important to the flow and rhythm of the early (first day) game turns. An early force or positional miscalculation, or even a single misplaced unit, can sometimes take many turns to correct. That said, and since both Bert nor Ed have arrived at this point in the tournament by virtue of their skill and not because of pure luck, it probably should not be surprising that both players have opted for relatively conventional (and conservative) starting set-ups.
The French: The commander of La Armee du Nord has distributed his units so as to quickly threaten the Ligne River and points north, while the balance of the French army has been deployed so as to be able to exploit the north-south primary road with an eye towards developing early pressure against the clear terrain between Ligny and the Quatre Bras Heights, as well as the Heights itself. Initially, the usable avenues available for a French northern advance are severely limited by the clutter of blocking terrain on this section of the game map. During this phase of the campaign, besides pushing north in the east and center -- barring launching early low-odds attacks, of course -- the only other major decision that the French player will immediately be called upon to make will be that of the size and composition of any force that he decides to send northwest towards Nivelles and the Braine le Comte Road.
The Allies: Like the French player, the Allied commander's starting set-up eschews any unusual or risky unit dispositions; so caution would seem to be the rule for now. Besides, since the starting Anglo-Allied dispositions are predetermined both at Nivelles and at Quatre Bras, Blucher's starting force of three Prussian corps is pretty much obliged -- if it is not to abandon too much ground too early -- to deploy in an extended line from the Ligne River to the forest just southwest of Quatre Bras. The advantage of this deployment is that it screens the Quatre Bras Heights for a turn, offers few attractive targets for low-odds French attacks, and still manages to limit the scope of the initial French advance towards the Quatre Bras and Tilly Gaps. Moreover, the Prussians, as long as they are concentrated, can be a very formidable force, so a prudent French commander will probably advance carefully, at least until the powerful Ist Corps arrives near Gosselies.
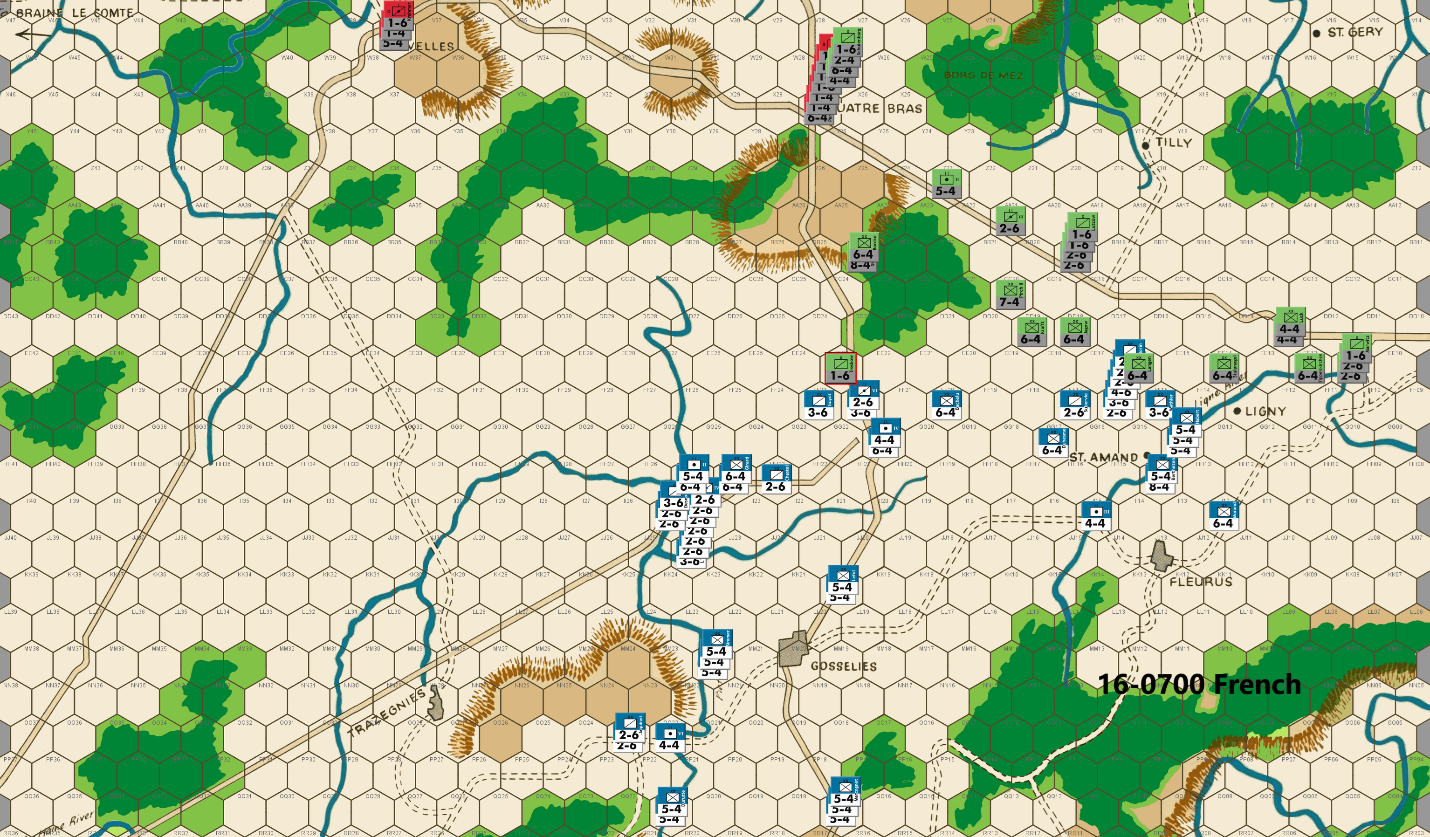
Bert: Well, Ed surprised me with his forward defense – it is something that I regularly do but I see most of the top players hang back out of range on the first turn. One difference is that I would have either stacked a second 6-factor unit at EE18 or put one at EE17. This would have forced me to soak off with a piece in order to make a 3-1 attack and I’m pretty sure I would have passed on it had it required a soak-off. I’m guessing that Ed wanted me to make this attack since I will be risking some valuable cavalry units in an exchange and/or a counterattack, so perhaps that’s why he set it up the way that he did. Since my early strategy is to cause attrition of the PAA and no soak off is necessary, I’ll oblige him and launch the attack this turn. Despite the risk of my cavalry units, I think that an early firefight in open terrain (no doubled positions) is to the French player’s advantage, so I will push for it. My guess is that if my boys score the D Elim result, Ed will fall back but an Exchange or D Back 2, will embolden him to possibly pursue this fight; we’ll see.
In general, I will almost always take 3-1 or higher attacks against non-doubled defenders and of course, every AV that is offered up – unless I sense a trap is being set or if the cost of soaking off is prohibitive. Doubled positions will be mostly (but not always – especially if they are strategically valuable) avoided due to the cost of an exchange result. I will always weigh the impact of low odds attacks and if I deem them worth the risk, those orders will be dispatched to the front lines. Many French players wait on making low odds (1-2 through 2-1) attacks once they feel the situation is a bit desperate. My approach is to always consider them early in the game, before the PAA has accumulated sufficient forces at the front line to effectively deal with an unfavorable outcome. If you do those attacks early (before the first day+ reinforcements reach the front lines), you can damage or break the PAA player’s positions to the point that they are forced out of their comfortable routine defensive positions. This exposes them to more attrition earlier in the game, which is what I aim for. Of course, these can lead to Attacker Eliminated results, which can greatly hurt the French player’s chances, so I don’t go crazy with them. I let the course of the game dictate when and if a low odds attack is warranted, rather than going into it with a set plan to automatically just commit to any particular attacks.
Elsewhere this turn, I’ve positioned lots of units that can push efficiently westward as originally planned, while also leaving open the opportunity to swing back to the east if I decide that a decisive firefight is unfolding there. I like to put the two infantry units at HH25 after my first move so they can get to DD29 on the second move, if they aren’t needed to be diverted to deal with some PAA shenanigans. My goal will be to project enough force to the woods to the southeast of Nivelles, that Ed can’t defend hex Z34 with a 6-factor unit without risking a 3-1 attack against it. This might lead to a push through the Z35 bottleneck more quickly than the PAA player is comfortable with. Against a more passive opening, the two units at KK20 would have moved to OO22 on this opening instead. I decided that I need them to project more strength to the potential firefight in the east.
Joe: Napoleon opens his campaign with a bit of a bang! That said, there are already a few clues as to French plans going forward.
In the West (Nivelles and the Braine le Comte Road): The Left Wing of La Armee du Nord begins its drive towards the northwest with what looks like a large mixed force of infantry and cavalry. However, initial dispositions suggest that Napoleon intends to launch this effort with an unusually sizeable number of horsemen (perhaps as much as 2/3rds of his available cavalry) in the French dash towards Nivelles and points west. Although circumstances might change, I personally have one minor nit with this choice of dispositions: In a nutshell, I personally believe that, should the French commander actually send all sixteen possible cavalry units (out of the army's total of twenty-four) northwest, then he could well find himself dangerously short of cavalry units on other fronts. In addition, once such a large mob of horsemen actually arrives in the Nivelles battle area, their one signal virtue, increased mobility, will quickly become irrelevant, especially if the battle lines in this sector devolve into a grinding stalemate, and the French forces are unable to breakout into the open ground north of the Samme River. If that were to happen, then our armchair Napoleon might well come to wish that he had held back a few more cavalry units in reserve to support his turn-to-turn operations against the Quatre Bras Gap and the Tilly Corridor.
In the Center: These first turn French dispositions seem to suggest that our armchair Napoleon intends to initially screen the Quatre Bras Heights while he presses his advantage in combat power (and unit count) against the left and right wings of the Allied line. This makes perfect sense since a major push directly up the center early on the first day will almost always end in a bloody French failure. In addition, I should note the fact that, had a stronger French infantry force remained in the center, and had two French 4-4s also moved to GG21 (or thereabouts) on this turn, then a prudent Allied player would have been obliged to treat the possibility of a French 1-2 versus Steinmetz (at AA27) on the 0900 game turn as a more credible threat, and would likely have had to position his Prussian infantry reserves accordingly.
In the East (the Ligny Plain): The French player, not surprisingly, advances his Right Wing north onto the Ligny Plain; he also decides to gamble on a 3-1 attack, with a force of pure cavalry, versus the a Prussian 6-4 on EE16. Needless to say, had the Allied commander swapped the positions of Pirch II and Langen, then such an attack would not have even been possible. But that raises the question: was the exposed position of this Prussian unit a mistake, or was it an aggressive Allied gambit? Maybe, it is actually possible to view it as a little bit of both. Certainly, the elimination, without compensation, of an additional Prussian 6-4 this early in the match would not be a trivial loss for the Allied commander. On the other hand, this audacious French move was not without its own share of downside risks: a D Elim (40% chance) would have been the only good result for the French player; alternatively, a DB2 (30% chance) would (as it turned out) have been irrelevant; while an exchange (30% chance) of three French cavalry units for a single Prussian 6-4 -- especially since no real French positional gain was to be had -- would have been a very welcome trade from the Allied player's standpoint. In addition, such an exchange would have made a blistering high odds Prussian counterattack against the surviving French horsemen near St. Amand exceedingly likely. Such a counterattack, if it were largely successful, could well have permanently crippled the French Right Wing's cavalry arm, and might even have shifted the initiative to the Allies in the east, at least temporarily. Finally, in order to gain his 3-1 odds, the French commander was obliged to strip away all of the French cavalry units that might otherwise have been able to threaten an early 0900 "right hook" crossing of the Ligne River at the FF11 ford: a tactical choice that inevitably would (and did) make the Allied 0700 fallback towards the Quatre Bras Gap and the Tilly Corridor much easier, whatever the ultimate outcome of this opening clash would have been. As things turned out, both sides escaped without suffering any real damage; so this first battle -- in spite of its potential risks for both sides -- pretty much ended in a draw.
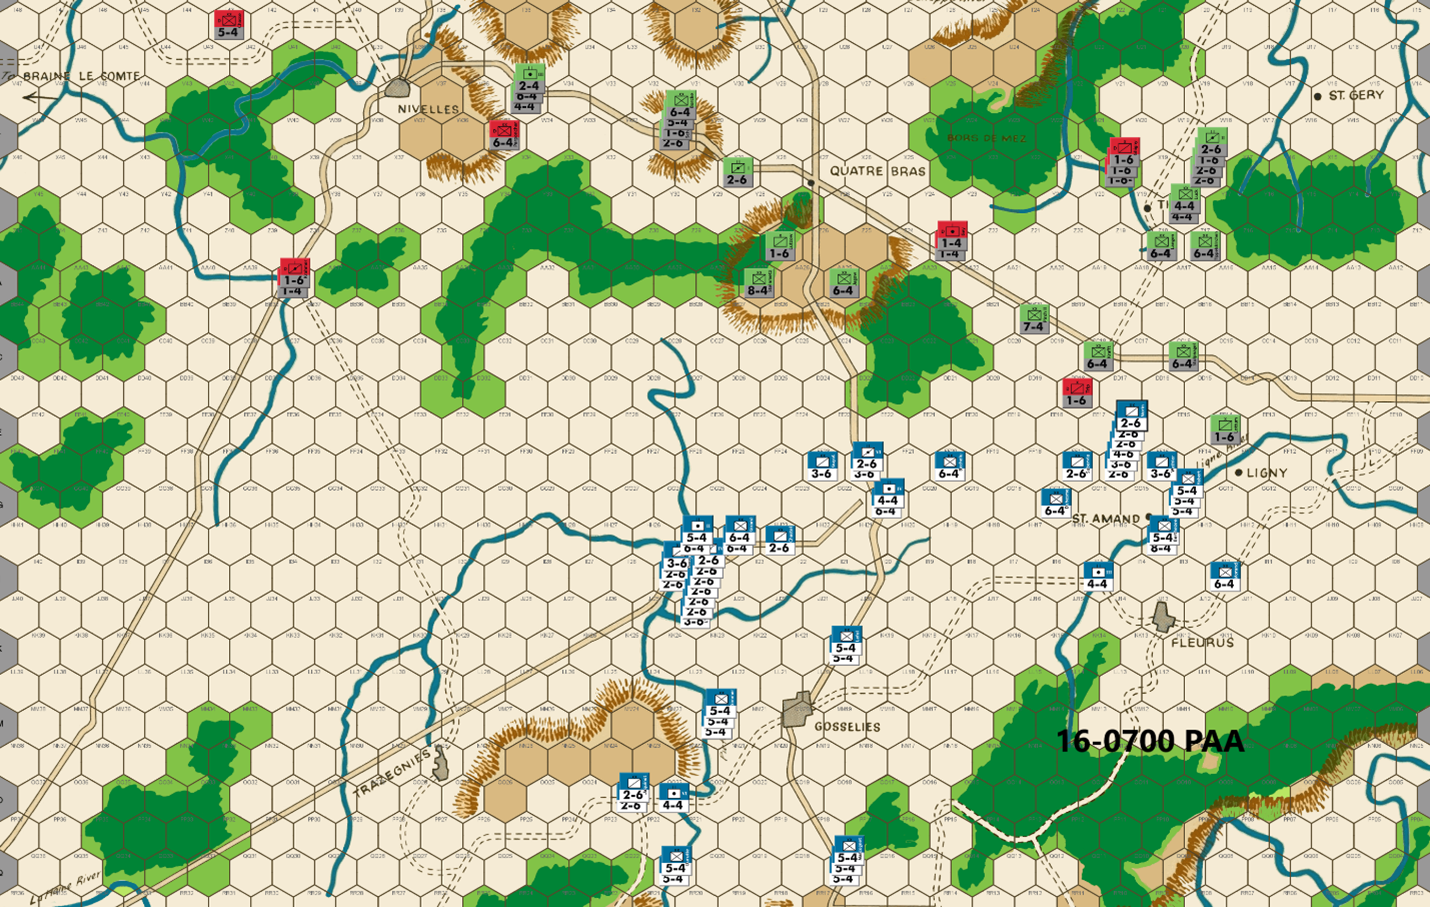
Ed: Bert took advantage of my map mistake and attacked at 3-1. The DB2 is pretty much a “no harm, no foul” result. For the sake of a good game, we both agreed that this is the best result. A DE (40%) would prematurely hurt the PAA, while the 30% exchange result would be favorable for the PAA.
I looked long and hard at counterattacking his cavalry lined up in the Ligny plains – three 5-1 attacks on 4 cavalry units. While the risk of a misfire in my attacks and losing two 6-4s in counterattacks was low, it was more than I wanted to take this early in the game. A second reason was the lack of French cavalry on my far-left flank allows me to hold a slightly more forward position than frequently is the case. I also note what I consider to be some minor positional weakness with the forces appearing to head for Nivelles. (e.g no cavalry at EE27) For this turn at least, I will play conservative and see how the game progresses
I thought about using a 6-4 at AA27 which is 3-1 proof but that would allow a 2-1 on the hex. So, I kept Steinmetz in his traditional position. I also position Prussians at W31, perhaps earlier than needed, but the French deployment indicates a large force heading toward Nivelles.
Joe: In the West (Nivelles and the Braine le Comte Road): The Allied player, totally cognizant of the danger posed by the Gallic juggernaut hurtling straight towards Nivelles, dispatches the first of several Prussian contingents west to reinforce the tiny force of Anglo-Allied units currently defending the forest approaches to Nivelles. On the whole, this Allied reaction seems both timely and -- at least for the next few turns -- adequate. However, since I am here to pick "nits," I will note that, if I was in command of the Allies, I would have moved Perponcher along the road to V35 and would have moved the Prussian units (currently on V35) to W34. This small change would allow the first arriving Prussian units to quickly deploy along the "34" forest hex file as a temporary block to early French cavalry infiltration into and through the eastern Nivelles forest barrier, while it would also free-up Perponcher to move, in three bounds (V35-T42-T46-V47), to ultimately occupy and, by so doing, also make hex V47 3-1 proof when attacked from two hexes. This move -- in my view, at least -- is advantageous because it would permit both the Anglo-Allied and the Prussian units in this sector to remain relatively concentrated; and, as an added benefit, it would also allow a sizeable portion of the incoming Anglo-Allied reinforcements (especially the 7-4s) to be deployed more flexibly when it came to the direct defense of Nivelles.
In the Center: Allied play in this sector is strictly "by the book;" to whit: Steinmetz immediately moves to take up his usual 3-1 proof (from three hexes) defensive station at AA27 on the Quatre Bras Heights, a cavalry (soak-off/delay) unit occupies Z27, and a Prussian 6-4 completes the Quatre Bras defense line by manning the easternmost crest hex at AA26. In addition, the Allied commander sets about concentrating on the beginnings of a significant Prussian reserve force in and around the hillock at W31: this position is critical during this phase of the game because any reserve units so situated will be able to reinforce either the Nivelles front or the Quatre Bras Gap in a single bound.
In the East (the Quatre Bras Gap and the Tilly Corridor): As was the case in the center, the Allied players’ moves in this sector are also strictly "textbook," and begin with a grudgingly slow, but economical (delay unit-wise) withdrawal back towards the open terrain of the Quatre Bras Gap and the Tilly Corridor. However, unlike in the previous turn, there are no attractive Allied targets -- other than a pair of delay units -- offered to the pursuing French. Moreover, since the Allied formations tasked with defending the two eastern forest corridors are certain to soon be separated by either terrain or French units (or both), it appears that preparations have been made to entrust a reinforced Prussian corps with the task of defending the soon-to-be isolated Tilly Corridor. I should probably note that there are actually several different Allied approaches to defending this narrow eastern forest corridor, but I tend to agree with this Allied player that a "strong" defense of this sector, while limiting Allied counterattacking options in the Quatre Bras Gap, is nonetheless the most flexible and economical option. That said, because the corps assigned to this mission will be -- perhaps for several campaign days -- virtually independent of most of the rest of the Prussian army, the Allied commander should take pains to ensure that this solo detachment will be both well-balanced (in unit types) and powerful enough (in combat strength) to offer serious resistance to any French force -- no matter how powerful -- that Napoleon might send north into the forest and river gap past Tilly and St. Gery, and towards the Dyle River bridges at Wavre farther north.

Bert: I guess that Ed’s setup was not what he intended as he shared that EE16 was supposed to be his 7-factor unit (Pirch II) instead. That makes sense. The neutral D Back 2 result of my attack was probably the best outcome as a result of a mistaken placement of his unit. I still believe that the attack I made was the correct response as it allowed me to advance my units further north by an extra hex compared to a more passive first move.
I feel like it is a win for the French to get two or more PAA blocking units that can be AV’d on the first day turns of this game. I’ll happily take out those two sacrifices and then push forward across the board with the rest of my units. My goal with that side is to “try” to limit my blockers to one unit a turn, but that is not always possible and it gives up some space more quickly.
A few notes about the advancements and placements of my units. I like to get my western cavalry in position so that they can all (except for one unit) reach the road to Nivelles on turn 3, if I decide to use that. This allows me to threaten getting some units to AA40 next turn. Their position also threatens the front of the wooded hexes (not too big of a deal) and possibly a 3-1 attack vs hex AA35, should Ed have thought about positioning his Perponcher unit to defend there – now, I’m sure he won’t. The infantry units at HH30 are more efficiently placed compared to the typical placement of those units at II31, in my opinion. This is because they can reach hex Z35 on turn 4, if nothing is used to block them. The units at DD29 allow them to project force against both the woods to the west or the center hill on turn 3. Ideally, my threats in the west will get Ed to offer up a sacrificial unit to impede my progress on that front – I’d be fine with that as an outcome.
I intentionally advanced one unit into EE14 following the AV there. This is for the near zero chance that this will tempt Ed to come and attack me since that hex leaves no retreat route for my advanced unit. I’m quite certain he won’t take the bait, but I think the cost of any soak off plus the follow up attack(s) make that sacrifice well worth it to me. In addition, my advancing unit will be in a position to get to hex Y13 next turn, as a small side show to have Ed perhaps commit at least one unit to deal with the pest.
Joe: In the West (Nivelles and the Braine le Comte Road): Right on schedule, the first wave of French cavalry finally gallops up to within one turn's movement range of the primary road and forest gaps south of Nivelles. Those hard-marching French infantry units which were apparently committed to a western advance, on the other hand, are still strung out from two to three game turn's distant from the Nivelles battle area. Moreover, the fact that only two French infantry divisions (rather than four) will be within range of the southern edge of the Nivelles front on the 1300 game turn means that the French commander will likely have to delay a major push into the forest corridors for at least one, and maybe two extra game turns. And while as many as twenty-nine factors of French cavalry could conceivably show up on the Nivelles front as early as next turn, it is also likely that, until the first sizeable detachments of French infantry actually arrive in the battle area, these horsemen will represent more of a nuisance than a serious threat to the defenses of the Allied Right. And if all this weren't enough for the French player to worry about, there is also his knowledge of the impending arrival of sizeable numbers of Anglo-Allied reinforcements which means that the clock will soon begin to tick for Napoleon, at least when it comes to his operations in the west. Finally, I should also note that, along with everything else, the French player will soon also need to decide on a specific mission for the infantry stacks at JJ24 and DD29 and then commit these units accordingly.
In the Center (the Quatre Bras Heights): The assorted French units within one turn's march of AA27 currently total a little over fifty combat factors; this means that Steinmetz is stuck where he is on the Quatre Bras Heights for the time being, as even Pirch II (a 7-4) could currently be attacked by local French forces at 3-1 (from three hexes, with a soak-off) should this unit swap places with Steinmetz. The real question for Napoleon is: How long should he maintain a credible attacking force within striking distance of the Quatre Bras Heights, when it is highly likely that both wings of his army will be steadily advancing away from his center, and one, or both wings, could soon require reinforcements?
In the East (the Quatre Bras Gap and the Tilly Corridor): The French Right Wing crosses the Ligne River and advances towards the east-west primary road, picking off a couple of Allied delay units in the process. The absence of a French cavalry "right hook" through FF11 last turn, however, means that the French drive against the Tilly force will be a bit late in developing. Nonetheless, next turn, communications between the units in the Quatre Bras Gap and those in the Tilly Corridor -- barring a surprise (and foolhardy) Allied counterattack in this sector -- will probably be completely severed. Once that happens, the French player will have to make some difficult choices as to how he will divide and allocate the units of his Right Wing against both the Quatre Bras Gap and the Tilly Corridor. Moreover, this issue will only increase in importance once the split between these two fronts widens too far for the French units on the two fronts to lend direct support to each other. In essence, the French Right Wing (with help from the center) has enough combat power to continue to successfully push into both the Quatre Bras Gap and the Tilly Corridor; however, what it really needs -- at least in my view -- is at least three or four additional cavalry units from the mob of horsemen currently threatening Nivelles.
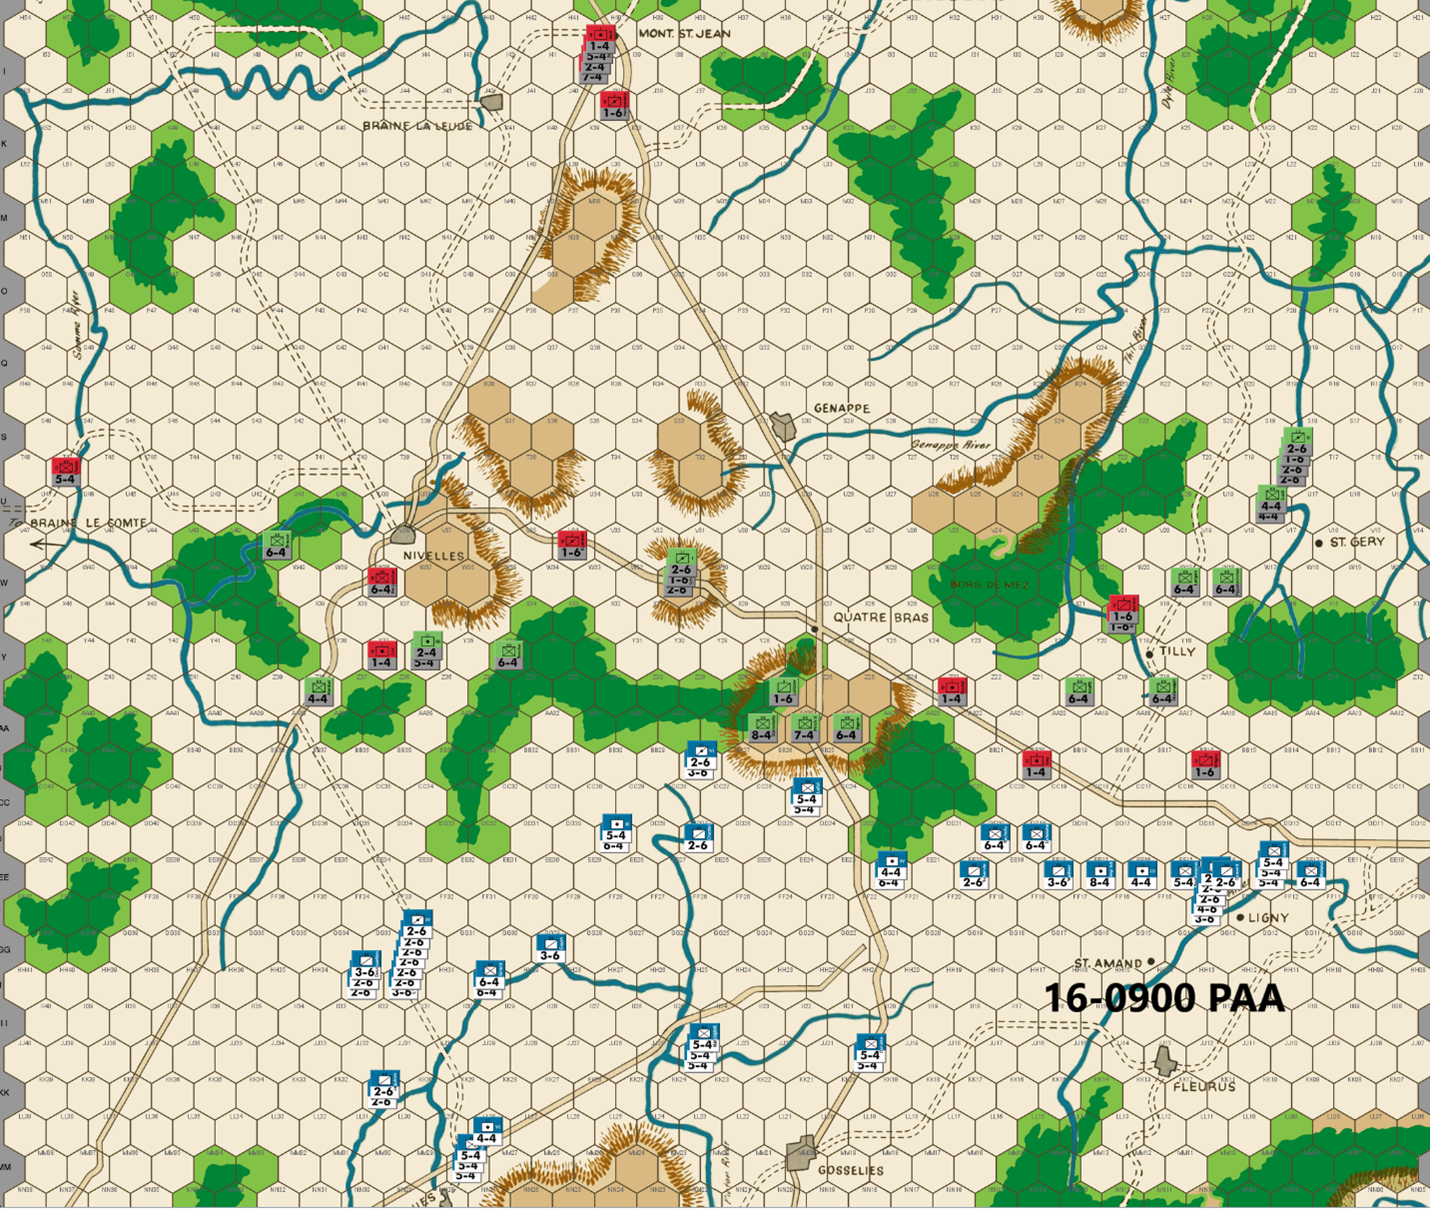
Ed: There is a large French force moving toward the Nevilles sector – 57 infantry and at least 29 cavalry factors. That is 44% of the total French combat strength, larger than I normally see. It appears the French are planning a major assault at Nivelles and points west. Chasse heads to the Samme River and when combined with the 11am arrival of Cooke can 3-1 proof the Samme River at V47/U47. Brause moves to V41 for subsequent defense of the river from V44. The rest of the Allied defense is pretty standard.
Joe: In the West (Nivelles and Points West): Given the meager assets at hand, the Allied commander does what he can to prepare for the coming French onslaught; unfortunately, his time is short: whatever he does, the Allied defense of Nivelles and the river line south of the Braine le Comte Road will soon come under steadily increasing enemy pressure as more and more French infantry arrive in the Nivelles battle area to reinforce their already-present cavalry brethren. Moreover, since it is now clear that our the French commander has decided to make a major effort (perhaps with as much as 90+ combat factors) against this sector and, to make matters even worse, that he has also positioned a substantial amount of French combat power within one turn's march of the edge of the eastern forest (e.g., the "33" hex file), any long-term Allied defense of the Nivelles position is almost certainly doomed. The sheer imbalance between the probable combat strengths of the two opposing forces (not to mention the Allied "non-cooperation" rule) makes the likelihood of an Allied victory vanishingly small. Therefore, the most reasonable goal for the Allied player should probably not be to actually defeat Napoleon's troops in this sector but, once battle is ultimately joined, to instead attempt to inflict a disproportionate amount of damage on the local French forces, while (hopefully) minimizing losses to the Allied "heavies." In addition, the PAA commander should also seek to give ground as grudgingly as possible. To that end, the longer the Allies can retain control of hexes Y39 and Z36, the longer they can avoid a "pitched" battle with the French, and the more time they will gain for their reinforcements to reach the front. Needless to say, the Allied player can sacrifice a delay unit or two to buy time, but no matter what he does, if he decides to fight, then battle could be joined as early as the 16 Jun 1500 game turn or, failing that, certainly no later than the 1700 game turn. Of course, the Allies can always attempt to avoid a major fight entirely, choosing instead to only expend sacrifice units in their attempt to slow the French advance to a crawl while the local Allied units slowly fall back towards Nivelles, and then to positions behind the river line that runs immediately to its west and north. Unfortunately, this approach poses its own problems: first, It allows the French Left Wing to spread and thin the Allied defense in the west at absolutely no cost in materiel or time; second, once his troops are through the forest gaps, the French commander might well be able to detach units, without serious risk, from his Nivelles force and back towards the center, likely in plenty of time to support a late-day drive against Quatre Bras.
In the Center (the Quatre Bras Heights): The French player continues to maintain a local force strong enough (50 combat factors) to maintain the pin against Steinmetz (at AA27); nonetheless, the deteriorating PAA situation at the Nivelles front may soon oblige the Allied commander to shift Jagow from AA25 (and, if he's feeling optimistic or lucky, Pirch II from AA26, as well) to a reserve position at W31. Fortunately, Kraft is within range of AA25, so the garrison on the Heights need not be weakened too much; at least, not yet.
In the East (the Quatre Bras Gap and the Tilly Corridor): Delay remains the Allied order of the day, as two units are again sacrificed to slow the French advance in this sector. Fortunately, the Allies still have a decent local inventory of potential delay units, so barring a sudden switch to low-odds attacks, French progress against the Gap and the Tilly Corridor should continue at its current "glacial" pace. Once these two fronts are split, however, it will be interesting to see how the French commander decides to apportion his infantry and cavalry between the two sectors over the course of the next couple of game turns. At least in the case of the Tilly Corridor, the presence of a reinforced Prussian corps lurking in the background should give the French player pause; and if he does decide to push into the Corridor, twenty-seven factors of "bloodthirsty" Prussians should cause him to rule out sending any but a strong mixed infantry/cavalry contingent north towards Wavre.
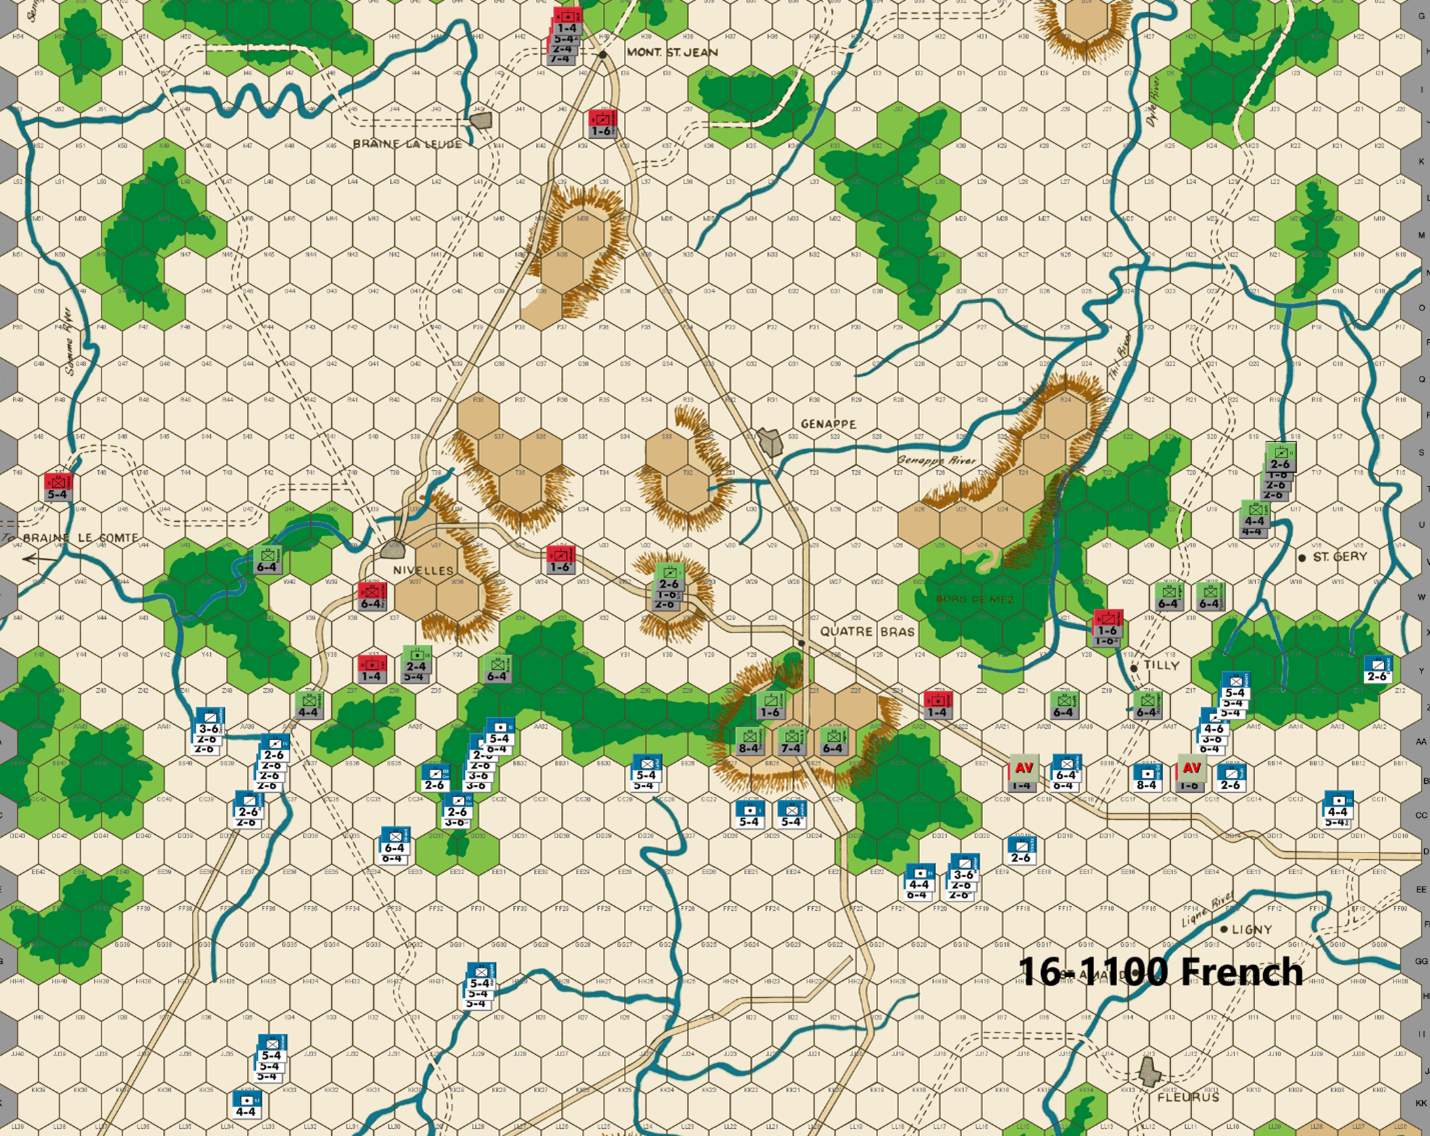
Bert: This turn is yielding me two additional blocking units, which makes me happy. I’m continuing with my strategy of trying to put pressure on Ed’s defense across the board. I’ll note a couple of items with Ed’s move that could have been done differently. He has utilized the excellent PAA tactic of exposing an infantry unit to only one hex of attack at less than 3-1 odds, multiple times already. See hexes Z18 and Z20 as an example this turn. I think a unit at Y17 could have accomplished the same benefit to keep me from putting units in Z16. In the west, he put a Prussian unit (Brause) at V41, which I think should have been the AA unit (Preponcher) instead. The reason is that I expect that Ed will strongly consider an attack against my units in the woods hexes near AA34, and Brause is not within range of aiding that attack on this coming turn. Ed doesn’t have enough AA units to conduct that attack, so any attack will have to be solely a Prussian operation, other than perhaps an AA unit soaking off. Having Brause positioned out of range, limits his ability to make an optimal attack.
I’m willing to expose Dormont to a 3-1 attack at Y13 due to the chance of an exchange result, and I’ve put some units within range so that I would be able to counterattack his exposed cavalry units if he takes that attack. The units can easily get back to the main front if that is not needed.
My forces are light near Tilly & Quatre Bras, but I think that this is not all bad as Ed has pretty much committed four “heavy” (4-factor or higher infantry units) Prussian units to the Nivelles region and at least four to the Tilly corridor region. As a result, he is light himself in terms of being able to counterattack my units in any one of those areas. I have enough force within range to keep Steinmetz garrisoning AA27, to keep it 3-1 proof, for at least one more turn. I expect at least one more turn of Ed offering up blocking units in those areas. I should be able to split the two areas from one another by next turn and then, depending on what Ed commits to where, I can focus on which direction I’ll concentrate the bulk of my central and eastern forces.
The real action for the coming turn or two is likely to be on the western front. My commitment to keep Ed out of Z34 on his previous turn has allowed me to establish a decent foothold into the woods hexes to the southeast of Nivelles. I did not include a cavalry unit in hex AA33 because that would make a counterattack easier for Ed to make. I’m hoping to force a fight that will hopefully lead to more PAA attrition OR have him fail to defend the Y row hexes with anything significant and fall back. Ideally, this would allow me to get through the bottleneck hex of Z35 before his reinforcements can reach that front as I’ve previously noted as an early goal for the French. In case he decides on the counterattack, I’ve moved a couple of additional infantry units to BB29 so they are available to assist my units already in those woods if needed. Ideally, they’ll return back to the Quatre Bras front. I’m really not sure what he’s going to do to deal with the threat, but I look forward to his response.
Finally, my cavalry units within range of Braine Le Comte are unlikely to try anything of significance until my infantry units get in range to assist in an attack. Those units want to project a threat in that direction to keep defenders tied up in that area while also staying within range of assisting any attacks that get ordered elsewhere on the Nivelles front. I’m guessing that I’m going to need pretty much all hands-on deck for the battle to break through to Nivelles, so Ed probably won’t be too worried about my units committing towards Braine Le Comte. An overly aggressive PAA player might try an attack against my western most units, but that would be risky with the limited retreat hexes behind any attackers. As a result, I don’t expect Ed to consider that as an option.
Joe: This is clearly the calm before the storm: in a very real sense, the preceding moves have simply been prologue: now the "real" game is about to begin!
In the West (Nivelles and the Braine le Comte Road): The French player continues to concentrate his forces against the Allied western defenses, while continuing to eschew any real combat. To be fair, until the French infantry begins to arrive in the battle area in some strength next turn, there is really very little that the cavalry can safely do on its own besides threatening an unopposed crossing of the western Samme River. Attempting to push into the forest gaps would be foolhardy without strong infantry support. That said, I do have one "nit" with this turn's French cavalry move: I think that at least one 2-6 should have moved to BB36. AA37 is a natural Allied delay position, and a convenient sacrifice unit (the 1-4) is suspiciously close-by. Other than that one lapse, the rest of the French move seems to be very effective: a sizeable contingent of French infantry is finally closing on the Nivelles battle area, and French units from the center have moved to establish threatening positions all along the eastern forest copse's "33" hex row. This last is no small thing as it accomplishes two different objectives: first, it sets the stage for a French advance into the eastern forest corridor; and second, in spite of the western shift in the French center, units with sufficient combat power to pin Steinmetz at AA27 still remain within range of this key hex, thanks to the ten factors of French cavalry positioned at BB33. Now, all that remains is for Napoleon's troops to force open the mouth of the eastern corridor (at Z35), and the western corridor (at Y38), then the stage will be set for the Emperor to finally launch the all out French assault towards Nivelles that he has gone to such lengths to prepare for.
On a somewhat off-topic, but related subject for those observers who are perplexed by the amount of French combat power that has been committed to the Nivelles campaign in this game, I offer the following answer: " Go big, or don't go at all!" This French player, like yours truly, clearly believes that a first day success in the west is an essential prerequisite (but not a guarantee) of a French victory. And since a) the dangerously-constricted forest terrain south of Nivelles is particularly unfavorable to the attacker, and b) the PAA player will almost certainly be able -- if he feels feisty -- to get in the first set of attacks against the advancing French, it only makes sense that any attacking force attempting to capture Nivelles -- especially from a skillful and determined enemy -- absolutely has to be powerful (and numerous) enough to absorb one or more rounds of adverse combat results, and still be able to continue to attack.
In the Center (the Quatre Bras Heights): As is typical during these early game turns, not much of dramatic significance -- besides a noticeable, but subtle shift of some French units to the west -- is actually happening in the center. The one minor tactical development on this front is that the French player continues to thin the force besieging the Quatre Bras Heights; however, his doing so incurs surprisingly little risk of an Allied surprise attack, as Blucher's units on the Heights are too weak to attack on their own, and the Prussian reserves -- presently clustered around W31 -- are almost certain to all move west within a turn or two. Looking ahead, the French units in the center may be able to continue to pin Steinmetz for a little longer, but, at some point (very likely within the next turn or two), the cavalry on EE20 and DD19 -- at the very least -- will probably have to be redeployed to support the Prussian drives against the Quatre Bras Gap and the Tilly Corridor.
In the East (the Quatre Bras Gap and the Tilly Corridor): The latest French move in this sector has largely been dictated by the Allied player's careful placement of two delay units. In addition, besides the two sacrificial blockers, the French player also again had the opportunity to take several low-odds attacks (1-2s up to 2-1s, each from a single hex) against a pair of exposed Prussian 6-4s that were deployed to support the flanks of this turn's two delay units. Wisely, in my view, the French commander declines to take either of these gambles and, instead, contents himself with taking the two easy Allied offerings. Finally, this French move, while not particularly exciting, is nonetheless significant because it effectively drives a wedge between the Allied units deployed in the Quatre Bras Gap and points west, and those in the Tilly Corridor. Moreover, this splitting of the eastern sector into two separate fronts (Quatre Bras and Tilly) inevitably poses an intriguing new challenge for the French commander: given the size and total combat power of his force, and the limited number of cavalry units locally available to him, how should he divide the units of the French Right Wing into two balanced and effective forces, each of which will need to be optimized for its own independent and very different operations against the PAA defenders in the Quatre Bras Gap and against those in the Tilly Corridor?
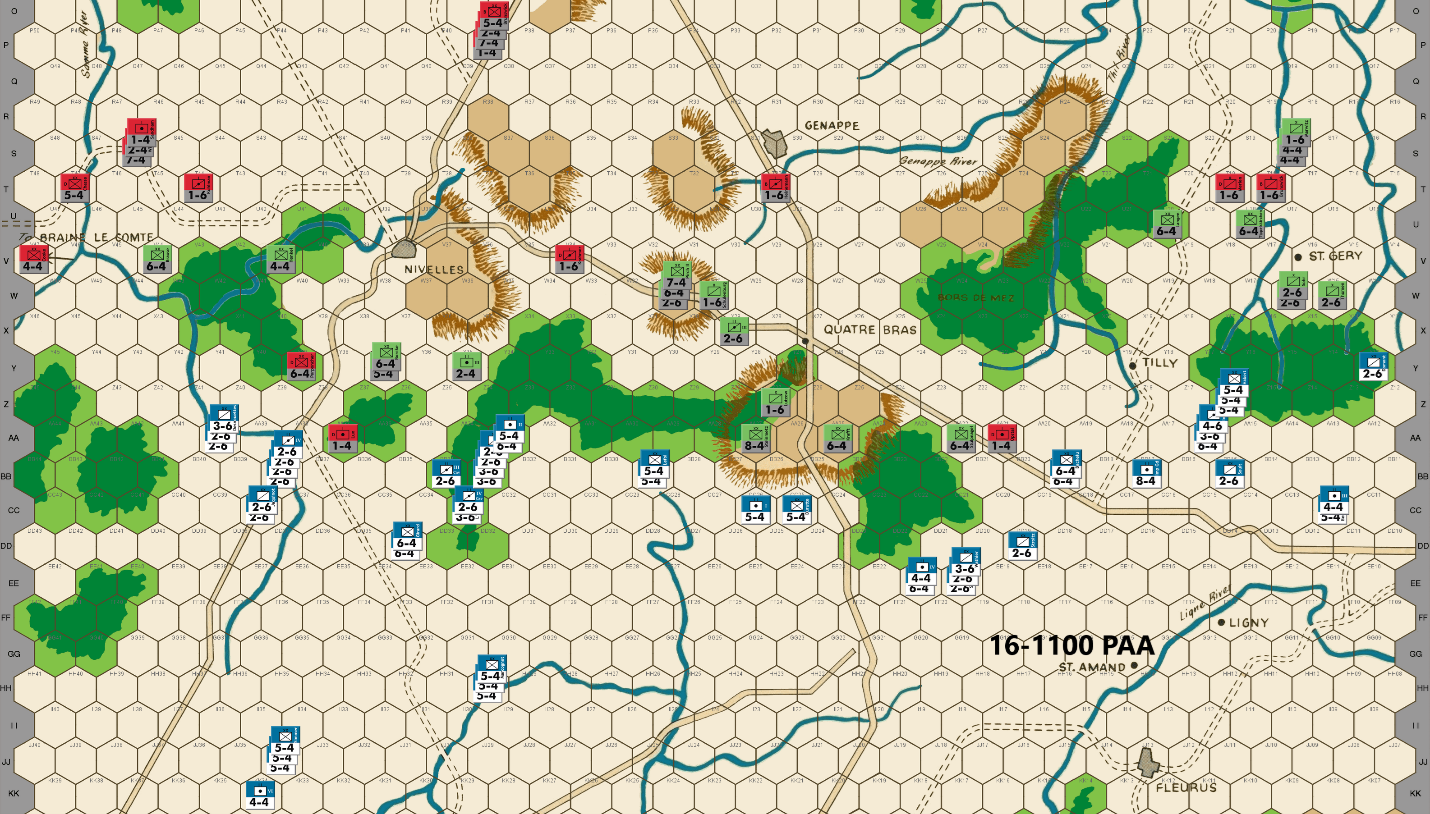
Ed: The Allies primary defense in the early turns relies heavily on 1-6 blockers. The Prussians only have five until the Fourth Corps arrives on the 18th. As here, they typically expend two of those in the first few turns and want to preserve the rest for soak offs later in the game. That means the PAA will need to judiciously use the thirteen Anglo-Allies they have prior to the 16-1700 reinforcements arriving at the front.
In the Nivelles sector, the French are assembling a greatly superior number of units and combat factors compared to the small Allied forces. I expect strong threats against the river defenses west of Nivelles and in the center south of Nivelles. But the PAA has some advantages. The French infantry is arriving piece meal at the front up to the 16-1500 turn. The Samme River can be 3-1 proofed blocking the French in the far west. The woods south of Nivelles constrict the French advance reducing their numerical superiority. The name of the game here is to delay the French juggernaut while avoiding any extended combat.
As a result, I am using a blocker at AA39 and Y35. Prussians move to W31 within striking distance of any French units attacking on Y35, hoping to discourage an attack on Y35.
In the center we offer the standard blocker unit defense. In the Tilly sector, I withdraw with my typical force to conserve the precious Anglo-Allied “1” units. It will be interesting to see how much the French send down the Tilly corridor, given the smaller than usual force in this half of the board.
Joe: The Allied moves this turn have now begun to take on the familiar "delay and retreat" pattern that -- barring French low-odds surprises -- tends to characterize an experienced PAA player's actions during the first day's turns of a typical highly-competitive WATERLOO game.
In the West (Nivelles and the Braine le Comte Road): On the whole, this is a very solid Allied move. The sacrifice unit at AA37 shields the Anglo-Allied 6-4 (Perponcher) at Y39 from anything but a French 1-1 attack (by pure cavalry, at that) for a full turn and, because of this, the Y39 hex can be preserved for possible use as a delay position next turn; as an added benefit of this, the French commander -- should he wish it -- will not be able to occupy AA37 with anything but cavalry, and then only after an attack from the river hex at AA38. But that is not even the most interesting of the French commander's problems: a little farther east, the PAA player has stationed a 2-4 arty sacrifice/delay unit at Y35 (indirectly supported by the eleven factor flanking stack, all at Y37), apparently in hopes of blocking the northern end of the eastern forest corridor for one more turn; this unit is clearly intended to be seen as a "poison pawn," because at least some of the French units attacking it will -- once the initial battle is resolved -- immediately find themselves vulnerable to an Allied surrounded counterattack. In addition, the supporting stack at Y37 denies the French commander the easy capture of Z36, unless, that is, he is willing to accept a low-odds battle in order to get it. Unfortunately, promising though the plan to use the 2-4 sacrifice unit as bait might be, the PAA commander has a problem. It turns out that, in order to make this threat of a surrounded counterattack truly credible (and not just a semi-bluff), he absolutely needs to have two small Prussian units that can both reach Z36 (even if Z35 is enemy occupied) on the 1300 Allied player turn: one to attack and one to soak-off. And that really is the rub: while there are several Prussian 1-6s and 2-6s near Quatre Bras and clustered around the W31 hillock, there is actually only one suitable Prussian unit (the 2-6 at W31) that meets this movement requirement. What this actually makes clear is that the Allied player -- assuming, of course, that he is really not keen on sacrificing Henkel (a 4-4) or some even larger Prussian unit -- simply has no way to retain post-combat control of Z36, and this in turn means that an attack against the 2-4 blocker, while certainly still risky for the French, is not nearly as problematic as it would be if an Allied unit were to occupy Z36 at the end of the 1300 game turn. And since we're on the topic of potential attacks and counterattacks, it should also be noted that, although the Prussian reserves in and around W31 are probably not all optimally situated for the defense of Nivelles at present, they are still positioned well enough to make early counterattacks against French incursions in the western sector a viable option for the Allied player, even if the arrival in the Nivelles battle area of the first batch of Anglo-Allied reinforcements is effectively two game turns away. Now for some unfair criticism: In spite of the Allied player having made a generally first rate move in this challenging battle area, I have still managed to find a couple of "nits" to pick; to whit: first up, Chasse's mission (being positioned, as he is, at T47) is so unclear as to be a total mystery to me (why, for instance, is this unit on T47 and not on some other hex?); the second "nit" is, I confess, a rehash of a subject upon which I have previously commented: e.g., my strong view that Perponcher (and not a Prussian unit like Brause) should have been used to defend the Samme River west of Nivelles, a deployment that would have allowed the only Allied 6-4 in the game to both stack and fight along with the other Anglo-Allied units in the far west: something that is impossible for any Prussian unit in this sector because of the PAA noncooperation rules. Looking towards Nivelles, Division Brause, or even Henkel, could easily have taken the place of the Anglo-Allied Perponcher at Y39; as for the rest of the Prussian reinforcements in the Nivelles battle space: these units, by operating together in a relatively compact geographical area, are able to coordinate and execute -- because there would be no rule restrictions against their stacking or fighting together -- both offensive and defensive operations much more effectively.
In the Center (the Quatre Bras Heights): The PAA player -- because of the recent developments on other fronts -- decides to reduce the garrison on the Heights to the bare minimum requirement of Prussian combat units. And, although this course of action carries with it a modest amount of strategic risk, it is nonetheless hard to argue with the Allied commander's decisions in this sector: clearly, a fight is coming, and it is glaringly obvious that that fight will be at Nivelles and not at Quatre Bras. As a final thought: the only minor change that I would have made to the PAA player's 0900 move, would have been to dispatch Lutzow (currently at Z27) "hot footing" it towards Nivelles, and then, just to be prudent, I would have replaced him at Z27 with Schulenberg.
In the East (the Quatre Bras Gap and the Tilly Corridor): The Allied defense in the Quatre Bras Gap is straight out of the WATERLOO "textbook," and I wouldn't change a thing. On the other hand, when it come to the Tilly Corridor I would definitely have handled things on this front a little bit differently, if only because the French player's intentions in this sector are still -- at least to me -- unclear. To be fair, most of this player's PAA move is fine. However, because it is possible that the French player might forgo a Tilly drive completely (a mistake, in my view) or, alternatively, that he might fake a push into the Tilly Corridor for a turn or two before suddenly backtracking to consolidate all of his forces against Quatre Bras, I personally prefer different positions for a few of the Allied units in order to prepare for just such a possibility. In a nutshell then, the single change in unit dispostions that I would make for Tilly is this: Instead of all moving to S18, I would move Kampfen, Luck and Marwitz one hex further north to hex R19. That's it; that's my only adjustment. And while I would be the first to admit that this is not much of an alteration, the subtle advantage of this simple change is that, if a powerful French detachment does not immediately begin a serious push into the Tilly Corridor, then some or all of the units at R19 can be sent west to straddle the Thil River on the 1300 game turn; so that, on the 1500 turn, they would be in a position either to continue covering the Tilly Corridor or, alternatively, to quick march west towards Quatre Bras.
June 16-1900 PAA
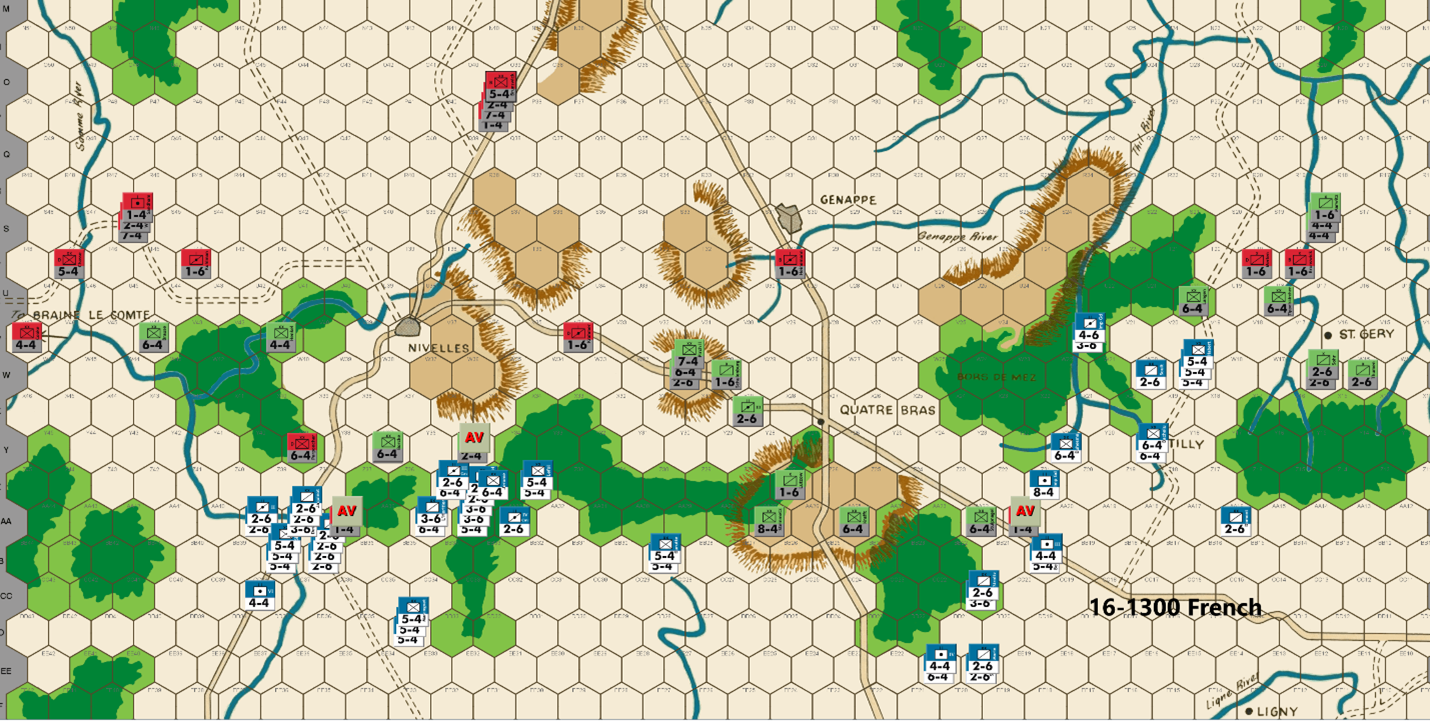
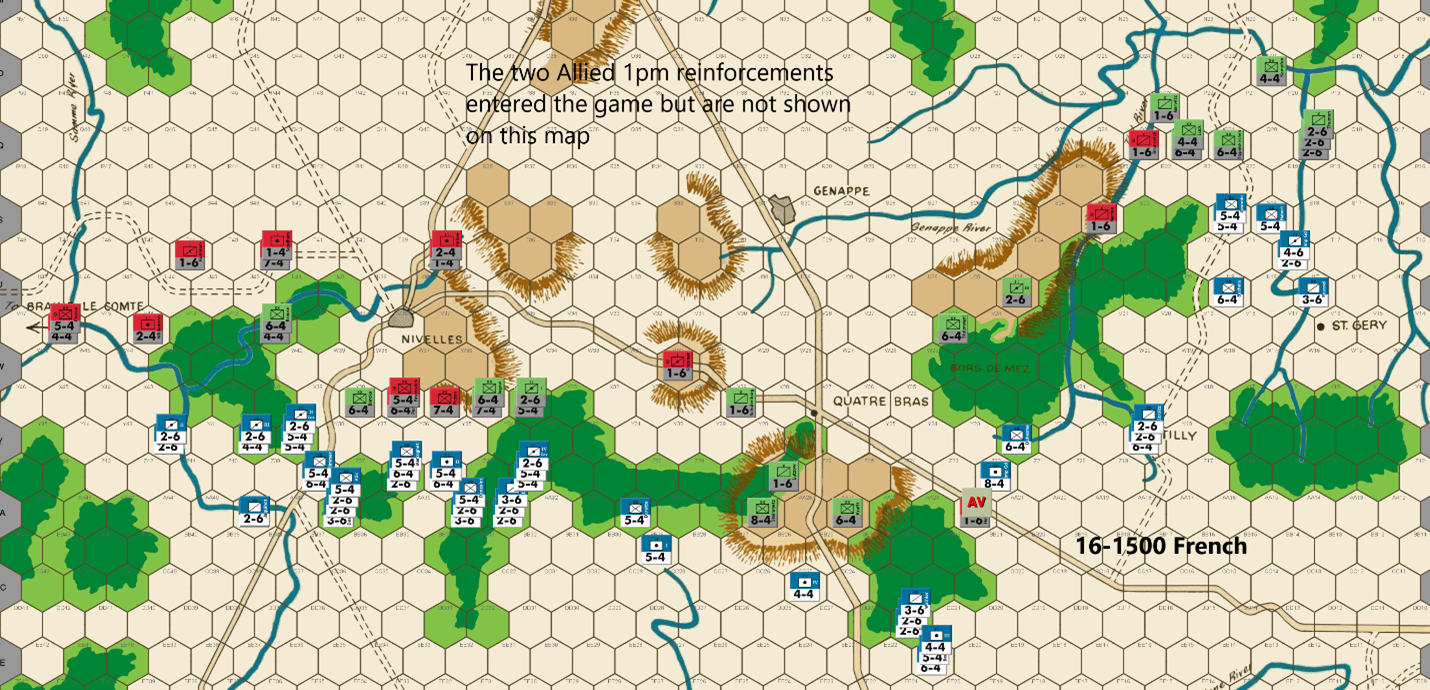
Bert: I was pleasantly surprised, for the most part, to see that Ed chose not to attack my units at Z34 & Z35 this past turn. His strong defensive position has made it certain that I won’t have an easy road ahead to fully break through the Nivelles bottlenecks as I like to call them. The good news, however, is that I am able to safely position my units this turn without any fear that a DB2 result would result in my unit(s) being lost. Establishing footholds in Z36, Y39 and Y40 are an important step in breaking down the PAAs position near Nivelles.
The bad news for me is that Ed was able to secure his positions across the entire front by offering up only a single blocking unit. That’s smart and effective play on his part.
My units are not in much of a position to threaten Braine Le Comte this turn but depending on what happens with the battle in front of Nivelles, I can quickly reposition my units to threaten the city prior to his 6/17 reinforcements arrival. That is currently the plan, but it will be scuttled if I prefer to keep my units engaged in a broad front battle at Nivelles instead. Ed is running low on Prussian units that can be used to soak off and while he has several Anglo-Allied units available and more on the way, I don’t think he’ll want to keep a fight going unless the dice yield uneven results for his side. Let me get those negative thoughts out of my head as quickly as possible! 😊
When I first made this move, I was so very tempted to launch a 1-1 attack vs Steinmetz position at hex AA27 on the center hilltop. I didn’t see any reason for Ed to keep that piece in that hex this past turn as he could have held the hilltop with the same two units but he would not have risked the downside of a DB2 result with one of his key pieces by flipflopping their defensive hexes. I normally don’t like to take reckless low odds attacks with the French when playing Waterloo, but those attacks are almost certainly necessary at some point, among evenly matched players to swing the balance. I mainly look for opportunities where success can break a position pretty effectively or if the unit is pinned and my low odds attack has it surrounded, like Steinmetz is when it’s at AA27.
Since I haven’t lost a piece yet, and the fact that minimal PAA units are in range to deal with a poor outcome (from the PAA player’s perspective), I was feeling rather strongly that this was the time to make such an attack, even if it meant risking 16 factors… In the end, I decided that it was better to wait a turn before making that attack. I’ve positioned enough units within range, so that AA27 won’t be 3-1 proof with just a 6-4 defending. This is intentional because I want to keep Steinmetz in that hex if I’m going to take a low odds attack against it. There is a chance that the hill defense gets withdrawn on Ed’s move, but I doubt it. If it does, I’ll probably look for an opportunity to attack Steinmetz at low odds when he’s not doubled on an upcoming turn. Of course, I’ll miss out on a DB2 result eliminating him, but it won’t cause me to risk the 16 factors, only 8.
I have no intention of pushing the battle in the Tilly corridor because he has too many defenders and I know that Quatre Bras should be my target for the combined center/eastern flank. Of course, Ed hopefully doesn’t know that I'm not going to be fighting heavily in the Tilly corridor.
My hope is that a relatively small French force can keep the rather significant number of PAA defenders tied up. If my units were withdrawn from that corridor to the Quatre Bras area, they would be standing around waiting another turn or two as Ed offers up blocking sacrifice units. It would allow his Tilly corridor defenders to start repositioning towards the defense in the center. I’m hoping to possibly draw Ed into launching an attack that costs him a soak off unit or like I said, keep enough force to pose a big enough threat to keep his units engaged in defending against a possible attack by my boys. I don’t expect to attack there unless he offers an easy target, or I see an opportunity to break his position with a low odds attack. Of course, his current position is not optimal for getting his Prussian defenders on the other side of the Thil River without being exposed to some sort of attack, so I guess I should never say never when it comes to ordering something to cause him angst.
I’m quite certain that we will have some action on either Ed’s coming move or on my next turn for sure, unless Ed shocks me and decides to fall back without giving me a shot at his line of main defenders.
Joe: As expected, things are finally heating up around Nivelles. I will say that, in view of Bert's first turn 3-1 attack versus Langen on the Ligny Plains (using a force of pure cavalry, to boot) I wasn't really too surprised that -- in order to clear the eastern forest corridor -- he decided to risk getting hit by a couple of surrounded Allied counterattacks last turn. In all honesty, its hard to fault his logic: with the first batch of Anglo-Allied reinforcements about to enter the battle space, delaying his attack would only have made his move against Nivelles more dangerous than it already was.
In the West (Nivelles and the Braine le Comte Road): This, in my view, is a particularly strong French move -- both tactically and strategically -- that does real damage to the Allied position immediately south of Nivelles. For starters, the French commander, as should be expected, picks off the Allied delay unit at AA37, and then advances three cavalry units after combat: this advance, by the way, is actually more important than it looks because it allows the French player to threaten a move with cavalry into Z37 next turn. Of far more importance, however, is Napoleon's decision to expose several of his units to surrounded PAA counterattacks by moving them into T34 and T35 in order to AV the Prussian 2-4 (on Y35). This French attack, although risky, actually makes a lot of sense. The hard fact is that this Prussian 2-4, by occupying Y35, poses a serious obstacle to French offensive plans on this front: first, because it blocks the north end of the eastern forest corridor; and second, because it also -- along with the Prussian stack at Y37 -- prevents the French from occupying the critically important Z36 hex. Of course, it now remains to be seen just how the PAA commander will respond to this audacious and troublesome French move.
In the Center (the Quatre Bras Heights): The strategic "die has been cast" in the west, so the French commander decides to strip off almost all of the units that had, until now, been pinning Steinmetz on the Heights at AA27and send them marching west towards Nivelles, leaving only enough local combat power behind to be able to threaten a 3-1 attack against a Prussian defensively line composed exclusively of doubled 2-6s, or, alternatively, robust enough to be able to advance in relative safety should the PAA player suddenly opt -- at some later point in the game -- to fall back in the center, completely abandoning the Heights in the process. Although this reduction in local French combat strength is hardly a surprise, it does finally remove any doubt that this sector -- at least in the eyes of this French player -- is now little more than a strategic "sideshow."
In the East (the Quatre Bras Gap and the Tilly Corridor): This sector has now been split into two very different fronts, and each of them presents the French player with its own set of opportunities and challenges.
The Quatre Bras Gap: The constricted terrain on this front -- regardless of the total combat power of the local French contingent -- invariably slows the attacker's advance north into the Gap to a hex or two a turn. Nonetheless, the French player should be satisfied with his situation on this front : first, because the Allied commander -- if, as is likely, he opts to reinforce Nivelles -- will then no longer have anywhere close to sufficient local combat power with which to mount any kind of plausible counterattack into the Gap; and second, because the PAA player is also rapidly running out of room in which to deploy his delay units. In view of these facts, a methodical French advance seems to be in order, especially since -- no matter what the Allied player does on this front -- the northern end of the Gap is virtually certain to come under threat of a French attack in only two more game turns. And, assuming that most of the available Prussian reserves have been committed to the fight at Nivelles and are no longer within supporting distance of the center, during the next few game turns, then it is possible that the scene might be set for L'Armee du Nord to simply walk into Quatre Bras unopposed sometime on the morning of the 17th of June.
The Tilly Corridor: The "bare bones" tactical approach that L'Armee du Nord is employing in its advance against the sacrifice/delay-based Allied resistance in the Quatre Bras Gap -- at least at this stage in the campaign -- seems somehow less like a protracted battle, and more like an unexciting game of "whack a mole". However, this is not the case when it comes to the French commander's conduct of his offensive against the PAA defenders in the Tilly Corridor. This is because, unlike the Quatre Bras Gap, the much longer Tilly Corridor is clogged, for more than half of its length, with a maze of forest and river hexes, and even when the forests are left behind, as the French drive north towards Wavre, there are still rivers running north-south and east-west that act as both barriers to movement, and as force-multipliers for the Corridor's defenders. Needless-to-say, because of this difficult terrain, French progress can often be painfully slow, even against a token force of Allied defenders; against the reinforced and flexible IIIrd Prussian Corps (of twenty-nine combat factors) defending the Corridor in this particular instance, however, it is both tricky and dangerous. Thus, it is not surprising that the initial French moves into the southern end of the Corridor have been cautious. Clearly, Napoleon's initial advance into this sector was organized so as to deny the Allied player any attractive opportunities for an early counterattack against the French vanguard, while, at the same time, leaving French options completely open. This explains why Bachelu and Morand are positioned on the "switch" Y19 hex, between Quatre Bras and Tilly -- to be ready in case the PAA reserves near W31 do not actually march west towards Nivelles on this turn -- and why Habert, Hulot and Jeannin were moved to W19: a position that can only be attacked from two hexes, and that will also leave any Allied attackers vulnerable to a powerful French counterstroke. Finally, the move of the two "heavy" cavalry units to V22 -- while no doubt a minor bother to the PAA -- is probably "over kill." The mission of these two units was apparently to draw at least one, or maybe more, Prussian units east to block the (unlikely) possibility of French cavalry infiltrating through the Borz de Mez, but this was probably a task that did not require the use of a pair of "heavy" cavalry units (a 4-6 and 3-6 to be exact), but probably could just as easily have been accomplished using one or two of the much more numerous 2-6s.
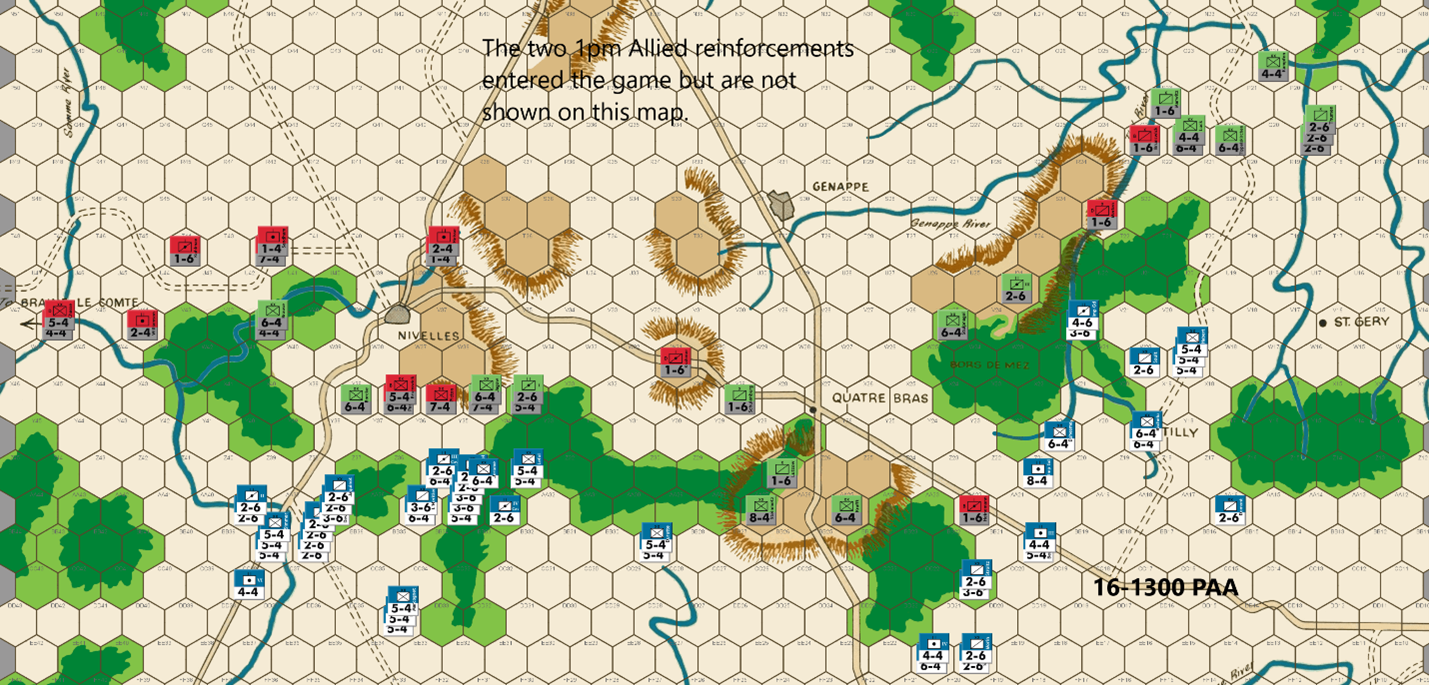
Ed: My hopes were dashed when the French attacked Y35. This is not that surprising, and I think the right move. Unfortunately, I don’t see a good counterattack. One problem for any PAA attack is that it more quickly consumes the precious supply of 1-6s. Instead, I deploy an array of “heavies” along the X-file row. This is an awkward area for French attacks since they do not occupy Y39 & Z36. By my count, the French will only be able to get a single 3-1 or a 4-1 attack. An exchange on Picton will cost the French two units. Perponcher and Brunswick are at X37 to increase the probability of French soak off losses should they attack. Pirch II and Jagow are at X35 to increase the likelihood that at least one will remain to assure any French soak off from Y34 will die. And finally, the 1 st HA and II FA are stacked at X 34 to prevent a 3-1 on both units in that hex.
Because the French far outnumber the PAA, Napoleon might just decide to combine low odds attacks with a 3-1 in an attempt to deplete the Allied forces. The two units at V41 are not needed for defense of the Samme River and add to the potential counterattack force next turn if a worthwhile target presents itself. Most likely I will withdraw next turn. Barring a successful low odds attack vs Borcke at X38, this alignment will delay the French for a turn irrespective of any attack results on his left flank.
Since the French did not occupy BB21 or Y24, one blocker at AA22 holds the Quatre Bras gap. I keep Steinmetz at AA27 to prevent a 2-1 possibility against a 6-4. Prussian units are sent to block French penetration of the Bors De Mez Forest. And the withdrawal continues in the Tilly Corridor.
Joe: In the West (Nivelles and the Brain le Comte Road): In the far west, Cooke and Chasse move to straddle the fork in the Samme River at V46, a hex from which they will be able to switch east or west of the river in one game turn. In addition, several of the 1100 Anglo-Allied reinforcements move to within one bound of the north-south Nivelles primary road and, hence, within reach of the Nivelles battle space on their next turn. A little farther to the east, French cavalry, as expected, picks off the delay unit at AA37 and then advances after combat; far more problematic for the Allies, however, is Napoleon's decision to gamble on the Nivelles front by risking an early attack against the 2-4 at Y35. This attack neatly puts the Allied player on the horns of a dilemma: An immediate PAA surrounded counterattack is certainly one possible response to this French move, but with no economical way to retain post-combat possession of Z36, such an aggressive and risky Allied line would be highly speculative. On the other hand, the failure to mount a counterattack would oblige the Allies to fall back towards Nivelles, thus opening up this front to a large-scale French advance. And although both PAA options have advantages and disadvantages -- in this instance, at least -- the French player's gamble pays off, and there is no Allied counterstroke. There are, of course, several reasonable explanations for why the Allied player chose to end this skirmish in the way that he did: it could have been because of the Allied commander's valid worry that his battle line would, on the next turn, have been exposed to a devastating French counterattack from three hexes, or it could have been because of his legitimate concern that -- regardless of the outcomes of the inevitable French counterattacks -- the potential cost in PAA exchange losses and/or soak-off units from his own counterstroke would just have been too high. Whatever his reasoning, the Allied player chooses discretion over valor and declines to rebuke the foolhardy French vanguard, opting to fall back towards Nivelles instead. And given the PAA units available for this operation, the fallback does allow reserves to come up which substantially reinforce the new Allied battle line. Here I do have one "nit" to pick with the Allied deployment, however, and that is the decision to place Picton at X36. As this 7-4 is currently positioned, the French can launch an early assault against this unit from two hexes on their 1500 player turn at 3-1, with two soak-offs, and the attackers would not incur any risk of a surrounded PAA counterattack. However, if X36 had been left unoccupied, then a 1500 French attack could realistically only be launched from Y34 and Y35 against the units in X35, and that would leave both French attacking stacks with no retreat, should the Allied commander decide to punish their impetuousness with a counterattack of his own. That said, this temporary respite should only last for a single game turn, and by 1700, the western wing of L'Armee du Nord -- regardless of whether or not the Allies have launched a preemptive strike on their 1500 player turn -- should be in a position, with virtually all of its local strength now present in the immediate Nivelles battle space, to assault the entire PAA line, from one end to another. The good news for the PAA player, such as it is, is that the early morning Anglo-Allied reinforcements are at last beginning to arrive in the Nivelles battle space; the bad news is that Napoleon's Left Wing, having stolen a march on the Allies without any real cost, will be able to start the real fight for Nivelles at least one turn earlier than usual. Finally, as one last tiny "nit:" I personally would have moved Krahmer (at W31) to W32 -- this change is negligible, as he can still reach the Quatre Bras Gap next turn -- but it does leave W31 open to Prussian occupation.
In the Center (the Quatre Bras Heights): Even though the French strength in this sector has been reduced to near irrelevance, the Allied player is still obliged to maintain some sort of defense line on the Heights. That said, the PAA commander decides to content himself with a minimal response to the French move, and only dispatches Stulpnagel and the IIIrd Corps Horse Arty to block the French cavalry attempting to infiltrate through the Borz de Mez. This move, in my view -- especially given the unfolding developments farther west -- seems a little too passive, all things considered. For my own part, I would have gambled on a move of Stulpnagel and Lutzow to W31. While it would be tempting to move Steinmetz to W31 and Stulpnagel to AA27, this could well end up being a wasted move, if the French commander shifts units back to the center. The only other change I would have made would have been to move Schulenberg to reinforce the IIIrd Corps Horse Artillery at U24, in order to help thwart the plans of the pair of sneaky French horsemen at V22. In addition, this position also sets up for either a move northeast onto the Thil River (and into the Tilly Corridor), or southwest back to the Quatre Bras Gap
In the East (the Quatre Bras Gap and the Tilly Corridor): At this point, the PAA move in the Quatre Bras Gap virtually makes itself; and this means that -- probably for the next couple of game turns, at least -- the only front really worth commenting on will be that of the Tilly Corridor.
The Tilly Corridor: On the whole, this turn's PAA move is both solid and flexible, and the only change that I might conceivably make would be to shift Kampfen one hex east to O20 from O21; other than that, I wouldn't change a thing. Now, turning to the foe: Even with late afternoon fast approaching, Napoleon's plans for the Tilly Corridor are still unclear. Looking ahead a turn or two, the French commander's present dispositions do suggest that he plans to continue his push farther north into the Corridor with a mixed force of thirty-eight factors, or so. On the other hand, these early French moves into the Corridor could just as easily be a feint, designed to tie down the Allied units in the Tilly Corridor for as long as possible. In fact, it's just as likely that the French player might really have no intention of driving north towards Wavre; and that, instead, he might actually be quite chary of detaching so much combat power from the current force covering the Quatre Bras Gap, particularly at this stage in the campaign. In any case, since both French options appear to be equally plausible, it looks like it will probably be at least one more game turn before Napoleon's intentions for the Tilly front really become clear.
Bert: I was pleasantly surprised, for the most part, to see that Ed chose not to attack my units at Z34 & Z35 this past turn. His strong defensive position has made it certain that I won’t have an easy road ahead to fully break through the Nivelles bottlenecks as I like to call them. The good news, however, is that I am able to safely position my units this turn without any fear that a DB2 result would result in my unit(s) being lost. Establishing footholds in Z36, Y39 and Y40 are an important step in breaking down the PAAs position near Nivelles.
The bad news for me is that Ed was able to secure his positions across the entire front by offering up only a single blocking unit. That’s smart and effective play on his part.
My units are not in much of a position to threaten Braine Le Comte this turn but depending on what happens with the battle in front of Nivelles, I can quickly reposition my units to threaten the city prior to his 6/17 reinforcements arrival. That is currently the plan, but it will be scuttled if I prefer to keep my units engaged in a broad front battle at Nivelles instead. Ed is running low on Prussian units that can be used to soak off and while he has several Anglo-Allied units available and more on the way, I don’t think he’ll want to keep a fight going unless the dice yield uneven results for his side. Let me get those negative thoughts out of my head as quickly as possible! 😊
When I first made this move, I was so very tempted to launch a 1-1 attack vs Steinmetz position at hex AA27 on the center hilltop. I didn’t see any reason for Ed to keep that piece in that hex this past turn as he could have held the hilltop with the same two units but he would not have risked the downside of a DB2 result with one of his key pieces by flipflopping their defensive hexes. I normally don’t like to take reckless low odds attacks with the French when playing Waterloo, but those attacks are almost certainly necessary at some point, among evenly matched players to swing the balance. I mainly look for opportunities where success can break a position pretty effectively or if the unit is pinned and my low odds attack has it surrounded, like Steinmetz is when it’s at AA27.
Since I haven’t lost a piece yet, and the fact that minimal PAA units are in range to deal with a poor outcome (from the PAA player’s perspective), I was feeling rather strongly that this was the time to make such an attack, even if it meant risking 16 factors… In the end, I decided that it was better to wait a turn before making that attack. I’ve positioned enough units within range, so that AA27 won’t be 3-1 proof with just a 6-4 defending. This is intentional because I want to keep Steinmetz in that hex if I’m going to take a low odds attack against it. There is a chance that the hill defense gets withdrawn on Ed’s move, but I doubt it. If it does, I’ll probably look for an opportunity to attack Steinmetz at low odds when he’s not doubled on an upcoming turn. Of course, I’ll miss out on a DB2 result eliminating him, but it won’t cause me to risk the 16 factors, only 8.
I have no intention of pushing the battle in the Tilly corridor because he has too many defenders and I know that Quatre Bras should be my target for the combined center/eastern flank. Of course, Ed hopefully doesn’t know that I'm not going to be fighting heavily in the Tilly corridor.
My hope is that a relatively small French force can keep the rather significant number of PAA defenders tied up. If my units were withdrawn from that corridor to the Quatre Bras area, they would be standing around waiting another turn or two as Ed offers up blocking sacrifice units. It would allow his Tilly corridor defenders to start repositioning towards the defense in the center. I’m hoping to possibly draw Ed into launching an attack that costs him a soak off unit or like I said, keep enough force to pose a big enough threat to keep his units engaged in defending against a possible attack by my boys. I don’t expect to attack there unless he offers an easy target, or I see an opportunity to break his position with a low odds attack. Of course, his current position is not optimal for getting his Prussian defenders on the other side of the Thil River without being exposed to some sort of attack, so I guess I should never say never when it comes to ordering something to cause him angst.
I’m quite certain that we will have some action on either Ed’s coming move or on my next turn for sure, unless Ed shocks me and decides to fall back without giving me a shot at his line of main defenders.
Joe: In the West (Nivelles and the Braine le Comte Road): Napoleon once wryly observed: "He that makes war and has never made a mistake, has not made war very long." Such is my view of the current French move. In the preceding game turns, this French commander's play has been audacious, tactically flexible, and precise; and, because of that approach, he has been able to apply relentless pressure on the PAA defense across the entire game map. Nowhere is that truer than here on the Nivelles front where the Left Wing of L'Armee du Nord has managed -- through a combination of bluff and rapid maneuver, and at absolutely no cost -- to gain one full game turn, and possibly two, on the Allies. The present French situation -- at least in my view -- could hardly be better: the Allied defenders are stretched thin to cover Quatre Bras, Nivelles and the Tilly Corridor, while the French force in the west, all by itself, currently numbers over one hundred combat factors, and includes fully two-thirds of the Emperor's cavalry. Now, with all of these factors working in Napoleon's favor, it would seem to be the perfect time to really press this French battlefield advantage. Unfortunately, this latest move -- in stark contrast to those that have preceded it -- is the first that has taken a noticeably more conservative and even cautious line, and thus, has allowed the Allied commander to either fall back completely unmolested, or, alternatively (assuming he is so inclined) to strike back at L'Armee du Nord in the west -- without an unacceptable amount of risk -- before the French hoards can debauch out of the forest corridors and onto the open ground immediately south of Nivelles. In any case, although there are a couple of positional "tweaks" that I would personally have made to this French move, the majority of these are, admittedly, as much a matter of personal style, as anything else. That said, my main problem with the French player's approach on this turn is that, although he has been presented with a rare opportunity to launch an early attack against an Anglo-Allied 7-4 (in this case, Picton) in the open at 3-1 -- granted, with two soak-offs required -- he has declined the 70% chance to eliminate this powerful unit while it was exposed and not doubled. Needless-to-say, such an opportunity could arise again in the next few turns -- always depending, of course, on the future actions of the PAA commander -- but the fact remains that attacking a 7-4 in the open is virtually always going to be considerably less risky than assaulting the same unit later on when it is doubled. Moreover, in addition to the likely destruction (whether through DE or Exchange) of Picton, launching this speculative attack would have been immediately advantageous to the French for two other reasons: first, it would have forced the Allied units defending in front of Nivelles to either counterattack or to withdraw north to a hex row that -- at least at its western end -- would have had river and forest hexes immediately to their rear; and second, it would have allowed several of the French units, presently stuck in the eastern forest copse, to directly enter the fight for Nivelles, by moving into Z34 on this turn, without the risk of being surrounded because of forest hexes.
In the Center (the Quatre Bras Heights): Interestingly enough, this front has suddenly become a lot more promising for the commander of L'Armee du Nord. Two positional adjustments have effected this change: first, the French player, no doubt hoping to force an early PAA withdrawal from the Quatre Bras Heights, has taken pains to position his units so as to restore the pin on Steinmetz at AA27; and second, he has moved additional French reinforcements into DD22 and EE21 which, as a result, has established a nicely-balanced reserve that can switch either to attack the Heights, or back to support operations in the Gap. In the East (the Quatre Bras Gap and the Tilly Corridor): The Quatre Bras Gap: The action on this front proceeds as expected, with another Allied delay unit being eliminated as the French advance methodically ever deeper into the Gap. Next turn, Napoleon will at last be able to position a stack at AA23 with which to threaten a concentric attack (from AA24, BB24 and BB25) versus AA25: such a move should unhinge the Quatre Bras Heights defense, and, by so doing, finally force the PAA to give up the "lynch pin" of the Allied center.
The Tilly Corridor: If, as is my view, the Emperor has been a bit overcautious in the far west, he just might have been a bit overly-aggressive in the far east. In truth, the dispositions of the vanguard units of the French Tilly expedition literally beg for an Allied spoiling attack. And while it is certainly reasonable for the IIIrd Prussian Corps to continue its withdrawal on this front; it is just as reasonable for the PAA commander to choose precisely this moment to turn and fight. That said, if the Tilly Prussians do decide to suddenly wheel around and strike back at their pursuers, then there is only one attack option available to the PAA commander that I would personally choose: a 5-1 versus Habert, from R19 and R20, with a post-combat advance by Marwitz into S19. Admittedly, even a DE result would not cripple this French contingent, but the loss of a 5-4 might oblige the French either to rush reinforcements northeast to shore up their Tilly detachment or, alternatively, to pull this force back, at least for a turn. And, even in the worst case scenario, if the French were to substantially reinforce their Tilly contingent, then the units of the Prussian IIIrd Corps, rather than continue the fight, could simply resume their retreat until they were able to take shelter behind the Thil and Genappe Rivers.

Ed: In the Nivelles theater of operations, the French follow what I think is the more prudent course which is to position for favorable attacks next turn. I follow through with my strategy – block the French and avoid any serious confrontation against a greatly superior force. Perponcher and Picton are at W38 to discourage the French from occupying the position. If they don’t, it will cost them a turn’s delay. I expect the French to move into the hex, but at least it will improve the odds of causing casualties against the required soak off.
I debated placing two 6-4s at W36 to discourage a low odds attack. In the end, I decided to go with one infantry in order to position the second 6-4 better to defend the Quatre Bras gap along with other withdrawing Prussians.
In the far west, I keep sufficient “heavies” available to 3-1 proof the Samme River against an expected serious threat next turn from French infantry and cavalry.
Sadly, I have to spend a blocker in the Tilly Corridor because I was not able to get an infantry in position to defend the Thil River against the advancing French infantry. I really hate giving up 3 blockers in one turn.
Joe: In the West (Nivelles and the Braine le Comte Road): West of Nivelles, the defensive predicament of Williamson (a 2-4), north of the Samme River is temporarily ignored by the French player -- at least for the time being -- as he does not bother to deploy even a token cavalry force of three to seven factors on the primary road hex at Z38; had he done so, this small contingent, if unnoticed by the PAA player, would have been enough -- when combined with the French cavalry at Y42 and AA39 -- to stage a sudden surprise 3-1 nuisance raid against Williamson's position at V44. Needless-to-say, the Allied commander is cognizant of the French threat to the Samme River, and so moves to rectify this problem by sending Alten (a 7-4) and Brunswick (a 5-4) west to replace the vulnerable 2-4. Farther east, the Allied units in the Nivelles sector actually catch a welcome break, as the French player opts not to press his advantages in tempo and combat power by immediately attacking through the eastern forest corridor on this game turn; but instead elects to cautiously deploy his units into the northern forest hexes in preparation for an all-out attack against the opposing PAA battle line on the 1700 game turn. However, this temporary absence of offensive pressure from the French Left Wing, creates an unusual situation in which control of the near-term trajectory of the action in the west, unexpectedly flips to the PAA commander at Nivelles; the question suddenly becomes: what should he do right now? In basic strategic terms, the Allied player really only has four viable options: a) he can selectively counterattack the advancing French (probably at Y39 and Z36); b) he can sit tight and reinforce his line along the X hex row; c) he can hybridize options "a" and "b," and attack Y39 from X39 (making sure to leave a post-combat sacrifice at Y38), while, at the same time, he reinforces the PAA line along the X hex row; or d) he can essentially "throw in the towel" when it comes to a protracted fight for Nivelles and, instead, pull the local Anglo-Allied contingent back to the W36 ridge hex and beyond, while leaving a delay unit at X38, and while also sending the Prussians quick-marching back towards the center and a possible battle at Quatre Bras. Somewhat unexpectedly, given my own experience competing against this Allied player, he chooses Option "d". And while somewhat surprising, this decision to temporarily avoid battle -- although it is far and away the most passive of the four alternatives -- does have a compelling pair of advantages which is probably what convinced the PAA player to decide in its favor; to whit: it is, indisputably, both the least risky, and the most economical -- at least in terms of immediate PAA casualties -- of any of these four Allied Nivelles defensive plans. Unfortunately, along with this "delay and fallback" strategy's advantages, there are also a couple of potential disadvantages which are really too important not to be considered. The first of these is the "time/terrain problem." What this refers to is simply the close relationship between the terrain on different sections of the map board, and the rate (in game turns) at which L'Armee du Nord is able to traverse those different map sections in its march north towards the Brussels Roads victory hexes. This rate of advance is critically important because the French Army starts in the south and, as a general rule, the southern half of the game map -- thanks to a landscape cluttered with forests and rivers, as well as with a few critically-sited ridge lines -- severely limits and channels the initial French advance into a small number of predictable avenues and, by so doing, heavily favors the PAA defenders, especially during the early turns of a typical game. Since the northern half of the map board tends to be much friendlier to the French player than to his PAA foe, it stands to reason that the earlier in the game that L'Armee du Nord can push the Allies off of the southern and onto the northern half of the game map, the better its chances for victory will be. And there's the real defect in relying too heavily of the "delay and fallback strategy:" sacrificing delay units can slow the advance of the French Army, but only combat can actually halt it, even if only temporarily. One handy, if crude way for players to actually assess this game metric is for them to check to see how far north on the game map the French Army has advanced by the morning of 18 June: if it is attacking near Mont. Ste. Jean, then Napoleon's prospects for victory are probably pretty good; on the other hand, if L'Armee du Nord is still fighting on or near the "Genappe - Nivelles Line," then the PAA will most likely have the edge. The second disadvantage of an Allied over-reliance on a "delay and fall back" strategy is the "comparative casualties problem." In a nutshell, this refers to the different capacities of the French and PAA armies to each absorb battlefield casualties as the game progresses. By way of explanation, the French Army starts play with fifty units, and receives no reinforcements for the balance of the game; the Allies, on the other hand, begin the game (assuming no unit removals) with thirty-five units and, over the course of the next fifteen game turns, receive forty-three more units as reinforcements. What this means is that, even accounting for Allied unit removals and for accumulating losses due to the steady drain of sacrifice/delay units, mutual battlefield attrition will -- assuming that Allied casualties do not reach catastrophic levels -- almost always do more long-term damage to the French than to the Allies, because -- if one does the math -- each PAA unit represents a smaller percentage of the Allied total combat strength than each French unit does. Finally, so far as the Allied player's execution of this strategy is concerned, I will offer only one caution (which doesn't even rise to the level of a "nit") concerning just a single part of this Allied move, and that is this: the positioning of Perponcher and Picton at W38, while appealing because of the fact that their combined combat factors guarantee the elimination of a 2-6 soak-off should the French player decide to occupy X37 in strength, is nonetheless, not without risk; on the contrary, it should be noted that Picton can be attacked at a basic 1-1 (30/40 risk/reward with a 5-4 and 2-6), and Perponcher at a basic 1-2 (30/20 risk/reward with a 3-6) and that these attacks would still allow the French player, regardless of the final outcomes of these two low-odds attacks, to retain post- combat control of X36 with a 5-4.
In the Center (the Quatre Bras Gap): Things may finally be about to heat up on what, hitherto, has been a comparatively uneventful front. As expected, the local French commander has restored the pin against Steinmetz at AA27; and, at the same time, he has increased pressure on the Heights by maintaining swing stacks at DD22 and EE21. It will no doubt come as a big disappointment to him when he discovers that the Prussian units seconded to Nivelles earlier in the game, are now quick-marching back to the center. Next turn, the French will almost certainly occupy AA23, and that will then make a 3-1 concentric attack against AA25 possible on the 1900 game turn. However, although AA25 cannot be made 3-1 proof as long as Steinmetz is pinned at AA27, the Allies can still make this troublesome hex virtually impervious to immediate capture by garrisoning it, either with two 6-4s or with a 6-4 and 7-4; in addition, as an emergency alternative, the French can also temporarily be kept out of AA25 simply by the PAA completely abandoning the hex, while, at the same time, heavily garrisoning AA26 and Z25, instead. This stratagem is guaranteed to prevent the French capture of AA25, at least for a single turn, and depending on the French commander's appetite for risk, maybe longer.
In the East (the Quatre Bras Gap and the Tilly Corridor): Another turn in the Gap, another delay unit sacrificed. Of course, since the Allies have almost run out of Gap to delay in, this sector shows every sign of heating up in the next turn or two.
The Tilly Corridor: In my previous comments, I acknowledged that, although my personal inclination was to launch a surprise 5-1 attack against Habert along with a post-combat advance by Marwitz into S19, I also admitted that such an attack was not without some risk and that, because of that fact the decision on whether to attack or to continue to fall back was really a "coin toss" for the PAA player. However, now that it is clear that Marshal Blucher has ordered the Ist and IInd Prussian Corps back to the center in order to concentrate at Quatre Bras, I've changed my mind! I now consider the attack against Habert to be the best possible option on this front. Moreover, I also believe that to insure that -- in the event that the French want to fight it out deep in the Corridor -- the IIIrd Corps will actually have enough staying power for a protracted fight, that Merlen should shift onto the Thil at Q23, and that Stulpnagel should move onto the Thil at R23.
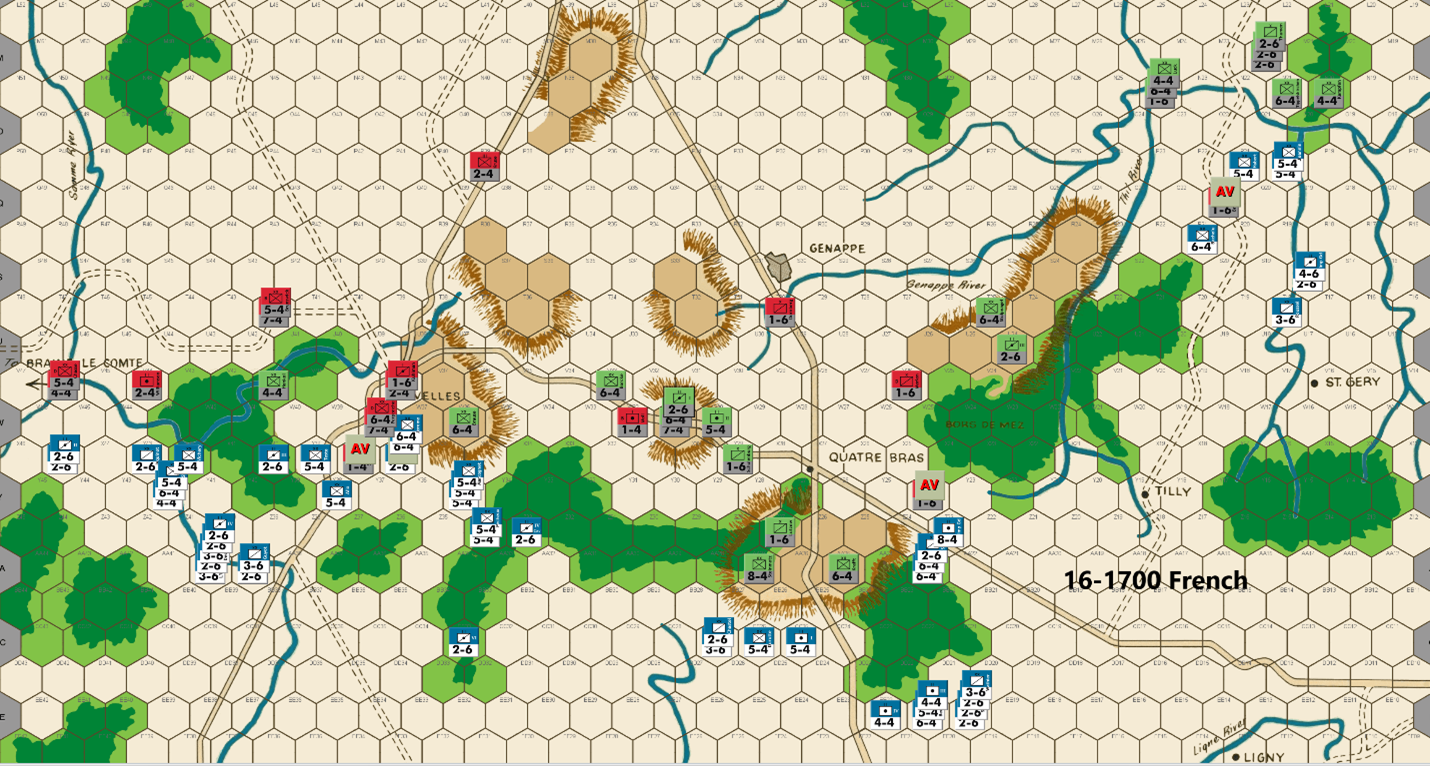
Bert: I guess that I ended up getting shocked when I saw that Ed fell back in the Nivelles region without initiating the fight for that area. He has protected his army, which is almost never a bad strategy for the PAA in this game, but he has allowed me to gain control of the Y row of hexes with little to no cost. This is important because it allows me units to have a retreat route on any attack he makes from here forward. I feel fortunate to break through the Nivelles bottlenecks without losing a unit. Of course, I didn’t get a decent chance to kill any of his big units either… so I’ll have to deal with a lot of them in the upcoming mid and end game.
Getting units into hex X37 is important to my French position this turn, so I’m offering up a cavalry as my first lost unit in the game to take it and try to hold it. The hex offers nice protection for my unit at Y39 because W39 leaves no place for the PAA units to retreat from, should he attack from there. More importantly, X37 makes it challenging for Ed to hold the Nivelles hilltop on the next turn, without him attacking me. By losing my soak off unit but leaving a formidable stack of two 6-factor units in that hex, I’m putting pressure on Ed to get him to fall back a hex further than he intended on this coming turn. He hasn’t shown the desire to fight for ground yet (nothing wrong that as I noted above), so I’d be surprised if he’ll want to do so for this hex; we’ll see.
Further to the west, I’ve shifted a significant force to a position to threaten Ed’s ability to hold Braine Le Comte through the 0700 6/17 turn. I’m expecting Ed to offer Williamson as a sacrifice on hex V45 this coming turn, which will screen the west side of the river so that I can only attack from one hex. I’ve tried to prevent him from blocking me from hex W44, as this might allow me to breach the river the following turn. Getting to kill an extra PAA blocking unit is good by itself, but I’d like even more of a gain from this position. I’m not sure if my threat is enough to draw his units at T42 westward to deal with my foray. Worst case, I can easily swing most of my threatening units back towards Nivelles if a fight breaks out near there or a better attack opportunity arises.
In the center, I’ve shifted some of the cavalry, that were initially dispatched to the west to assist in breaking through the bottlenecks, back eastward. They haven’t missed much action in the center and their mobility will have them arriving back there just in time for when I’ll need them.
Last turn, I wrote that I would probably be launching a low odds attack against Steinmetz this turn…, but I decided that with Ed’s significant shift of Prussians back to the flexible center position, the center hill is not as vulnerable as it was last turn. I expected the fight to happen in the west and since it hasn’t, I decided I should not tempt fate by making that low odds attack when his unit is doubled, and he has reinforcement in position to mostly plug any resulting hole.
I’m a bit worried that Ed might launch an attack vs my weak position at Z23 & AA23. With his 38 Prussian factors now in range of those hexes, he can get something like a 3-1 vs my 8-factor Imperial Guards unit and a 6-1 vs my cavalry unit while it would only cost him a single soak off unit. With Borcke & Stulpnagel both slightly out of range of my units in that area, that attack would almost certainly require Ed to give up the doubled hilltop hexes this turn. It’s possible he makes that attack, but that would seem to be out of character for the way Ed is playing this game so far.
Finally, I did not expect Ed to offer me another ‘free’ blocking unit in the Tilly Corridor. That was enough to keep my units engaged with this “mostly a feint” for another turn. What is nice about keeping my French forces in that area as a threat or nuisance, is that Ed committed 5 units to the east side of the Dyle River on this turn. If I’m going to be attacking anywhere in that area, I suspect it will be to swing my units westward so that they can fight to cross the Thil River and then hook up with my forces that will eventually (HOPEFULLY!) breakthrough in the Quatre Bras area. If he wants to offer up any additional blocking units northward, I’ll probably chase and take them, but with his 5 units in that direction, I don’t expect that to happen.
Joe: In the West (Nivelles and the Braine le Comte Road): The French move in this sector virtually makes itself this time around. Because Napoleon's Left Wing is at least one and maybe even two game turns ahead of schedule in the west, the French player has the surplus combat assets and the extra time available with which to both mount a credible (if perfunctory) threat against the PAA Samme River defenses, and to also aggressively push north, with comparative safety, towards the main western primary road junction. In the case of the push towards Nivelles, the French commander chooses the conservative approach and -- in order to deny the PAA commander uncontested control of W38 (as a delay hex next turn) -- occupies X37 with two 6-4s and a sacrificial 2-6 soak-off. I should note, at this point, that although I personally would have been sorely tempted to take a chance on a pair of speculative low odds (a 1-1 and 1-2) attacks against Picton and Perponcher (in W38), I cannot fault this French player for making the more prudent play, especially considering the mob of Prussians still lurking around W31. That said, the only small "nit" that I could find to pick with this French move concerns the position of the III Corps Horse Artillery: it accomplishes virtually nothing in its present hex (X40), but had it been moved to Y38, then it would have increased the combat factors available with which to attack V44 (from forty-three to forty-five factors). More to the point, this small juggling of combat power, while not inconveniencing the French commander in the slightest, would, nonetheless, have added yet another niggling little worry to the Allied player's already challenging defensive problems in the far west.
In the center (the Quatre Bras Heights): The French contingent in front of the Quatre Bras Heights continues to pin Steinmetz at AA27, while its central reserve at EE20 and EE21 makes ready to threaten future action against the Heights. Such action, were it to come, would probably either take the form of a head-on low-odds assault, or -- if the French player is willing to wait two more game turns -- a concentric 3-1 attack against AA25; an assault which would also require the direct support of units from the French force already deep within the Quatre Bras Gap.
In the East (the Quatre Bras Gap and the Tilly Corridor): The French continue to advance into the Gap at their usual pace of one hex per turn, eliminating yet another Allied sacrifice/delay unit as they go. The one major situational change this turn, is that the path has at last been pried open for the French to occupy AA23 next turn. Now, "like the dog that, after years of chasing cars, finally catches one," it will be interesting to see what the French player actually decides to do with his new-found possession of this critical hex.
The Tilly Corridor: The Tilly Corridor can, for both players, be a very tricky and dangerous front in which to campaign; however, it can be particularly so for a French expedition that neither enjoys a significant numerical, nor a large combat strength advantage over the Allied force defending in this challenging sector. In view of that fact, this raid north towards Wavre has been astonishingly successful; especially since the French detachment conducting it is actually numerically inferior to, and enjoys only a very small advantage in combat power when compared to its foe: a reinforced Prussian corps. Be that as it may, through a combination of audacity and maneuver, this French detachment -- without incurring any losses -- seems to have succeeded in driving its more numerous Allied adversaries out of the Corridor and across the Thil and Genappe Rivers. If the Allies continue their retreat, and do not wheel around to take advantage of their second opportunity for a 5-1 attack versus Habert -- then this will be a signal accomplishment that, I think, nicely illustrates the validity of Frederick the Great's famous dictum: "L'Audace, l'audace, toujours l'audace."
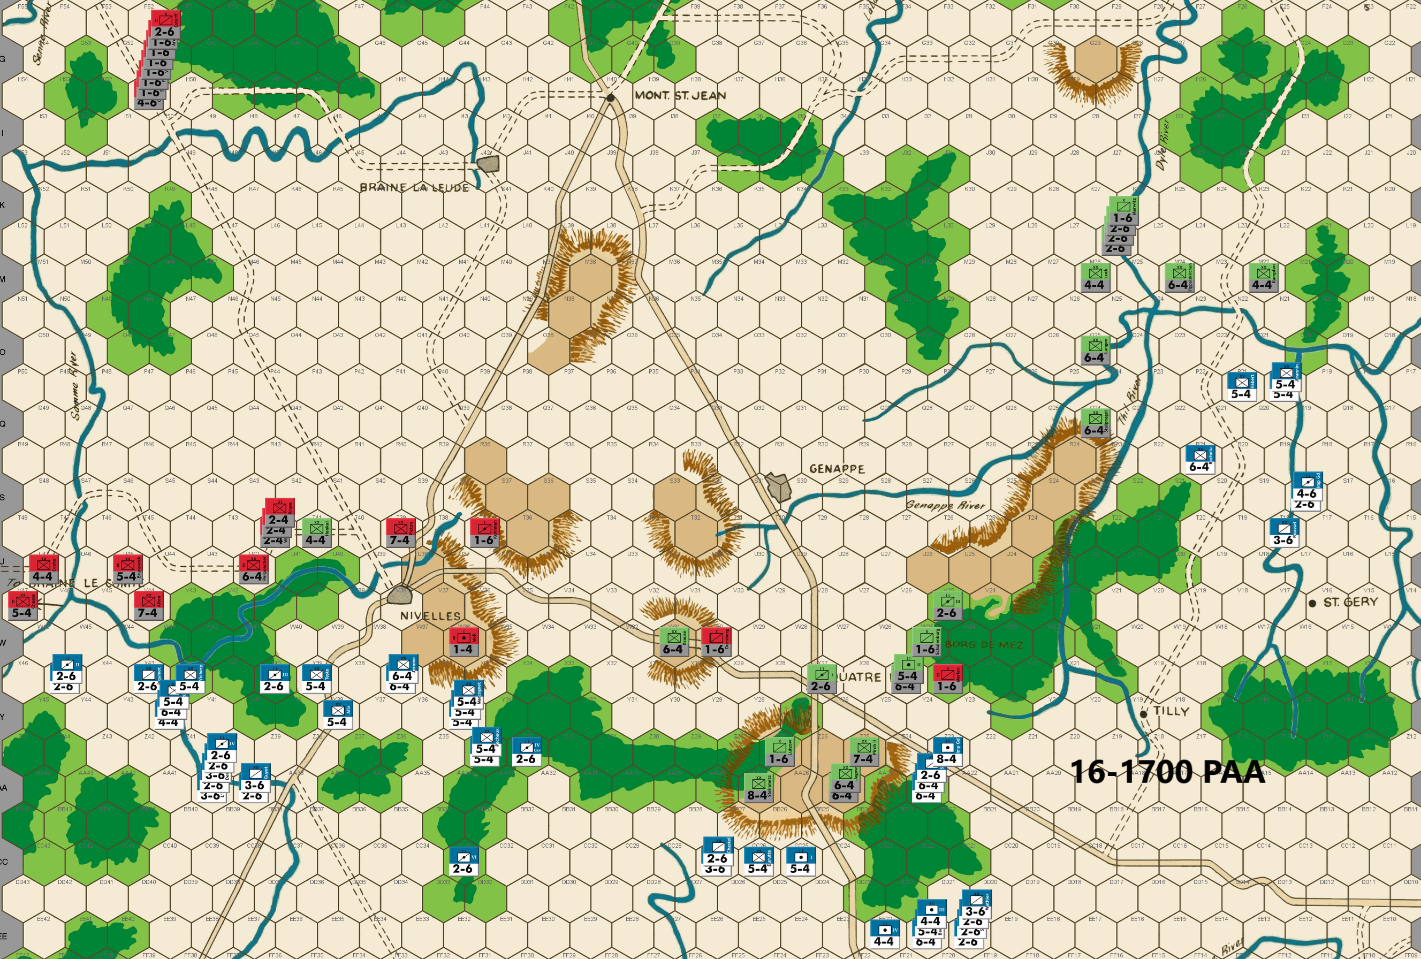
Ed: My goal in the west is to 3-1 proof the Samme River keeping U47 out of a French ZOC so as to bring the 17-0700 reinforcements on the Braine Le Compte Road. As expected, Bert threatens the Samme River now that he has broken into the open south of Nivelles, but with only 43 factors rather than the 45 I anticipated. That means only one infantry flanker is needed for Alten rather than two. This frees up Henkel to begin the slow migration east to join up with his Prussian brethren. I note that Bert has a 5-4 infantry X42 who could move to W42 next turn. Three 2-4 units move within range to support a surround attack if he does.
An Anglo-Allied blocker is used southeast of Nivelles at W36 along with a typical river defense. I decided not to deploy a Prussian 6-4 at V36 hoping to cause a soak off loss from V37. I cannot afford to lose any infantry to lucky low odds attacks.
Steinmetz is again pinned to AA27, given the array of French attackers within range. I double up on AA25 to prevent any 3-1 advance on the hex which is my standard defense against this French deployment. I would not attack this hex as the French because of the exchange and Prussian surround counterattack risks. We will see how bold Bert is. The French did not occupy Y23, which surprised me. It allows me to place a blocker at X24. Any French attackers at Y24 can be hit with a surround attack and have to soak off vs 11 factors at X25. If they do not attack from Y24, I gain another turn of delay in the gap. I’m guessing Bert will move into the hex since I don’t think he will want to lose a tempo.
I use a typical defense in the Tilly Corridor with 3-1 proof river defenses. I’m doubtful that the French will push north with such a weak force. I expect they will mostly threaten the Thil & Dyle Rivers to keep significant Prussians from the central front. We will have to yield the Thil River however, once the Quatre Bras forest gaps are breached. I do not expect any low odds attacks here.
Joe: In the West (Nivelles and the Braine le Comte Road): With Nivelles about to fall to the French, the western Samme River has become the PAA main line of resistance in the west. Fortunately, the Allied commander has (barely) enough local forces to render this line pretty much secure -- always barring low-odds attacks, of course -- until the Anglo-Allied Cavalry Reserve and the 17 June 0700 Braine le Comte reinforcements can arrive on the scene. This line, however, is probably not his primary concern: the main problem confronting the PAA player -- at least in my view -- is actually the speed at which the French Left Wing is advancing on the Nivelles front; which is to say: once the Allied sacrifice at W36 is cleared (followed by an automatic advance after combat), then the French will be able to begin pushing east along the primary road back towards the center; this eastern advance should quickly render the continued PAA defense of the Quatre Bras position untenable, and will require -- in order to conserve both regular combat and soak-off/delay units -- an early Allied withdrawal north to the Genappe-Nivelles defense line.
In the Center (the Quatre Bras Heights): As expected, the Prussians have fortified the Quatre Bras Heights as well as they could, so we should soon see exactly how much appetite for risk the French commander actually has. Unfortunately for the Prussian defenders, after strongly garrisoning AA25 and Z25, there were not enough units left to effectively garrison AA26 as well; this means that the French player could theoretically attack the eastern end of the Heights at a cost of a single soak-off. However, all is not as meets the eye. In point of fact, since such an attack would leave any surviving French units at AA24 exposed to a Prussian surrounded counterattack -- unless, that is, one or more French units also occupied Y24 -- it is highly likely that the Imp. Gd. Foot Arty would be posted to that hex with orders to attack Merlen at 8-1, while a 2-6 came along for the 1-6 soak-off against X25.
In the East (the Quatre Bras Gap and the Tilly Corridor):
The Quatre Bras Gap: The Allied move on this front is pure "textbook" WATERLOO. Schulenberg is set up for a soak-off/surround move to X24, should the French venture into Y24 without any flank protection. The main goal of this threat, of course, is to discourage an attack against Merlen from Y24 and, by so doing, to preserve X25 as a delay hex next turn.
The Tilly Corridor: The Allied player makes the same questionable choice that he made on the last turn and again declines to rebuke the impetuous French with a surprise against their vanguard; instead, he chooses to continue his retreat across the Thil and Genappe Rivers. This is an unforced error, in my opinion: the French player has again exposed his advancing column to a Prussian counterstroke: a surprise attack that -- in my view, at least -- has now, because of the absence of any local French reinforcements in the Corridor, become irresistible, especially since Stulpnagel and the III Corps Hrs. Arty can both move to straddle the Thil River at R23 and S23, respectively. Granted, it is always prudent -- because of the remoteness of this front -- for the Allied player to conduct operations in the Tilly Corridor with a great deal of care; however, when circumstances are such that an attack can be launched with a minimum of risk, then I think that it should be done. Besides, the rare opportunity to chase the French back down the Corridor for a turn or two is just too appealing to turn down.

Bert: Ed’s move has me becoming more confident that he’s playing the PAA side with no plans to attack me unless he can do so with virtually no risk of a loss to his army. This is one version of a defense that I have played the PAA side with successfully. The premise is that you don’t want to lose any PAA units via a counterattack, including soak offs, so that there are more pieces that the French has to fight through during the game. This can be a winning strategy, especially if your opponent doesn’t spread your defensive units out across the board. The best way to counter this is to take some chances when you have an opportunity to severely disrupt the defensive flow.
In case you haven’t noticed, I think that now is the time to take a couple of chances. Despite my earlier comments, I won’t be taking a low odds shot against the center hill. Ed has shifted his forces over the last two moves so that what was a brittle position that might have been broken had I taken the attack two turns back, is now one of his strongest positions on the board.
I have probably played Waterloo close to 100 games over the years. I don’t recall a PAA commander committing so much defensive force to the Braine Le Comte area in any of those games, ever! Yes, I projected a lot of force in that direction for a possible attack, but the response has been overwhelming and so I’m not going to push a losing position. By moving BOTH the 5-4 and 7-4 westward to defend the V45 side of the river, and what I think is a misplacement of Moll at W36 instead of V37, Ed has left his 7-4 at T39 particularly vulnerable to a low odds attack. I think Moll at V37 and Brause at V35 would have been a better defensive position for Ed. Anyway, I determined almost immediately upon seeing his move, that I would be attacking T39 on my move since both the defenders to the west and the 5PM reinforcements are two turns away from helping to fight for that river bend. If I manage to get lucky and breakthrough there, it will leave us fighting in open ground, which strongly favors the French side, especially this early in the game. I struggled with making it a 1-2, 1-1 or 2-1. In the end, I decided that the 1-2 was enough of a gamble. This is especially once I realized that I could flood the potential attacker retreat hexes with 11 or more factors so that Ed will be forced to retreat Donzelot to V36, if an AR is rolled. This will take away the optimum delay hex that Ed would like to utilize. I’ll be even happier with a DB2, to advance across the river or an Exchange took take out one of the major defensive pieces. The AE risk seems well worth it. I just don’t know if I should have fully committed to break the river with a higher odds attack that would have made a D Elim outcome, a possibility…
In the center, I’m mostly repositioning my units so I can force a fight through the Y24 gap southwest of Quatre Bras. If I’m right about Ed not wanting to actually engage in a counterattack that might cost him a unit or more, I feel like I can be aggressive since I feel like my progress is too slow in this area. Frankly, it is due to Ed’s play with a small assist by me not taking the low odds attack when his units were two turns to the west.
My strategy in the Tilly Corridor has been a hot mess. I could probably play it safe but Ed has made what I believe is another positional mistake that has made a low odds attack just too tempting to pass up. Positioning Stulpnagel at Q24 instead of R24 has made a frontal attack against that piece a surrounded attack due to the river behind those men. I debated what odds made the most sense for this attack and here I settled on the 2-1 attack that I’m making. Once again, Ed is quite strong to the north of here but his position is vulnerable if I can eliminate his defender. The risk of losing 24 factors on the 10% chance is daunting, and could lead to a lot of regret, but I have always felt that the French player has to take a few low odds attacks in this game against a strong PAA player and the upside for this attack tells me that this is one of those times. If I’m successful (a DB2 or D Elim especially), I could easily see Ed finally give up the center hill as he’ll need to reposition units to deal with a critical breakthrough. If I get the A Elim result, I think that this will toughen Ed’s resolve to make me fight for the Quatre Bras area for multiple turns. I guess that makes this the definition of a critical attack!
Joe: In the West (Nivelles and the Braine le Comte Road): The French Left Wing, having captured Nivelles with negligible losses, attempts a low-odds "attack from the march" assault against T39, either to break the Anglo-Allied defense north of Nivelles or, falling that, to at least eliminate Picton with an Exchange. Unfortunately for the French player -- as will tend to happen when the odds are 60/40 against -- the attack misfires, in this case with an A Elim, and his attempt at a surprise "bold stroke" comes to naught. Speaking for myself, I usually don't care for this particular attack, either because the opportunity to make it will usually not occur this early in the game, and the Anglo-Allied Cavalry Reserve will have already come up to the front, or because there will often be enough Prussian combat power at W31 (and in the west) to launch a counter attack (with soak-off) from T38 and S39 against a lone 2-6. Moreover, even if both the 5-4 and the 2-6 advance, then the Anglo-Allies will usually be able to attack the 5-4 at 3-1 (surrounded) while the Prussians take care of the 2-6. In this specific instance, however, because of how early it is in the game, the Allied commander has literally no reserves available for such a counterattack, so this speculative gamble actually makes a lot of sense. That said, I really only have one "nit," and one major criticism regarding this turn's French move. In so far as the "nit" is concerned: it appears that the the IV Cav. Hrse. Arty is completely wasted at Z34. Regarding my single major criticism: I believe that, given the surplus of French combat units currently available on this front, the French player should have continued to maintain a mixed infantry/cavalry force of at least forty-two factors within range of V44, in order to tie down as many Anglo-Allied units as possible, just in case his low-odds attack should actually meet with success.
In the Center (the Quatre Bras Heights): With the strong possibility of a major fight coming in the Gap in the next turn or two, the French player -- wisely, I think -- concentrates virtually all of the units directly threatening the Heights (some thirty-seven combat factors) -- into switch positions (EE21, EE20, EE19 and FF20) from which this entire contingent can now "fork" both the Heights and the Gap.
In the West (the Quatre Bras Gap and the Tilly Corridor):
The Quatre Bras Gap: Still keeping to his strategy of methodical and careful advance in the Gap, the French player eliminates the Allied sacrifice at X24, but because of the very real possibility of a Prussian counterattack, opts to bolster his battle line in the Gap just in case Blucher finally decides to strike back. This response, in my view is an error: purely from a tactical standpoint, I believe that it would have been more effective -- in terms of offensive pressure -- if the French player had maintained his threat against AA25, by leaving the stack of fourteen factors at AA23 unmoved, and if he had also shifted the 6-4 stacked with the Imp. Gd. Foot Arty one hex to the southwest at Z23. With this deployment, French options in the center would have remained open, and none of the French units in this new line (except for the 2-6 on AA23) would have been any more vulnerable, than they are now, to attacks at odds greater than 4-1.
The Tilly Corridor: The French player's decision to gamble on a highly speculative 2-1 attack against a doubled Prussian 6-4 on this game turn -- although strongly implied by his already-demonstrated appetite for risk-taking on the Tilly front -- still took me completely by surprise! Granted, Division Stulpnagel -- with his back to the Gennape River -- cannot retreat, and his predicament does improve the positive outcome bias of this 2-1 attack from 20% to 40%; nonetheless, the unpleasant truth of all this for the French commander is that any combat result other than a DB2, D Elim, or AB2 would have been absolutely crippling to virtually any of his future offensive prospects in the Corridor. And yet, in spite of this risk, the French player still commits the bulk of his Tilly contingent to this highly dangerous attack, and comes away with a complete victory that not only destroys Stulpnagel at no cost, but that also completely disrupts the PAA commander's defensive plans for both the Tilly and the Quatre Bras fronts. And, although this is an attack, that -- because of the previous success of French operations in this sector -- I, personally, would almost never be tempted to make, I do have to acknowledge that -- at least in this case -- its outcome turned out, quite literally, to be a "game changer!"

Ed: Bert maintains a threat against the Samme River and advances in the open ground south of Nivelles. I was not expecting his 1-2 attack across the river against my 7-4. Fortunately, the dice gods favored me with an AE. I’m stretched thin on this front and have to make some tradeoffs. I prioritize the defense east of Nivelles leaving T41 undefended. Of course, the French can advance adjacent to T41, but I can attack any such units from doubled terrain.
I move a 7-4 to T37 and a blocker to V35 to hold as much territory as possible. The 7-4 is vulnerable to a low odds attack and I need a credible counterattack to dissuade Bert. Thus, Henkel moves to a position where he could join in with the two infantries west of Quatre Bras in a surround counterattack. This is the best I can come up with.
Bert’s surprise 2-1 attack across the Thiel River was successful, forcing me to withdraw units to defend against the new threat and yield the Quatre Bras sector. I deploy a blocker and 3-1 proof infantry to hold as much of Quatre Bras real estate as I can.
In the far east, I defend the eastern branch of the Genappe River with a single 2-6 which can be attacked at 3-1. I don’t expect Bert will reverse course now that he has breached the Thil River. I would not in his shoes as I think these French units are more valuable aiding the attack on Genappe. There is also the risk of an exchange if he attacks. But Bert has already surprised me, so we shall see.
Joe: In the West (Nivelles and the Braine le Comte Road): The PAA commander is treated to a scare this turn, as the French player launches a surprise low-odds (1-2) attack against Picton at T39; luckily for the Allies, the French gamble misfires, and the unlucky attackers (a 5-4 and 2-6) are both sent to "dead pile" by an A Elim result. Somewhat surprisingly, although this French gamble fails, it nonetheless appears to have "rattled" the PAA player a little, as his response seems both "too much" and "too little" at the same time. Too much, because a number of Allied units have just been moved (e.g., Alten, Brunswick, Chasse and Henkel, to be specific), but will very likely have to backtrack -- because of renewed French threats against the western Samme River-- on their very next turn. Too little because, if the PAA commander was truly concerned about another low-odds attack against T39, then he would have been better served to stack Picton and Perponcher together in T39, and to then cover the block at T37 with Brause. Finally, although this is a bit of a "nit," I personally think that the three local Anglo-Allied 2-4s should have been split up between T42, O39 and S38 (instead of S38 and S39) if, for no other reason than to disperse these soak-off/delay units across a wider arc of the Allied front.
In the Center (the Quatre Bras Heights): It is not often that a battle in a remote section of the map -- well-removed from the Allied center -- directly affects the strategic situation at Quatre Bras, but this seems to be one of those times. In point of fact, the French defeat of Stulpnagel, along with their accompanying breaking of the southern Thil River line deep in the Tilly Corridor, appears to have provoked something akin to a general panic among the PAA forces on both fronts. In the case of Quatre Bras, Marshal Blucher has ordered a general retreat off of the Heights and towards the western Genappe River, ostensibly in a move to intercept the French units presently astride or across the Thil should they attempt to move west. A sacrifice/delay unit has been has been left behind at Z25 to slow the pursuit of the French in the center. This Prussian response -- at least in my opinion -- seems to be a bit overdone. If I had been Blucher, I would have held onto the Heights with 6-4s at AA27 and AA25, and a 7-4 at Z25, with, of course, a 1-6 at Z27. Most of the remaining Prussian units would have been sent racing north, with those that were able to, moving to straddle the Genappe River so that they could shift to either bank, depending on the actions of French units on the Tilly front. Finally, my reason for holding on the Heights for another game turn is simple: If the French player decides he is keen to press his battlefield advantage with a couple of low-odds attacks, then it is my preference that he test his luck against doubled rather basic strength Prussian defenders.
In the East (the Quatre Bras Gap and the Tilly Corridor):
The Quatre Bras Gap: This sector has now, for all intents and purposes, merged with the Heights. A single 3-1 proof Prussian 6-4 defends at W26, but, assuming that he survives, he will be retreating north, next turn, once the French capture and consolidate their hold on the Heights. In the case of my alternative defense, the Gap is blocked by a single sacrificial 1-6 at X25.
The Tilly Corridor: The success of the surprise French attack against the Thil River defense line has completely upended the situation in the Tilly sector. This unexpected change in strategic direction strongly suggests that the French commander has decided to alter the focus of his campaign, and now intends to move his force across the Thil and to then establish a bridgehead across the western Genappe before Allied reinforcements can be moved to block him. Given this reasonable appraisal of the French Tilly commander's intentions, the Allied player scrambles to shift his units onto and across the Dyle, so that they can then move to support the Prussians from Quatre Bras in their efforts to prevent the Genappe River defense line from being broken on the morning of the 17th. A Prussian 2-6 is left behind at M22 to discourage a nuisance raid by the small band of French cavalry that are present on this front. The problem with this Allied assessment of French intentions is that, until the Tilly French actually commit to a western drive by actually crossing to the west bank of the Thil River, a resumption of their northern push towards Wavre cannot be completely ruled out. Certainly, the paucity of French cavalry in this sector would seem to make such a drive unlikely, but you never know. In fact, as a general rule, and having been "gobsmacked" more times than I can remember, over the years, I now always operate under the assumption that, if a player has surprised me once, then I assume that he will find a way to do so again. That said, my own Allied approach to the very real problem of determining French intentions on the Tilly front -- at least in this situation -- would be to initially send a couple of cavalry units west to support the Prussians marching east from Quatre Bras, but to otherwise hold my regular defensive positions behind the Dyle and eastern Genappe Rivers, at least until the French commander on the Tilly front has definitely committed to one offensive objective or the other.